Applies to: Mobile Payments SDK - iOS | Payments API | OAuth API
Learn how to build a secure in-person payment solution for iOS devices with the Mobile Payments SDK.
Applies to: Mobile Payments SDK - iOS | Payments API | OAuth API
Learn how to build a secure in-person payment solution for iOS devices with the Mobile Payments SDK.
The Mobile Payments SDK offers developers a secure way to integrate the Square checkout flow into their mobile applications, and accept in-person payments with a Square Reader or Square Stand.
There are four steps required to take your first payment using the Mobile Payments SDK:
For an example implementation, download the Mobile Payments SDK sample application, written in Swift using SwiftUI.
To build with the Mobile Payments SDK for iOS, the following must be true:
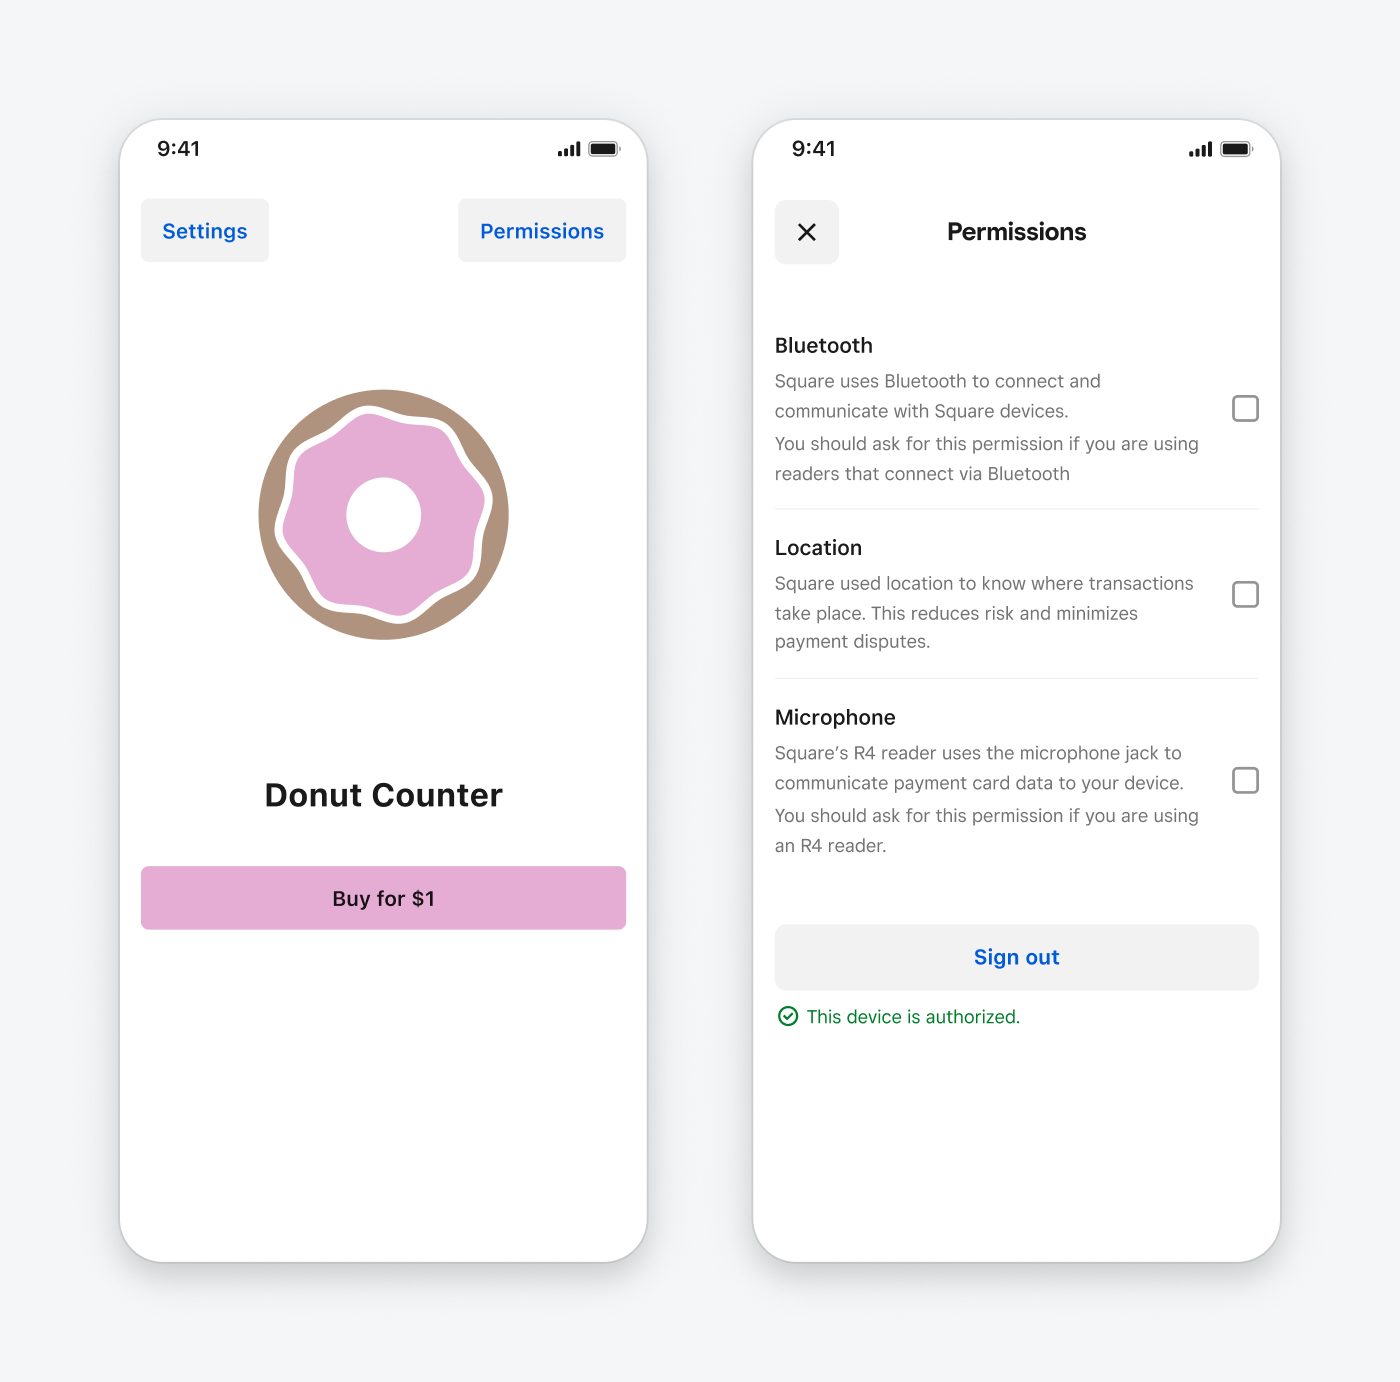
The Mobile Payments SDK requires that each user grant access to their device's current location while using your application. This ensures that payments are taken in a Square-supported country and that each payment is associated with a specific seller location. At this time, the Mobile Payments SDK can only be used to take production payments in the United States, Canada, the United Kingdom, or Australia. Bluetooth must be enabled to take payments with a contactless and chip reader and microphone access must be granted to take payments with a magstripe reader.
Include the following privacy key/value pairs in your application's Info.plist file:
| Key | Description |
|---|---|
| NSBluetoothAlwaysUsageDescription | Square uses Bluetooth to connect and communicate with Square readers and compatible accessories. |
| NSLocationWhenInUseUsageDescription | Square needs to know where transactions take place to reduce risk and minimize payment disputes. |
| NSMicrophoneUsageDescription | Some Square readers use the microphone to communicate payment card data to your device. |
Some additional settings are required to use the Mobile Payments SDK with Square Stand.
The Mobile Payments SDK isn't compatible with custom devices from OEMs that violate Square's security rules or on devices that grant root access to the mobile device operating system code and kernel. These devices cannot connect to a contactless and chip reader.
The following additional considerations apply when trying to run the SDK on custom devices:
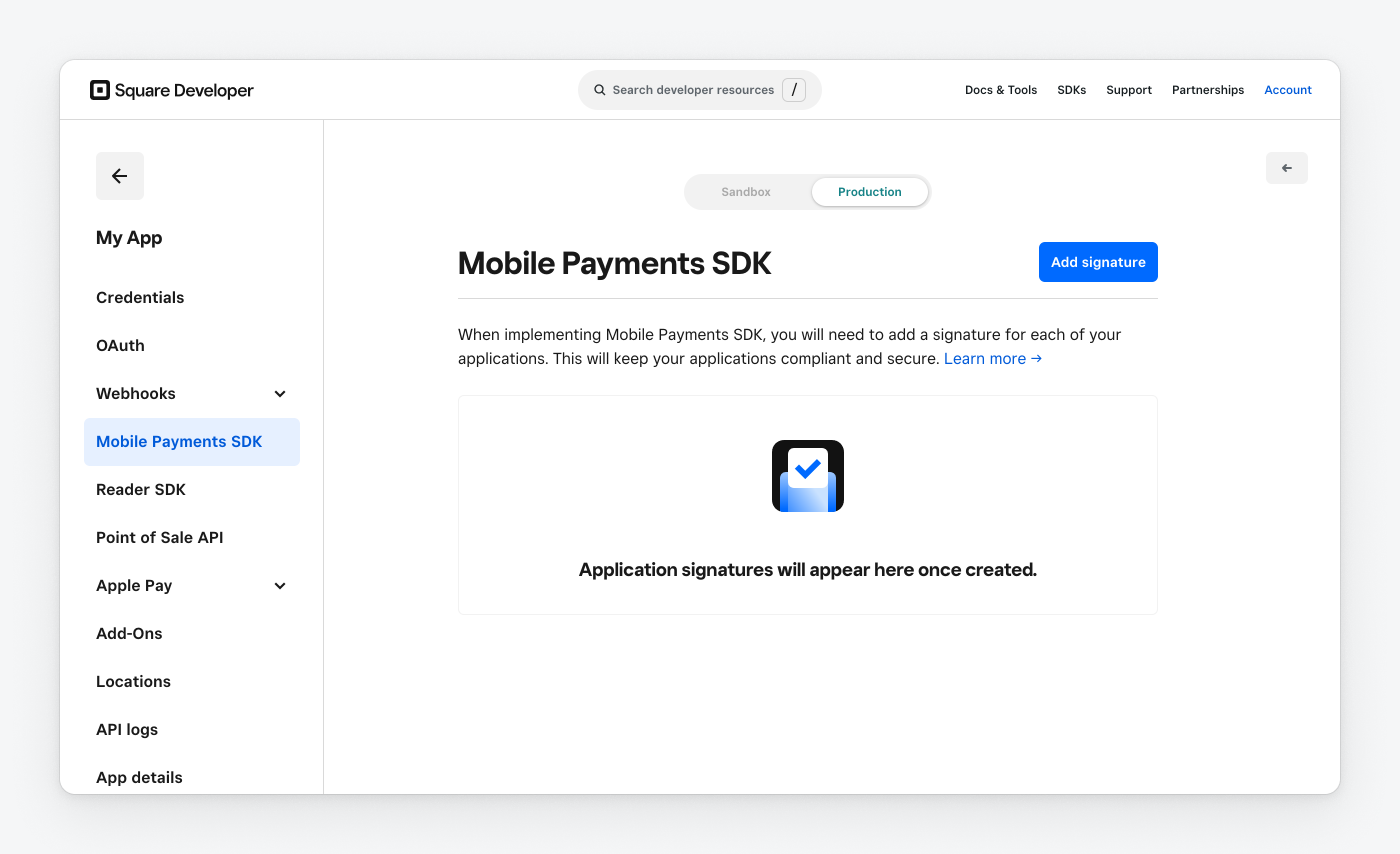
Developers using the Mobile Payments SDK version 2.1 or later are required to submit an application signature to Square prior to taking payments in production. This signature is an extra layer of security that ensures that your application hasn't been tampered with or otherwise modified by a user.
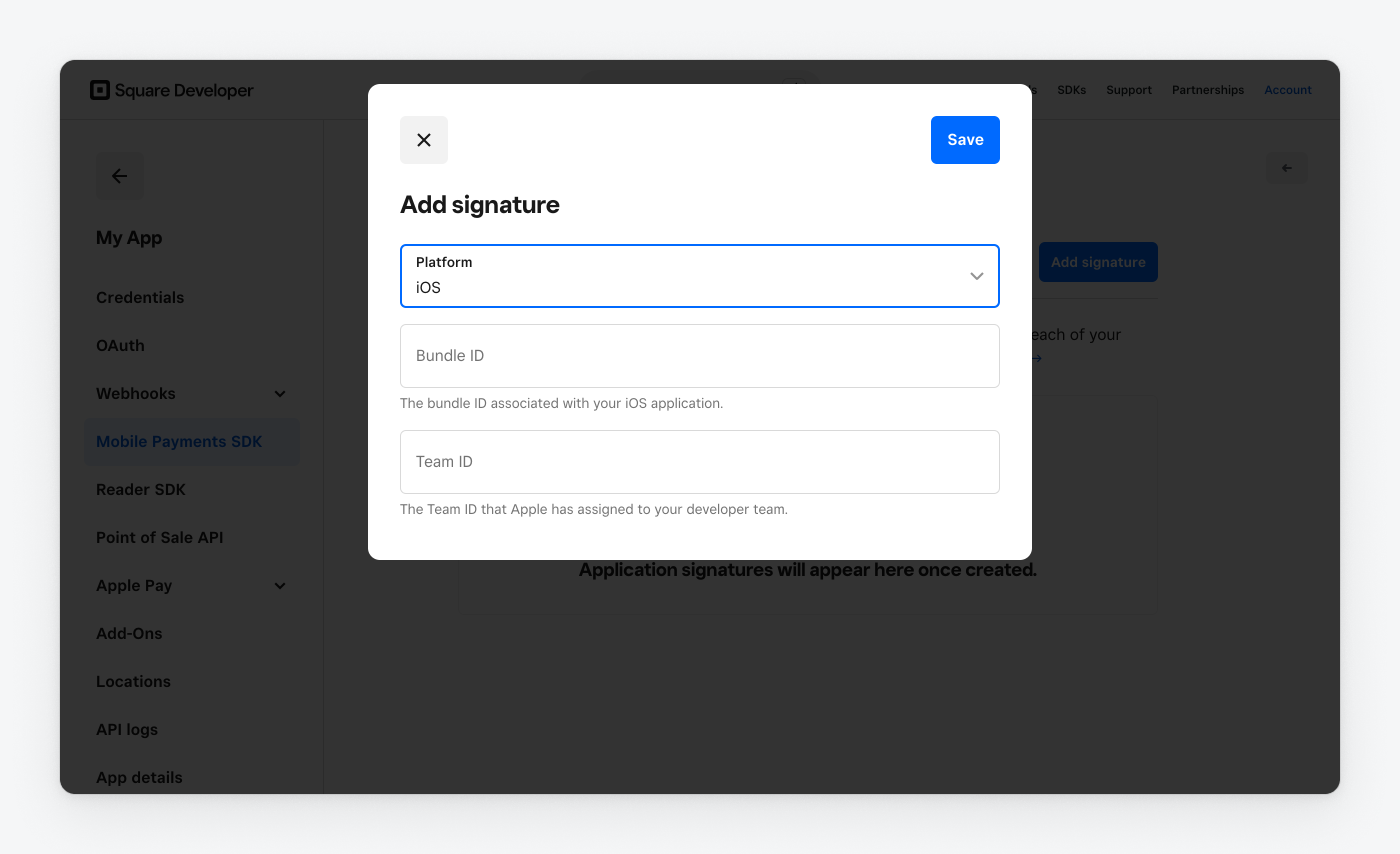
To submit an application signature, log in to the Developer Console and choose your application. In the left pane, choose Mobile Payments SDK, and then choose Add Signature.
You must provide your bundle ID and team ID to Square.
If you publish a single mobile application used by multiple Square sellers using the same Square application id, you only need to submit one signature per platform for that application. Any debug builds you create that take payments in production also require their own application signature.
The Mobile Payments SDK page in the Developer Console lists each signature that you've submitted. If an application signature is deleted, the application is no longer able to take payments, but you can submit a new signature for your application at any time.
If you're developing with the Mobile Payments SDK's Flutter or React Native plugins and publishing both an Android and iOS application, you must submit a signature for each application.
To comply with data privacy laws, the Mobile Payments SDK requires merchants in Canada, the United Kingdom, and the European Union to grant or deny consent for performance and analytics tracking. Your application must handle consent appropriately for merchants in these regions using the TrackingConsentManager protocol.
Before processing payments, check the current state of consent for the authorized merchant.
let consentState = trackingConsentManager.getTrackingConsentState()
The possible states are:
pending - Consent has not yet been providedgranted - Merchant has granted consent for trackingdenied - Merchant has denied consent for trackingnotRequired - Merchant is in a region where consent is not required for trackingWhen your application prompts merchants for consent, log their response using setTrackingConsentStateIsGranted(_ isGranted: Bool).
trackingConsentManager.setTrackingConsentStateIsGranted(true) // or false
If you don't implement consent handling via the API, the SDK automatically displays a consent dialog modal to users in regions where consent is required. This modal:
Listen for changes to trackingConsentState by conforming to the TrackingConsentStateObserver protocol.
If you use a custom UI for your payment prompt screen and have not provided your user's consent status with the API, the SDK returns an error from startPayment. You must handle consent before initiating any payment when using a custom payment UI.
Get started with the Mobile Payments SDK by configuring your iOS application and taking a test payment in the Square Sandbox.
Use the following steps to set up and test the Mobile Payments SDK in your own application. You can also download the Mobile SDK sample application (written in Swift) to see an example of initialization, authorization, requesting permissions, and taking payments in production or the Square Sandbox.
Install the Mobile Payments SDK with Swift Package Manager by following these steps in your Xcode project:
2.4.0.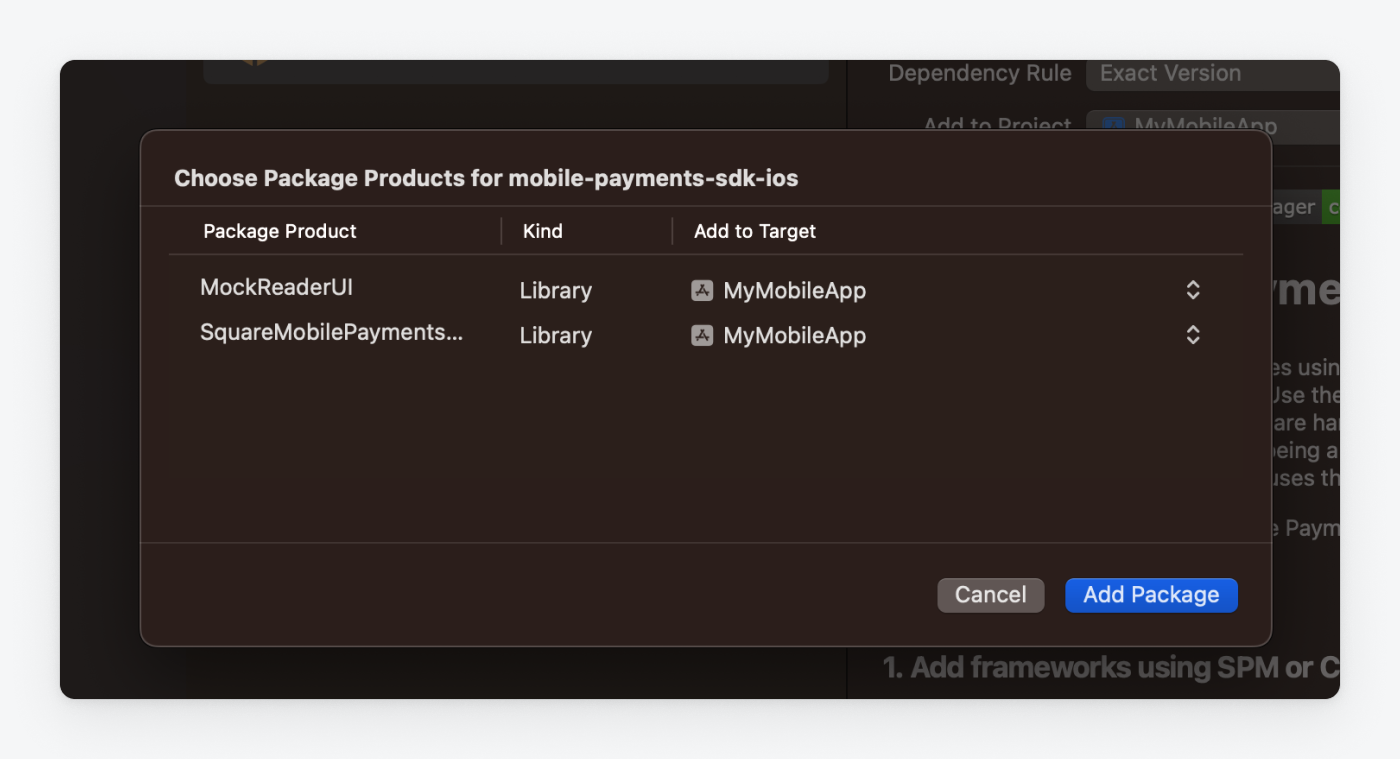
Install the Mobile Payments SDK with Cocoapods by adding the following to your Podfile:
use_frameworks!

pod "SquareMobilePaymentsSDK", "~> 2.4.0"

# To use a simulated reader device to take sandbox payments, add the optional MockReaderUI:
pod "MockReaderUI", "~> 2.4.0", configurations: ['Debug']
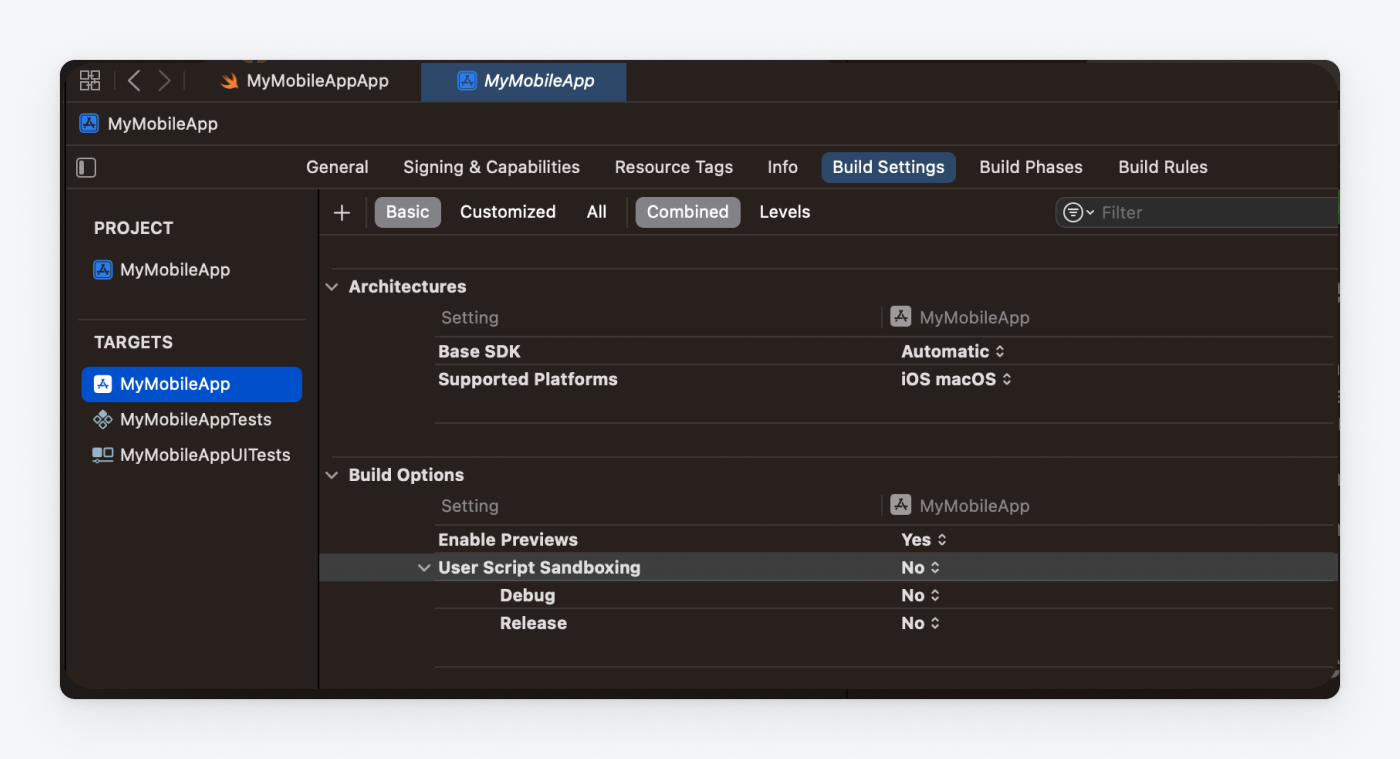
On the Build Phases tab for your application target, choose the + button (at the top left of the pane).
Choose New Run Script Phase. The new run script phase should be the last build phase.
Paste the following into the editor panel of the new run script:
FRAMEWORKS="${BUILT_PRODUCTS_DIR}/${FRAMEWORKS_FOLDER_PATH}"
"${FRAMEWORKS}/SquareMobilePaymentsSDK.framework/setup"
Ensure that the new run script phase is the last build phase. Otherwise, the build fails.
For the run script to execute correctly, your application must disable user script sandboxing.
Before taking a payment or attempting any other operation with the Mobile Payments SDK, you must initialize it using the initialize() method and your Square application ID in your AppDelegate's didFinishLaunchingWithOptions method.
To get your application ID, sign in to the Developer Console and choose your application. If you don't have an application yet, see Get Started for steps to create a Square application.
Your application opens to the Credentials page. This page contains the Square application ID used to initialize the Mobile Payments SDK.
To test the Mobile Payments SDK in the Square Sandbox with mock readers and mock payments, switch the toggle at the top of the Developer Console to Sandbox to show your Sandbox credentials and initialize the SDK with your Sandbox application ID. To start taking production payments, you must initialize the Mobile Payments SDK again with your production application ID.
import UIKit
import SquareMobilePaymentsSDK

@UIApplicationMain
class AppDelegate: UIResponder, UIApplicationDelegate {

    func application(_ application: UIApplication,
        didFinishLaunchingWithOptions launchOptions: [UIApplication.LaunchOptionsKey: Any]? = nil) -> Bool {

        MobilePaymentsSDK.initialize(
            applicationLaunchOptions: launchOptions,
            squareApplicationID: "<#your_square_application_id#>"
        )

        return true
    }
}
The AuthorizationManager handles authorization for the Mobile Payments SDK. Call the authorize() method with an OAuth access token and location ID. If you're testing your application in the Square Sandbox, you can use your personal access token and location ID from the Sandbox tab in the Developer Console.
Don't deploy an application into production that contains your personal access token. For a secure authorization implementation in production, you should implement OAuth instead of using a personal access token.
When authorization completes, the AuthorizeCompletionHandler provides the result of the authorization, including any errors.
import SquareMobilePaymentsSDK

class <#YourViewController#>: UIViewController {
    func authorizeMobilePaymentsSDK(accessToken: String, locationID: String) {
        guard MobilePaymentsSDK.shared.authorizationManager.state == .notAuthorized else {
            return
        }

        MobilePaymentsSDK.shared.authorizationManager.authorize(
           accessToken: accessToken,
            locationID: locationID) { error in
                if let authError = error {
                    // Handle auth error
                    print("error: \(authError.localizedDescription)")
                    return
                }

                print("Square Mobile Payments SDK successfully authorized.")
        }
    }
}
The Mobile Payments SDK requires the user to grant access to the device's current location while using your application. This permission is required for payment, so you should only start a payment if you've determined that location access has been granted.
import CoreLocation

class <#YourViewController#>: UIViewController {
    private lazy var locationManager = CLLocationManager()

    // Call this in your app's lifecycle
    func requestLocationPermission() {
        switch CLLocationManager.authorizationStatus() {
        case .notDetermined:
            locationManager.requestWhenInUseAuthorization()
        case .restricted, .denied:
            print("Show UI directing the user to the iOS Settings app")
        case .authorizedAlways, .authorizedWhenInUse:
            print("Location services have already been authorized.")
        @unknown default:
            fatalError()
        }
    }
}
To use contactless readers (Square Reader for contactless and chip or Square Stand) with the SDK, you must request Bluetooth permission from users of your application. Use a method similar to the following requestBluetoothPermissions() method:
import CoreBluetooth

final class <#YourViewController#>: ViewController {
    private var centralManager: CBCentralManager?

    // Call this in your app's lifecycle
    func requestBluetoothPermissions() {
        guard CBManager.authorization == .notDetermined else {
            return
        }

        centralManager = CBCentralManager(
            delegate: self,
            queue: .main,
            options: nil
        )
    }
}

extension <#YourViewController#>: CBCentralManagerDelegate {
    func centralManagerDidUpdateState(_ central: CBCentralManager) {
        // Check state and prompt for permission if necessary
    }
}
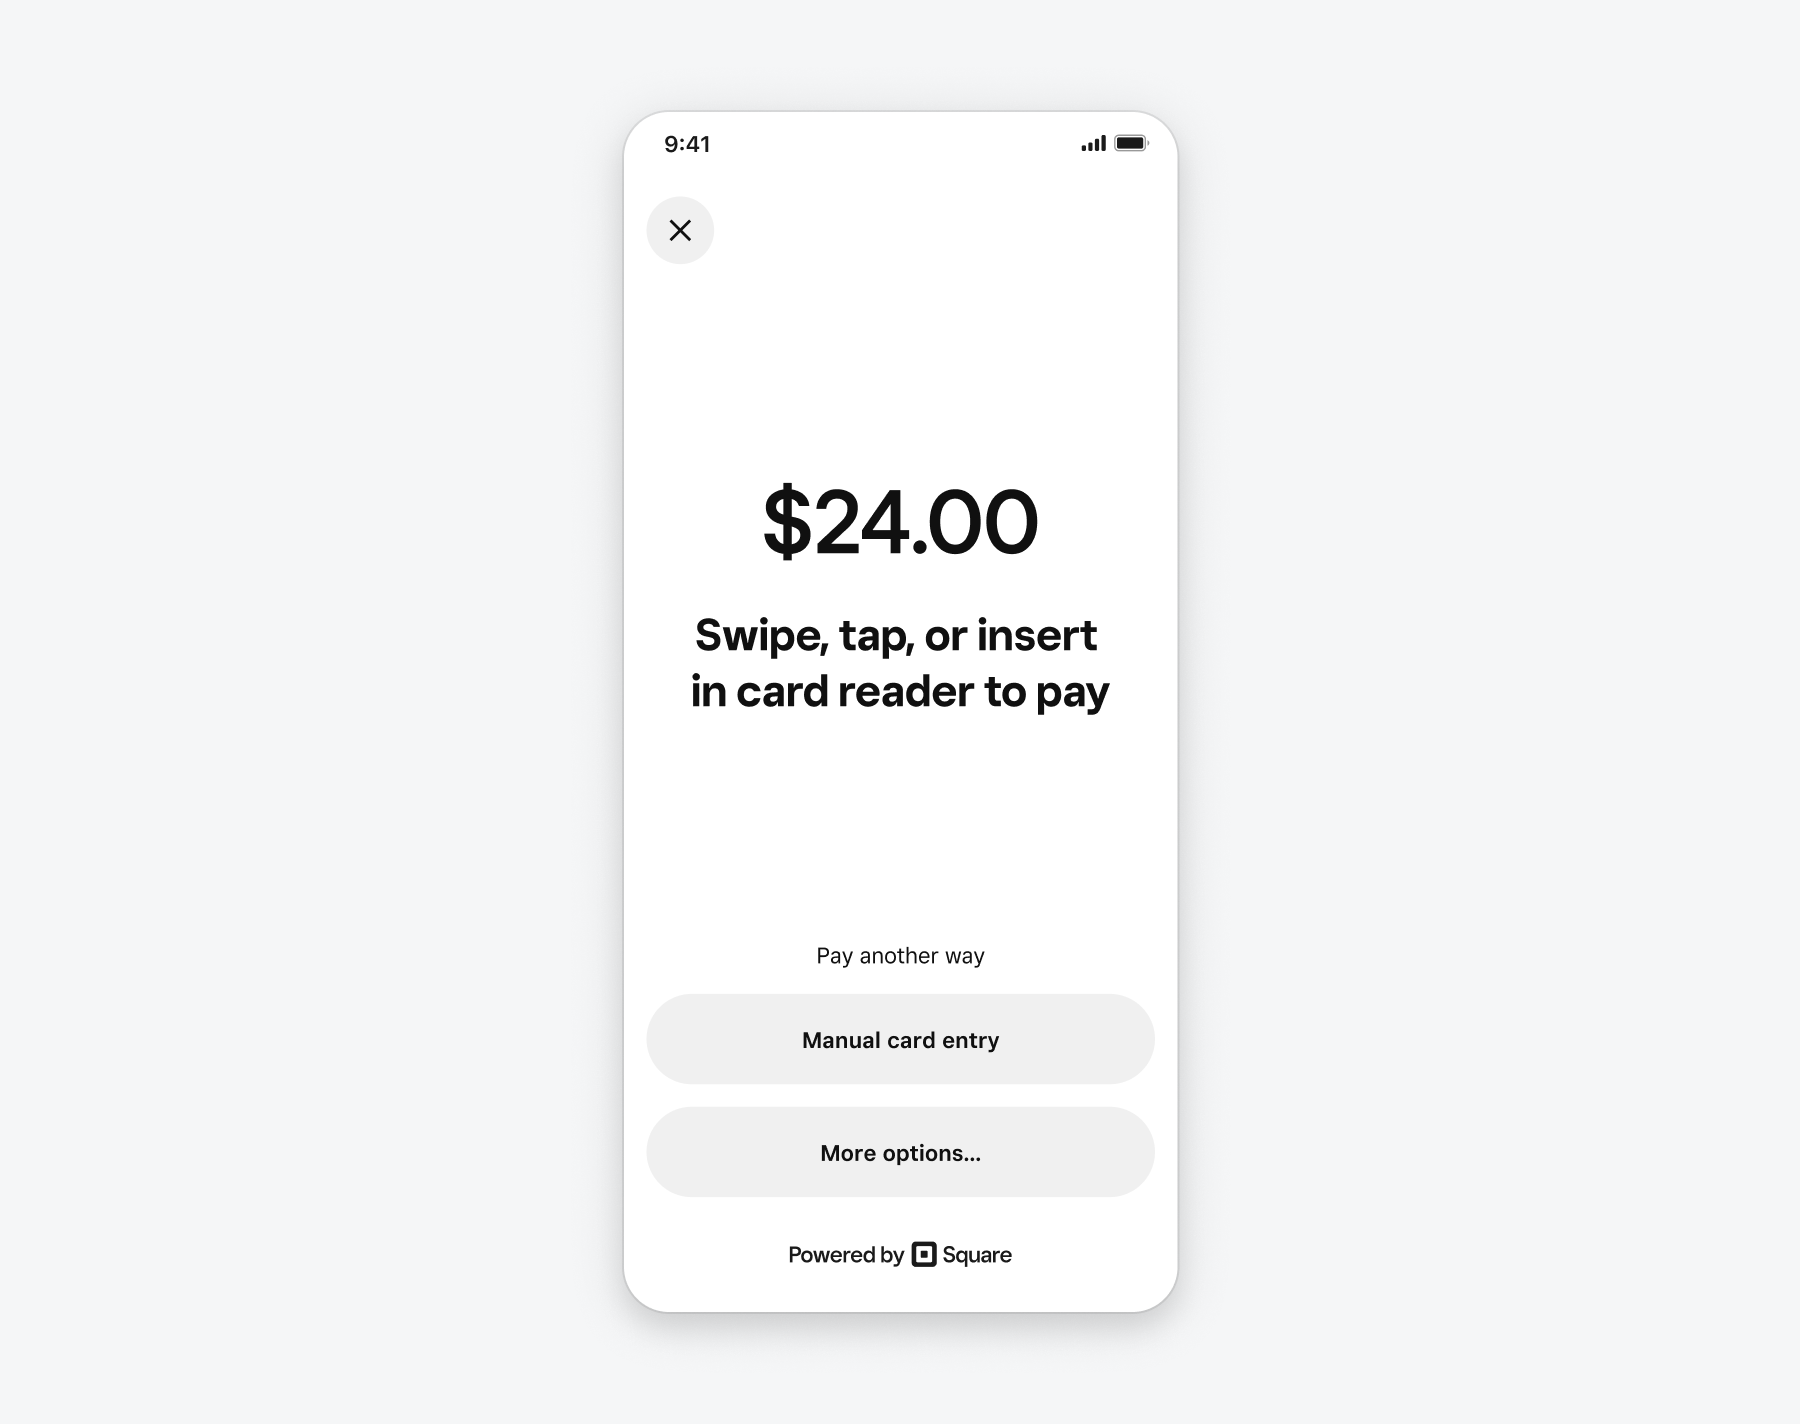
Physical card readers aren't supported in the Square Sandbox. To take test payments, you must simulate a virtual reader with the Mock Reader UI.
The Mock Reader UI consists of a floating button that can be dragged anywhere on the screen and persists as you navigate between screens in your application. Instantiate the Mock Reader UI and show the button with try? self.mockReaderUI?.present().
import MockReaderUI

private lazy var mockReaderUI: MockReaderUI? = {
  do {
    return try MockReaderUI(for: MobilePaymentsSDK.shared)
  } catch {
    assertionFailure("Could not instantiate a mock reader UI: \(error.localizedDescription)")
  }

  return nil
}()

try? mockReaderUI?.present()
Click the following button to simulate connecting a magstripe reader or a contactless and chip reader to your device.

When mock readers have been connected and you begin a payment, click the button again to test your application's payment flow and simulate a swiped, inserted, or tapped card with the mock reader. Choose Payment details to select different card brands and payment behaviors (approved or declined) for testing purposes. To hide the mock reader UI in your application, call self.mockReaderUI?.dismiss().
When testing card payment flows, any inserted cards must be removed through the mock reader UI before beginning a new payment.
To pair physical readers for production payments, see Pair and Manage Card Readers.
The PaymentManager handles payments in the Mobile Payments SDK. Prior to starting a payment, you create PaymentParameters to represent details of an individual payment and PromptParameters to indicate how the payment prompts are presented to the buyer.
When setting up a payment, you must conform to the PaymentManagerDelegate to handle results and errors from a payment. If the payment completes successfully, a Payment object is returned, which can be accessed on the Sandbox Square Dashboard or with the Payments API. If the payment fails, the response contains a PaymentError.
Before beginning a payment, create a PaymentParameters object. At a minimum, you must include the payment amount, a payment attempt ID, and the processing mode, which determines whether payments can be taken offline. For the complete list of payment parameter values and details, see iOS technical reference.
Each payment must also have PromptParameters configured, consisting of a mode and additionalMethods available to buyers.
Square provides a payment prompt screen that displays a UI to buyers prompting them to swipe, insert, or tap their card, depending on the payment options available. To use this screen for your quickstart application, set the PromptParameters.mode to default.
If you create your own custom payment prompt UI by passing custom in the PromptParameters.mode, use the availableCardInputMethodsObserver to update your UI if the available card entry methods change (for example, if a magstripe reader is inserted or removed from the mobile device).
When you're ready to begin a payment, call PaymentManager.startPayment() with the PaymentParameters and PromptParameters you created for this payment.
import SquareMobilePaymentsSDK

class <#YourViewController#>: UIViewController {

    private var paymentHandle: PaymentHandle?

    func startPayment() {
        paymentHandle = MobilePaymentsSDK.shared.paymentManager.startPayment(
            makePaymentParameters(),
            promptParameters: PromptParameters(
                mode: .default,
                additionalMethods: .all
            ),
            from: self,
            delegate: self
        )
    }

    func makePaymentParameters() -> PaymentParameters {
        PaymentParameters(
            paymentAttemptID: UUID().uuidString,
            amountMoney: Money(amount: 100, currency: .USD),
            processingMode: processingMode.onlineOnly
        )
    }
}

extension <#YourViewController#>: PaymentManagerDelegate {
    public func paymentManager(
        _ paymentManager: PaymentManager,
        didFinish payment: Payment
    ) {
        print("Payment Did Finish: \(payment)")
    }

    public func paymentManager(
        _ paymentManager: PaymentManager,
        didFail payment: Payment,
        withError error: Error
    ) {
        // Handle Payment Failed
        print("error: \(error.localizedDescription)")
    }

    public func paymentManager(
        _ paymentManager: PaymentManager,
        didCancel payment: Payment
    ) {
        // Handle Payment Canceled
    }
}
During each payment, Square takes control of the screen display to ensure that buyer information is handled securely and that the final confirmation of the payment is correctly shown to the buyer. While a payment is in progress, the UIViewController passed to startPayment must remain presented or pushed until your PaymentManagerDelegate receives a callback indicating the payment has completed, failed, or was canceled. After the payment starts, it cannot be canceled by the developer.
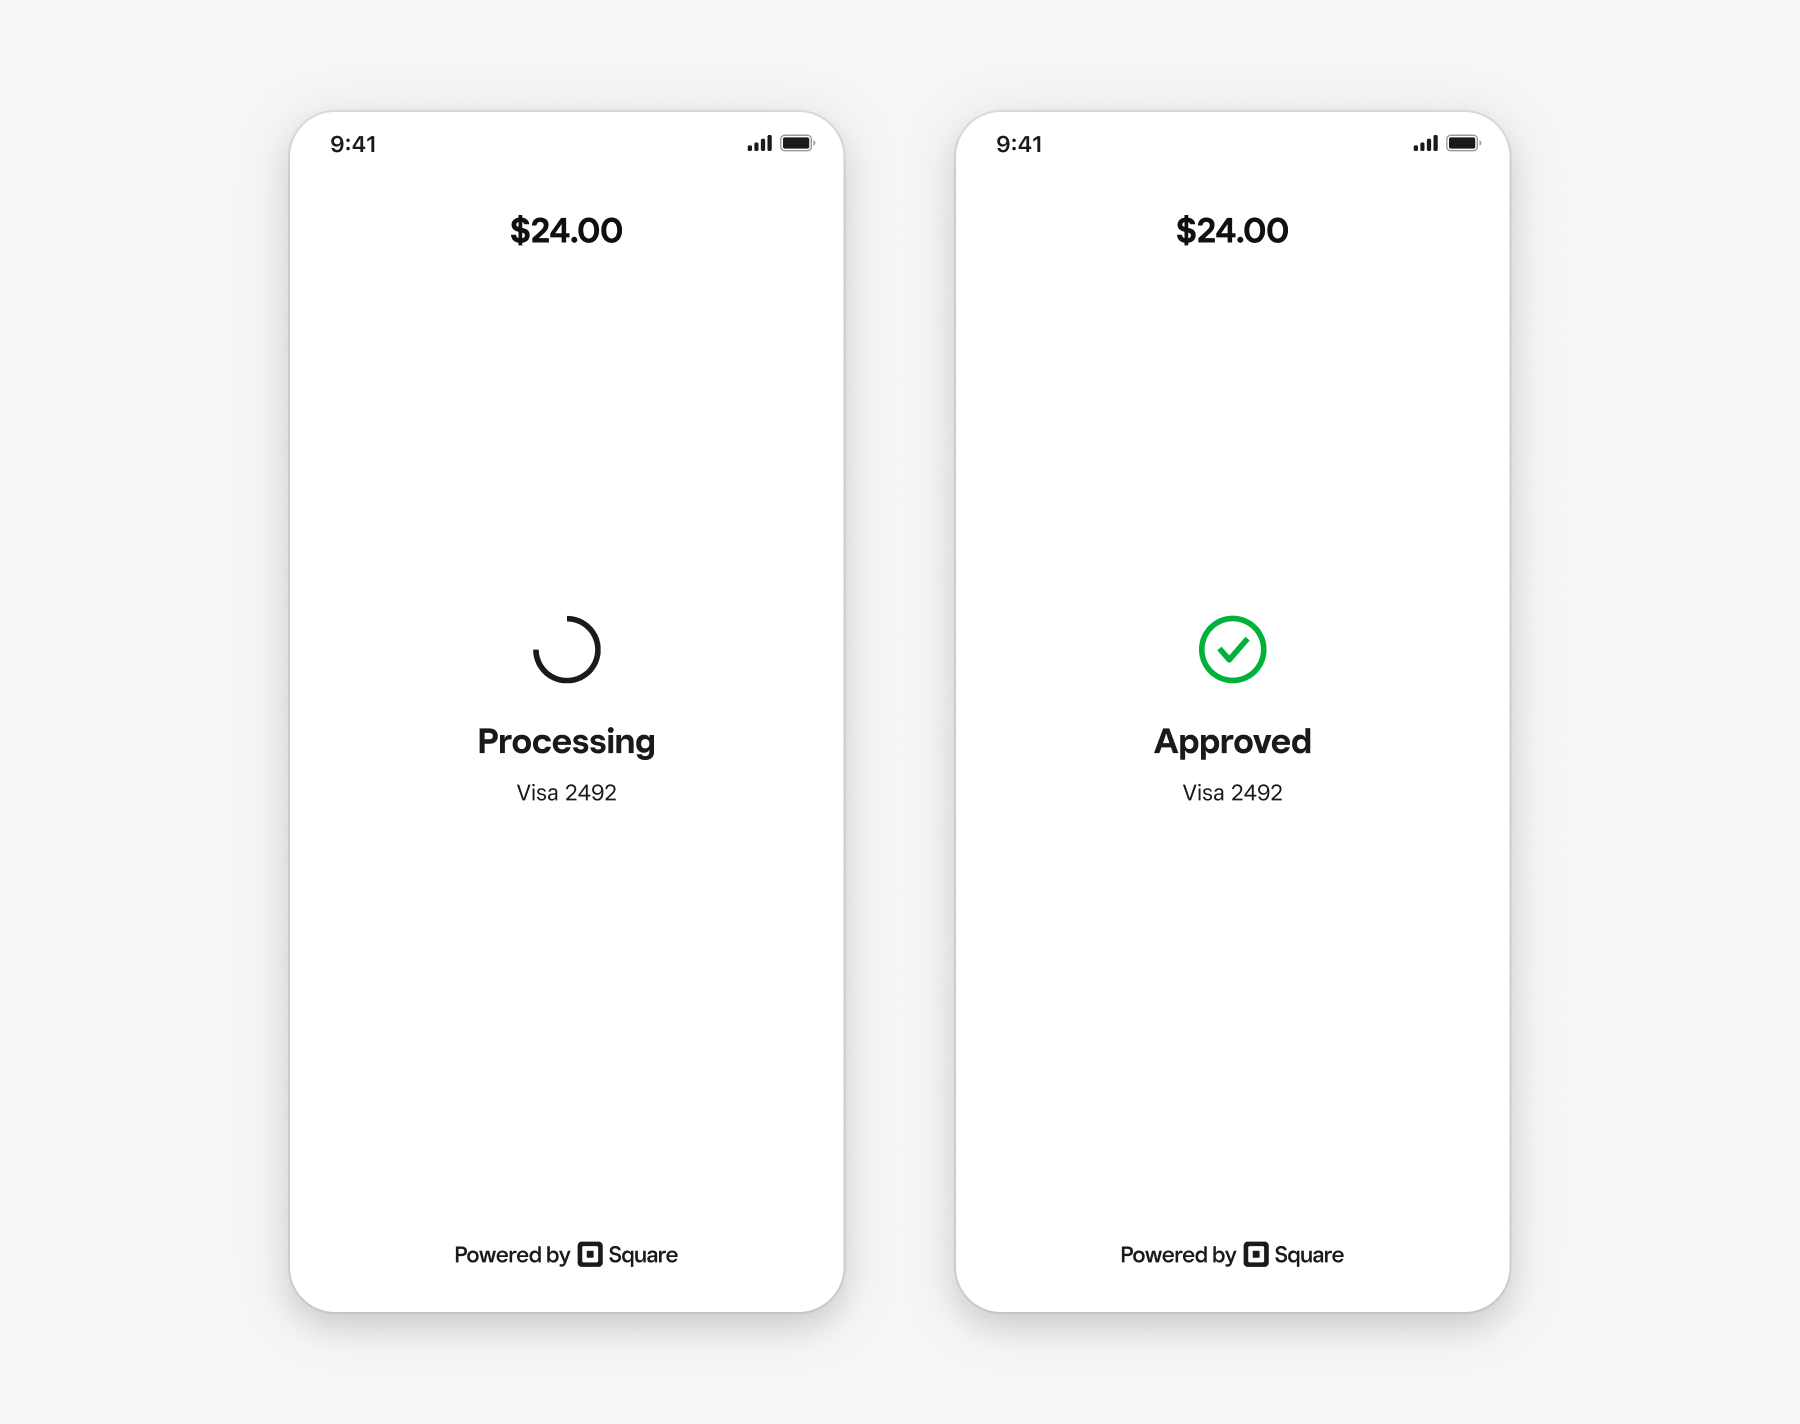
If the payment completes successfully, a Payment object is returned to your payment callback. This payment can be accessed on the Square Dashboard or with the Payments API. If the payment fails, the response contains an error.
After installing the Mobile Payments SDK and testing your application with test payments in the Square Sandbox, learn more about configuring your application to take production payments: