Applies to: Web Payments SDK | Payments API
Learn how to initialize the Web Payments SDK with the web client and a Square application to accept a card payment, generate a payment token with buyer verification, and send the resulting payment token to the server for payment verification.
At the highest level, to add the Web Payments SDK to the web client, you need to:
- Get your application credentials, set up your localhost development environment, and initialize the SDK.
- Collect buyer input.
- Tokenize the buyer input in a call to
card.tokenize(). - Pass the token for future use in a server-side call to the CreatePayment endpoint.
The following code demonstrates the basic order of operations:
// Customer input, hard-coded for example only
const verificationDetails = {
  amount: '1.00',
  billingContact: {
    givenName: 'John',
    familyName: 'Doe',
    email: '[email protected]',
    phone: '3214563987',
    addressLines: ['123 Main Street', 'Apartment 1'],
    city: 'London',
    state: 'LND',
    countryCode: 'GB',
  },
  currencyCode: 'GBP',
  intent: 'CHARGE',
  customerInitiated: true,
  sellerKeyedIn: false,
};

// Tokenize the input
const token = await card.tokenize(verificationDetails);

// Pass the token to create a Payment
const payment = CreatePayment(token);
The following sections explain these steps in more detail and include sample code that you can add to the quickstart repository to test a concept.
The quickstart application is configured to send requests to the Square Sandbox instead of your production Square account. To find your Sandbox credentials:
- Open the Developer Console and choose the plus symbol under Applications to create a new application.
- Open the application, and then choose Credentials in the left pane.
- At the top of the page, set the Developer Console mode to Sandbox to get to the Sandbox Application ID and Sandbox Access Token values.
- In the left pane, choose Locations to find the Sandbox Location ID.
- Paste all of these Sandbox credentials (Application ID, Location ID, and Sandbox Access Token) into a temporary text file.
Important
Your Sandbox credentials are secure secrets. Don't share these values with anyone or upload them to the cloud.
You must use your seller's location ID and access token when deploying to production. Your testing credentials will not work for processing real payments.
To properly configure your production environment:
Replace your test access token with your seller's production token.
- Obtain this token through the OAuth flow by calling the ObtainToken endpoint.
Replace your test location ID with your seller's actual location ID.
- After obtaining the production token, retrieve a list of the seller's locations to get the seller's valid location IDs.
- Select the appropriate location ID for this deployment.
❌ Common Issue: Application payments often fail in production because developers forget to replace their test location ID with the seller's actual location ID.
If payments are being rejected in production, verify that you're using the correct seller credentials, especially the location ID.
The quickstart server code calls the CreatePayment endpoint and needs to be updated to use your Sandbox access token.
In the project root folder, create a copy of the
.env.examplefile and name it.env.sandbox.The dotenv library is used to manage secrets that shouldn't be made public. The
.env.sandboxfile should never be committed.In .env.sandbox, define
SQUARE_ACCESS_TOKENwith your Sandbox access token from the Developer Console.SQUARE_ACCESS_TOKEN={SANDBOX_ACCESS_TOKEN}Restart your server for the Sandbox test environment (
npm run dev) to use this new value.
Replace the contents of the
<body>inpublic/index.htmlwith the following HTML elements:<form id="payment-form"> <div id="card-container"></div> <button id="card-button" type="button">Pay $1.00</button> </form> <div id="payment-status-container"></div>This HTML adds an element (
div id="card-container") that the Web Payments SDK attaches the card element to and adds a button that starts the tokenization process.Did you know?
The SDK also enables the Apple Pay, Google Pay, ACH (bank transfer), Square gift card, and Cash App Pay payment methods.
The quickstart code already includes the following <script> tag to initialize the SDK. Add this tag to your own application if you're working outside the quickstart.
<script
    type="text/javascript"
    src="https://sandbox.web.squarecdn.com/v1/square.js"
></script>
Add an empty
<script>tag to the<head>of index.html.<script> </script>Add the following global constants inside the
<script>tag, substituting the IDs from the Developer Console for the placeholder ({YOUR_SANDBOX_APPLICATION_ID}and{YOUR_SANDBOX_LOCATION_ID}) values:const appId = '{YOUR_SANDBOX_APPLICATION_ID}'; const locationId = '{YOUR_SANDBOX_LOCATION_ID}';Add the following code inside the
<script>tag, beneath your credentials:async function initializeCard(payments) { const card = await payments.card(); await card.attach('#card-container'); return card; } document.addEventListener('DOMContentLoaded', async function () { if (!window.Square) { throw new Error('Square.js failed to load properly'); } let payments; try { payments = window.Square.payments(appId, locationId); } catch { const statusContainer = document.getElementById( 'payment-status-container', ); statusContainer.className = 'missing-credentials'; statusContainer.style.visibility = 'visible'; return; } let card; try { card = await initializeCard(payments); } catch (e) { console.error('Initializing Card failed', e); return; } });
The code does the following:
- Defines a helper
initializeCardfunction. - In the event listener, initializes the Square payments object by calling Square.payments(appId, locationId).
- In the event listener, calls the
initializeCardhelper. - The
initializeCardhelper calls the Payments.card()method to initialize theCardand calls the Card.attach()method to attach the payment method to the DOM.
Test the application
Navigate to
http://localhost:3000/in your browser.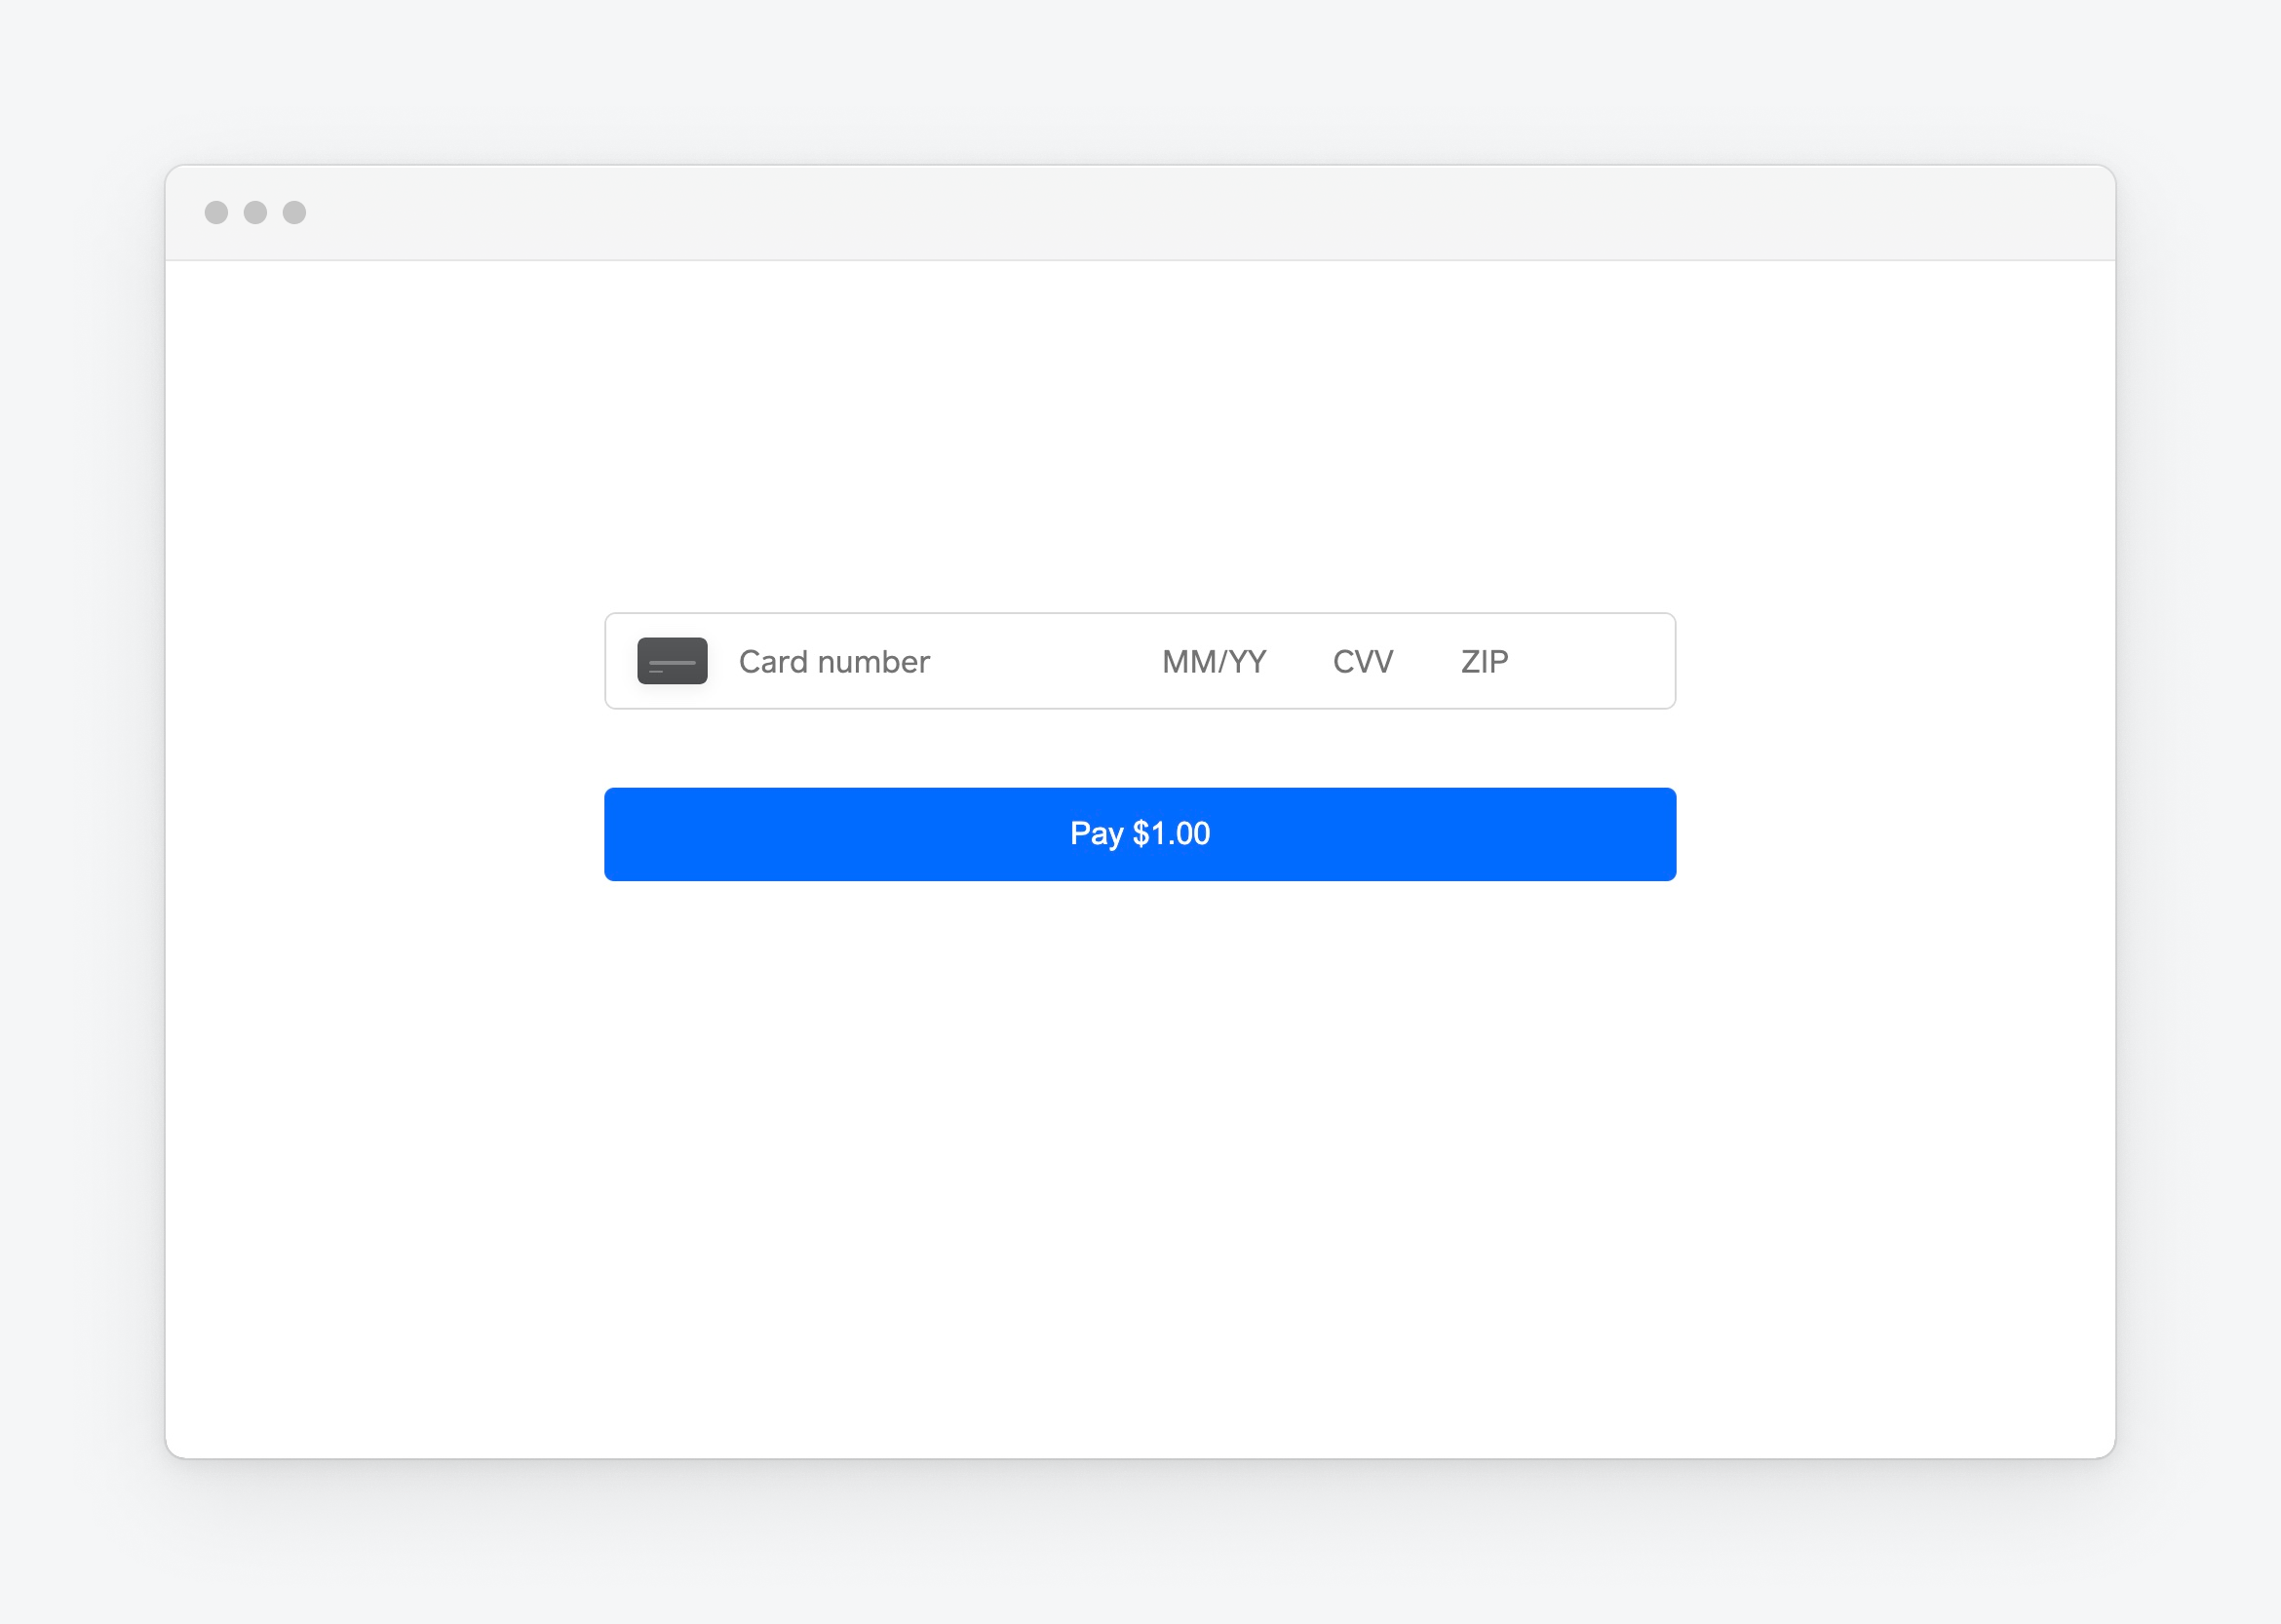
Success
You should see the payment card input rendered on your page.
Collect input from the customer to pass to Card.tokenize(). You need to pass the following properties in a
verificationDetailsobject:amount- The amount of the card payment to be charged.billingContact- The buyer's contact information for billing.intent- The transactional intent of the payment.sellerKeyedIn- Indicates that the seller keyed in payment details on behalf of the customer. This is used to flag a payment as Mail Order / Telephone Order (MOTO).customerInitiated- Indicates whether the customer initiated the payment.currencyCode- The three-letter ISO 4217 currency code.
Important
Provide as much buyer information as possible for
billingContactso that you get more accurate decline rate performance from 3DS authentication.To follow along and continue adding code in the quickstart repository, declare a
verificationDetailsobject as a constant after theappIdandlocationId.const verificationDetails = { amount: '1.00', billingContact: { givenName: 'John', familyName: 'Doe', email: '[email protected]', phone: '3214563987', addressLines: ['123 Main Street', 'Apartment 1'], city: 'Oakland', state: 'CA', countryCode: 'US', }, currencyCode: 'USD', intent: 'CHARGE', customerInitiated: true, sellerKeyedIn: false, };Warning
Don't hardcode any buyer information in production. These example instructions are for testing only.
Declare a
tokenobject to handle the result of thecard.tokenize(verificationDetails)function call. Include theawaitparameter.const tokenResult = await card.tokenize(verificationDetails);To add the code to the quickstart, wrap the call to
card.tokenize(verificationDetails)in a helper function as shown in the following example. Add the helper to the<script>tag.async function tokenize(card) { const tokenResult = await card.tokenize(verificationDetails); if (tokenResult.status === 'OK') { return tokenResult.token; } else { let errorMessage = `Tokenization failed-status: ${tokenResult.status}`; if (tokenResult.errors) { errorMessage += ` and errors: ${JSON.stringify( tokenResult.errors )}`; } throw new Error(errorMessage); } }
Define the
CreatePaymenthelper function.The
CreatePaymenthelper function passes the token and the seller's location ID to the server to make the CreatePayment call.Warning
The location ID must match in these places:
- Your Web Payments SDK initialization
- Your backend payment processing request
This example demonstrates the correct approach by passing the same
locationIdfrom the client to the server endpoint.The following is an example
CreatePaymenthelper function. Add it to the quickstart in the<script>underinitializeCard.async function CreatePayment(token) { const body = JSON.stringify({ locationId, sourceId: token, idempotencyKey: window.crypto.randomUUID(), }); const paymentResponse = await fetch('/payment', { method: 'POST', headers: { 'Content-Type': 'application/json', }, body, }); if (paymentResponse.ok) { return paymentResponse.json(); } const errorBody = await paymentResponse.text(); throw new Error(errorBody); }Declare a
Paymentobject to store the result of the call toCreatePayment.const paymentResults = await CreatePayment(token);Define the
Paymentwithin ahandlePaymentMethodSubmissionhelper function. When thecardButtonelement is clicked,handlePaymentMethodSubmissioncalls the tokenize card and creates payment methods sequentially.To keep working in the quickstart, nest
handlePaymentMethodSubmissionwithin theDomContentLoadedevent listener that you added in step 4.document.addEventListener('DOMContentLoaded', async function() { // ... // ...Previous Payments and Card initialization code... // ... async function handlePaymentMethodSubmission(event, card) { event.preventDefault(); try { cardButton.disabled = true; const token = await tokenize(card); const paymentResults = await CreatePayment(token); displayPaymentResults('SUCCESS'); console.debug('Payment Success', paymentResults); } catch (e) { cardButton.disabled = false; displayPaymentResults('FAILURE'); console.error(e.message); } } const cardButton = document.getElementById( 'card-button' ); cardButton.addEventListener('click', async function(event) { await handlePaymentMethodSubmission(event, card); }); })handlePaymentMethodSubmissionalso calls a helperdisplayPaymentResultsfunction that displays whether the transaction was a success. AdddisplayPaymentResultsto the<script>tag under thetokenizefunction definition.function displayPaymentResults(status) { const statusContainer = document.getElementById( 'payment-status-container' ); if (status === 'SUCCESS') { statusContainer.classList.remove('is-failure'); statusContainer.classList.add('is-success'); } else { statusContainer.classList.remove('is-success'); statusContainer.classList.add('is-failure'); } statusContainer.style.visibility = 'visible'; }
Navigate to
http://localhost:3000/in your browser.Complete the card payment form and submit a test payment with a card-not-present test credit card from Sandbox Payments.
Use an SCA test card with a challenge type of "Modal with Verification Code".
The following modal launches:
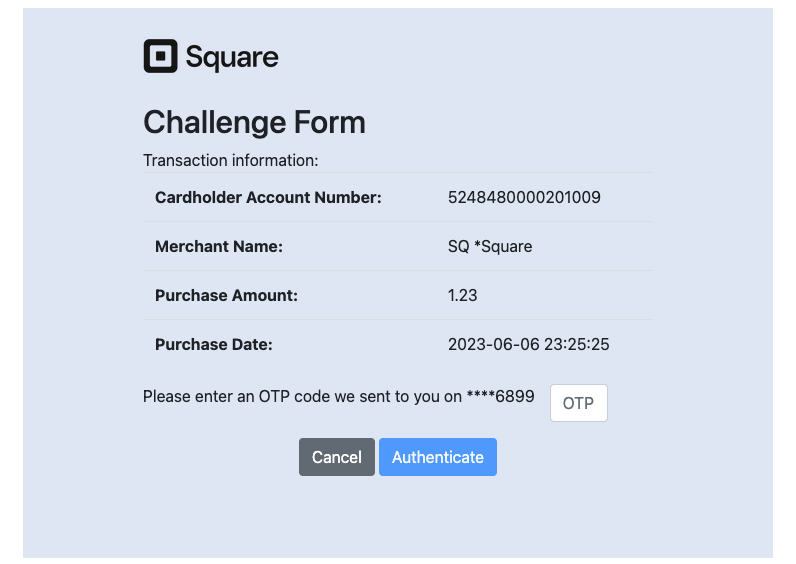
Enter the verification code in the pop-up window and choose Authenticate. After authentication, the application sends the payment request to complete the card payment.
Add a
console.log()to check the token in your browser or check your terminal for the returned TokenResult object to confirm that the payment token is generated.Refresh your browser and use a test card from the Card-not-present success state values table or an SCA test card with no challenge.
Check the console log again in your browser or the returned TokenResult object to confirm that the payment token is generated.
If you have any issues with testing, copy and paste the following into the quickstart index.html:
<!doctype html>
<html lange="en">
  <head>
    <meta charset="utf-8" />
    <title>Square Web Payments Quickstart</title>
    <link href="app.css" rel="stylesheet" />
  <script
      type="text/javascript"
      src="https://sandbox.web.squarecdn.com/v1/square.js"
    ></script>
    <script>
      const appId = '{APP_ID}';
      const locationId = '{LOCATION_ID}';

      const verificationDetails = {
        amount: '1.00',
        billingContact: {
          givenName: 'John',
          familyName: 'Doe',
          email: '[email protected]',
          phone: '3214563987',
          addressLines: ['123 Main Street', 'Apartment 1'],
          city: 'Oakland',
          state: 'CA',
          countryCode: 'US',
        },
        currencyCode: 'USD',
        intent: 'CHARGE',
        customerInitiated: true,
        sellerKeyedIn: false,
      };

      async function initializeCard(payments) {
        const card = await payments.card();
        await card.attach('#card-container');

        return card;
      }

      async function CreatePayment(token) {
        const body = JSON.stringify({
          locationId,
          sourceId: token,
          idempotencyKey: window.crypto.randomUUID(),
        });

        const paymentResponse = await fetch('/payment', {
          method: 'POST',
          headers: {
            'Content-Type': 'application/json',
          },
        body,
        });

        if (paymentResponse.ok) {
          return paymentResponse.json();
        }

        const errorBody = await paymentResponse.text();
        throw new Error(errorBody);
      }

      async function tokenize(card) {
        const tokenResult = await card.tokenize(verificationDetails);
        if (tokenResult.status === 'OK') {
          return tokenResult.token;
        } else {
          let errorMessage = `Tokenization failed-status: ${tokenResult.status}`;
          if (tokenResult.errors) {
            errorMessage += ` and errors: ${JSON.stringify(
              tokenResult.errors
            )}`;
          }
          throw new Error(errorMessage);
        }
      }

       // status is either SUCCESS or FAILURE;
      function displayPaymentResults(status) {
        const statusContainer = document.getElementById(
          'payment-status-container'
        );
        if (status === 'SUCCESS') {
          statusContainer.classList.remove('is-failure');
          statusContainer.classList.add('is-success');
        } else {
          statusContainer.classList.remove('is-success');
          statusContainer.classList.add('is-failure');
        }

        statusContainer.style.visibility = 'visible';
      }

      document.addEventListener('DOMContentLoaded', async function () {
        if (!window.Square) {
          throw new Error('Square.js failed to load properly');
        }

        let payments;
        try {
          payments = window.Square.payments(appId, locationId);
        } catch {
          const statusContainer = document.getElementById(
            'payment-status-container',
          );
          statusContainer.className = 'missing-credentials';
          statusContainer.style.visibility = 'visible';
          return;
        }

        let card;
        try {
          card = await initializeCard(payments);
        } catch (e) {
          console.error('Initializing Card failed', e);
          return;
        }

        async function handlePaymentMethodSubmission(event, card) {
          event.preventDefault();

          try {
            // disable the submit button as we await tokenization
            cardButton.disabled = true;
            const token = await tokenize(card);
            const paymentResults = await CreatePayment(token);
            displayPaymentResults('SUCCESS');

            console.debug('Payment Success', paymentResults);
          } catch (e) {
            cardButton.disabled = false;
            displayPaymentResults('FAILURE');
            console.error(e.message);
          }
        }

        const cardButton = document.getElementById('card-button');
        cardButton.addEventListener('click', async function (event) {
          await handlePaymentMethodSubmission(event, card);
        });
      });
    </script>
  </head>

  <body>
    <form id="payment-form">
      <div id="card-container"></div>
      <button id="card-button" type="button">Pay $1.00</button>
    </form>
    <div id="payment-status-container"></div>
  </body>
</html>
The payment is credited to the Sandbox test account whose access token is used in the application that you just built. To see the payment in the Sandbox Square Dashboard, go to the Developer Console.
- In the left pane, choose Sandbox test accounts.
- Choose Default Test Account.
- Choose Open in Square Dashboard.
- In the left pane, choose Transactions.