Applies to: Reader SDK - iOS | Mobile Authorization API
Learn how to build a secure in-person payment solution for iOS devices.
Requirements and limitations
- You have a Square account enabled for payment processing. If you haven't enabled payment processing on your account (or you're not sure), visit squareup.com/activation.
- You're using Xcode 15.
- You've set your Xcode iOS deployment minimum target to iOS 15.
- Your version of the Reader SDK adheres to the Square update policy. To limit risk to developers and their users, Square enforces an update policy for the Reader SDK requiring that developers keep their version of the Reader SDK current.
- You're generally familiar with developing applications on iOS. If you're new to iOS development, you should visit the Apple Training Center before continuing.
To complete the following steps, you need:
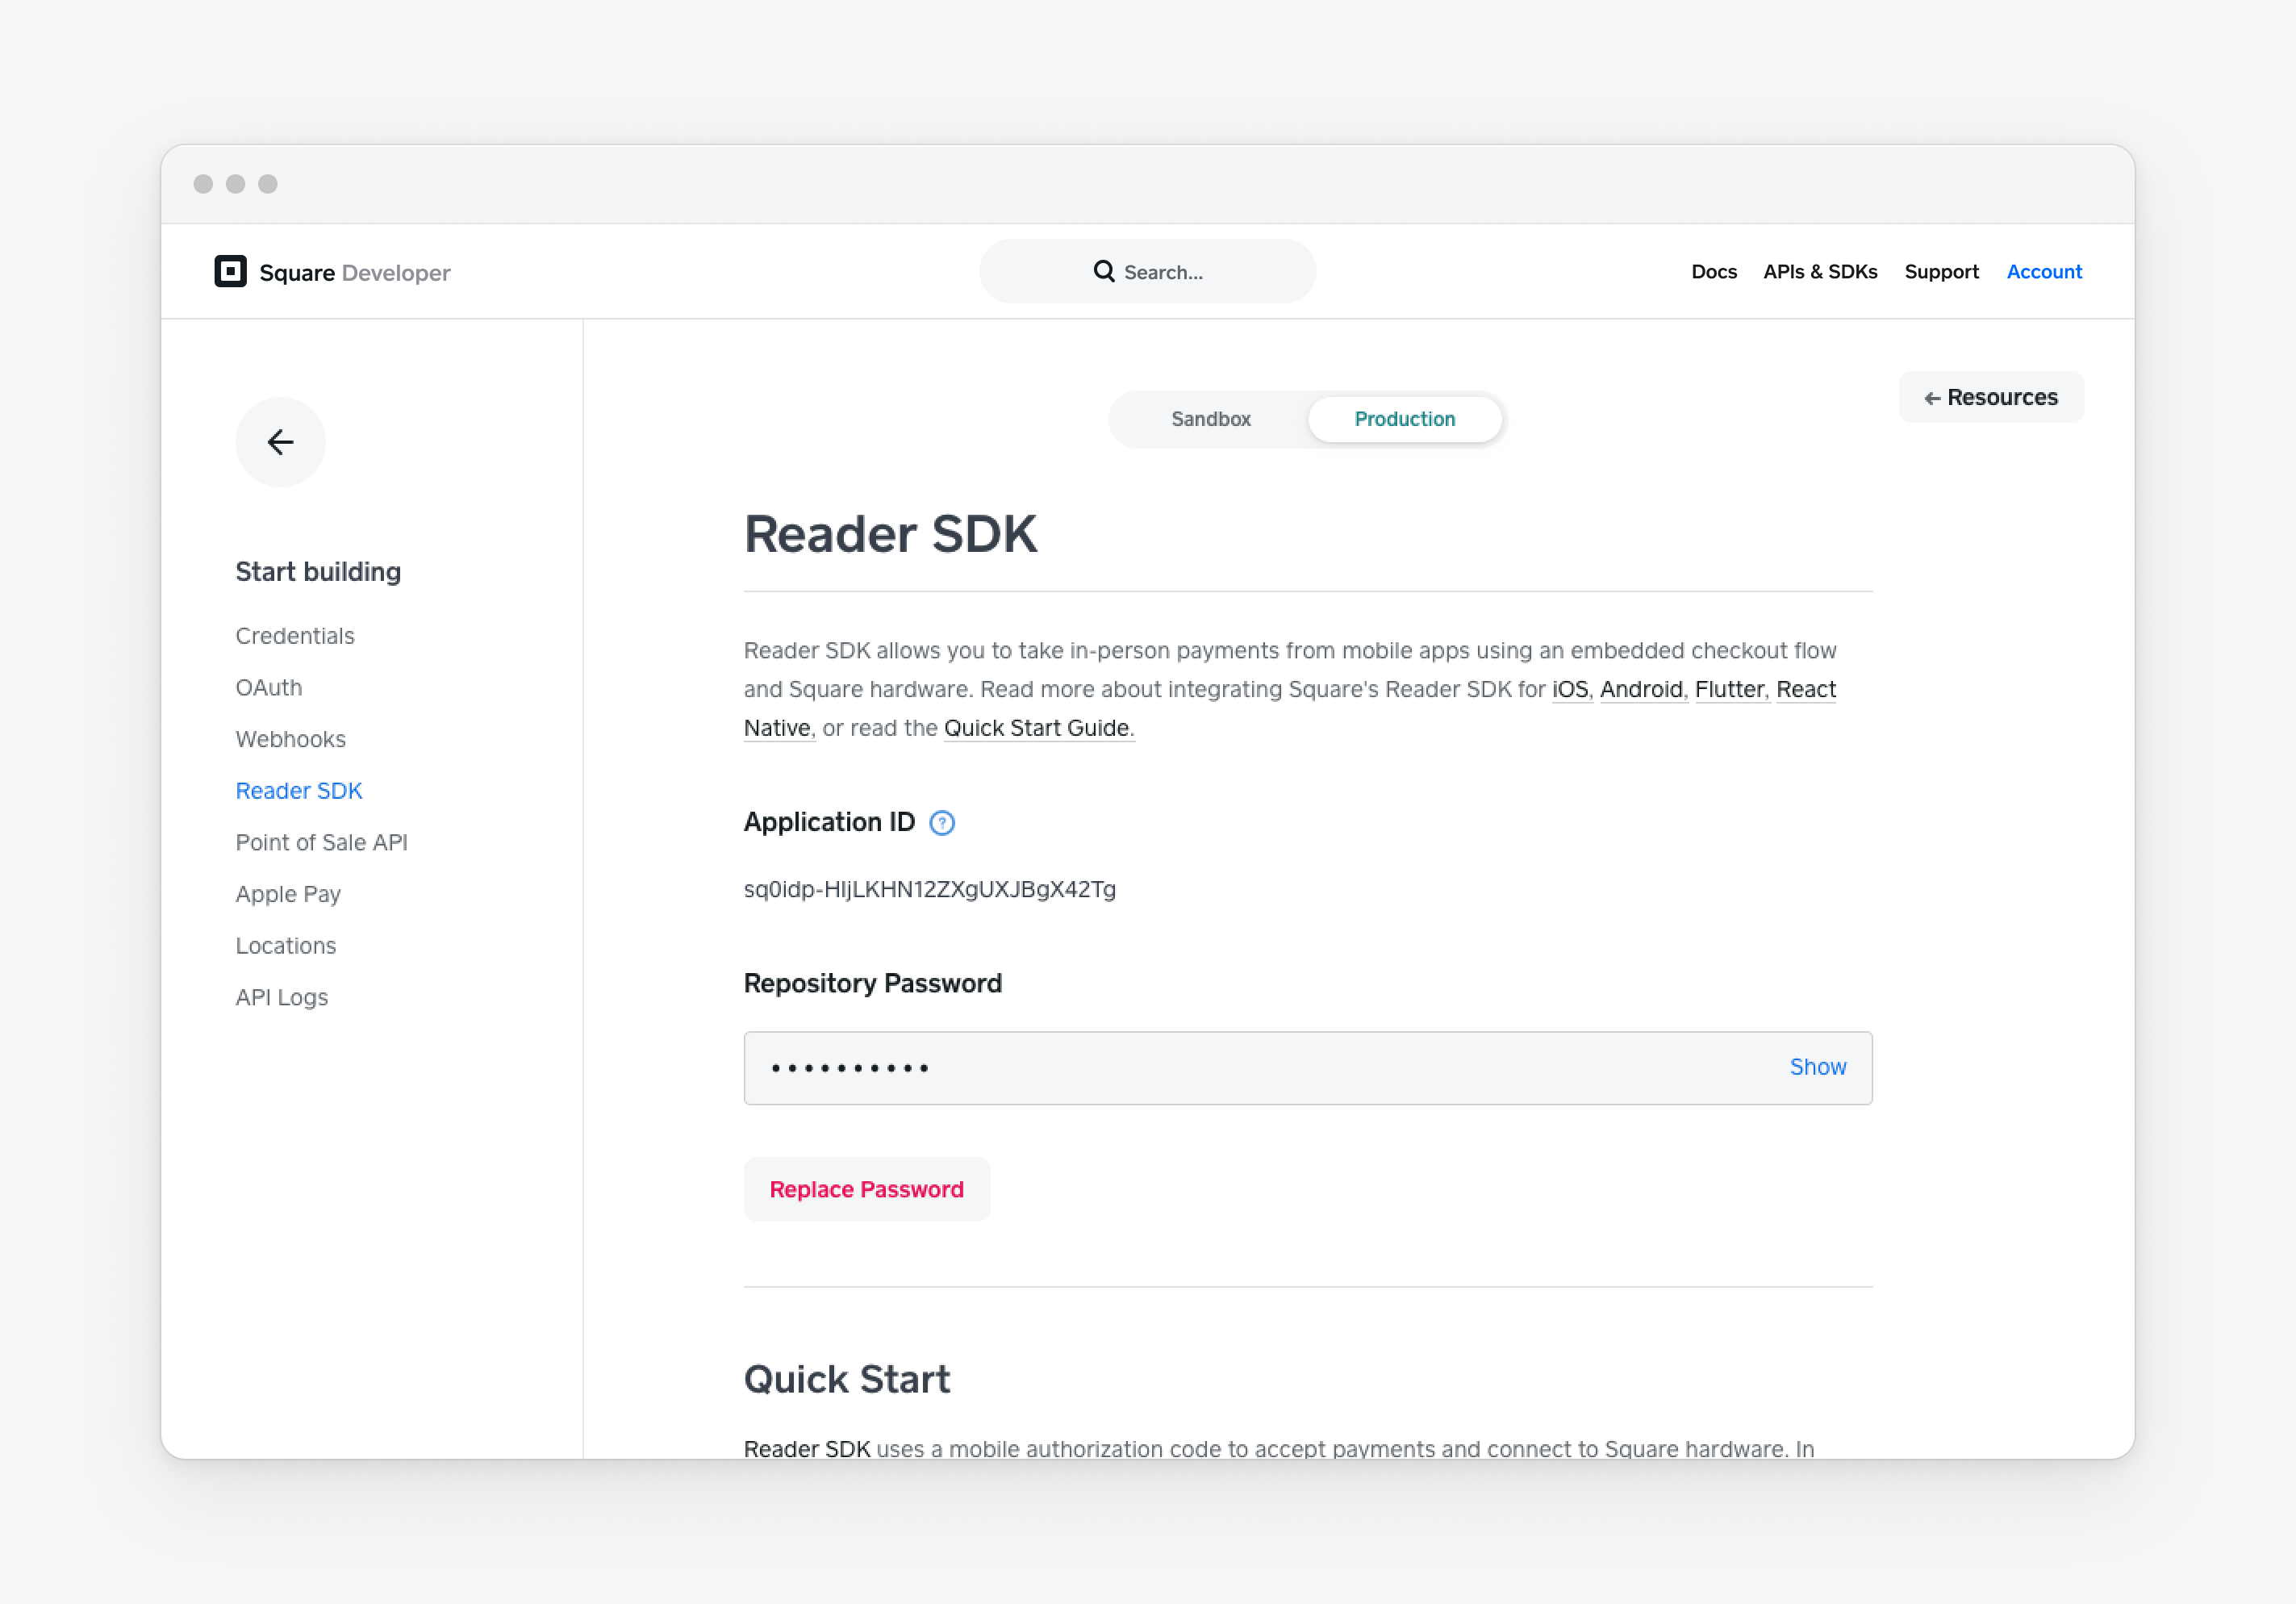
- Your application ID - Find your application ID on the Credentials page of your Square application in the Developer Console.
- Your Reader SDK repository password - Find your Reader SDK repository password on the Reader SDK page of your Square application in the Developer Console.
The Reader SDK isn't compatible to run on custom devices from OEMs that violate Square's security rules or on devices that grant root access to the mobile device operating system code and kernel. As a result, these devices cannot connect to a Contactless and Chip Reader.
The following additional considerations apply when trying to run the SDK on custom devices:
- The Reader SDK cannot run on custom operating systems.
- The Reader SDK isn't supported to run on rooted or jailbroken devices.
- Square prohibits using any software that provides the ability to record or capture screen data or that results in elevated privileges.
- Verify that your device is supported (see Devices Compatible with the Square Magstripe and Chip Card Readers).
- Supported OS versions should be the latest or as close to the latest as possible.
- Review Square's support window for the OS version and confirm support for the compilation target version and the runtime version: The compilation target currently supports versions 14 and later.
The following steps are recommended to verify your device:
- Test the device with any expected software requirements before committing to using it for the Reader SDK.
- Review Square's version support window.
- Ensure that you can pair the device with the Reader SDK using Bluetooth.
1. Request Reader SDK credentials
Open the Developer Console. You're prompted to sign in or create an account.
Create a Square application.
Choose the new application to open the Square application settings pages.
Open the Reader SDK page, and then choose Request Credentials to generate your Reader SDK repository password.
2. Install the Reader SDK
Download and configure the latest version of SquareReaderSDK.xcframework in your project root. The framework is installed in the current directory.
ruby <(curl https://connect.squareup.com/readersdk-installer) install \
--app-id SQUARE_READER_SDK_APPLICATION_ID                             \
--repo-password SQUARE_READER_SDK_REPOSITORY_PASSWORD
Optional: If you need to test or revert to a previous version of the SDK, you can also include the desired version number. If unspecified, the most recent version is installed.
3. Configure your iOS project for the Reader SDK
Add a Reader SDK build phase
Add the Reader SDK to your project:
- Open the General tab for your application target in Xcode.
- Drag the newly downloaded SquareReaderSDK.xcframework into the Embedded Binaries section, and then choose Finish in the dialog box that appears.
Open the Xcode workspace or project for your application.
On the Build Phases tab for your application target, choose the + button (at the top of the pane).
Choose New Run Script Phase.
Paste the following into the editor panel of the new run script:
FRAMEWORKS="${BUILT_PRODUCTS_DIR}/${FRAMEWORKS_FOLDER_PATH}"
"${FRAMEWORKS}/SquareReaderSDK.framework/setup"
Important
To avoid "No such file or directory" build errors, make sure that the Reader SDK Run Script phase is the last phase in the list.
The Reader SDK doesn't currently support bitcode. To disable bitcode:
- Open the Build Settings tab for your application target.
- In the top right search field, search for "bitcode".
- Change the value of Enable Bitcode to NO.
If your application target is pure Objective-C and contains no Swift code, you must include the standard Swift libraries with your application.
- Open the Build Settings tab for your application target.
- In the top right search field, search for "embed swift".
- Change the value of Always Embed Swift Standard Libraries to Yes.
Add support for required interface orientations
In Xcode, open the General tab for your application target.
Make sure the Landscape Left and Landscape Right device orientations are supported, as shown:
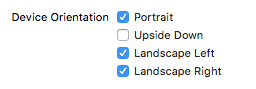
If your application runs on iPhone, it must support portrait and landscape interface orientations so that the Reader SDK can display the signature screen during checkout.
If you want specific screens in your application to only support the portrait orientation, you can override the supportedInterfaceOrientations method in your UIViewController subclasses.
Add or update the following key-value pairs on the Info tab for your application target to explain why your application requires these device permissions. Xcode can display human-readable labels (such as Privacy - Microphone Usage Description) rather than the raw keys.
| Key | Description |
|---|
| NSLocationWhenInUseUsageDescription | This application integrates with Square for card processing. To protect buyers and sellers, Square requires your location to process payments. |
| NSMicrophoneUsageDescription | This application integrates with Square for card processing. To swipe magnetic cards using the headphone jack, Square requires access to the microphone. |
| NSBluetoothPeripheralUsageDescription | This application integrates with Square for card processing. Square uses Bluetooth to connect your device to compatible hardware. |
| NSCameraUsageDescription | This application integrates with Square for card processing. Upload your account logo, feature photo, and product images with the photos stored on your mobile device. |
| NSPhotoLibraryUsageDescription | This application integrates with Square for card processing. Upload your account logo, feature photo, and product images with the photos stored on your mobile device. |
| NSBluetoothAlwaysUsageDescription | This application integrates with Square for card processing. Square uses Bluetooth to connect your device to compatible hardware. |
Note
Your application doesn't need to request Bluetooth, Camera, or Photo Library permissions to use the Reader SDK. The usage descriptions are required due to the way the Reader SDK is built.
4. Request location permission
Add code to ensure that your application has permission to use location services before starting a checkout flow. The location permission is managed by Apple's CLLocationManager class.
import CoreLocation

class YourViewController: UIViewController {
    private lazy var locationManager = CLLocationManager()

    func requestLocationPermission() {
        switch CLLocationManager.authorizationStatus() {
        case .notDetermined:
            locationManager.requestWhenInUseAuthorization()
        case .restricted, .denied:
            print("Show UI directing the user to the iOS Settings app")
        case .authorizedAlways, .authorizedWhenInUse:
            print("Location services have already been authorized.")
        }
    }
}
5. Request microphone permission
Add code to ensure that your application has permission to access the microphone before starting checkout. The microphone permission is managed by Apple's AVAudioSession class. You must have the record permission from AVAudioSession to use Square Magstripe Readers.
import AVFoundation
extension <#YourViewController#> {
func requestMicrophonePermission() {
AVAudioSession.sharedInstance().requestRecordPermission { authorized in
if !authorized {
print("Show UI directing the user to the iOS Settings app")
}
}
}
}
6. Add code to initialize the Reader SDK
Update the application:didFinishLaunchingWithOptions: method in your application delegate to initialize the Reader SDK.
import SquareReaderSDK

func application(
    _: UIApplication,
    didFinishLaunchingWithOptions launchOptions:
    [UIApplicationLaunchOptionsKey: Any]? = nil
) -> Bool {
    SQRDReaderSDK.initialize(applicationLaunchOptions: launchOptions)

    return true
}
7. Add code to request a mobile authorization code
The Reader SDK requires a mobile authorization code from the Mobile Authorization API. Mobile authorization codes allow custom mobile applications to process payments on Square hardware on behalf of a specific Square account for a given location.
Mobile authorization codes are short lived and should be used immediately to authorize the Reader SDK. Authorization is valid until it's explicitly revoked by calling deauthorize or your application fails to take a payment within 90 days. Mobile authorization codes don't need to be manually refreshed under normal operations.
Did you know?
Production applications should request mobile authorization codes programmatically, but you can generate mobile authorization codes on the Reader SDK page of your application settings or manually with cURL during development.
Create a function, retrieveAuthorizationCode, to handle the work of calling your authorization service and handling the result.
import SquareReaderSDK
func retrieveAuthorizationCode() -> String {
return "<Mobile Authorization Code>"
}
8. Add code to authorize the Reader SDK
import SquareReaderSDK
func authorizeReaderSDKIfNeeded() {
if SQRDReaderSDK.shared.isAuthorized {
print("Already authorized.")
} else {
let authCode = retrieveAuthorizationCode()
SQRDReaderSDK.shared.authorize(withCode: authCode) { _, error in
if let authError = error {
print(authError)
} else {
}
}
}
}
9. Implement CheckoutControllerDelegate methods
Your view controller must conform to the SQRDCheckoutControllerDelegate protocol to handle results and errors from the checkout flow. In most cases, your view controller should implement SQRDCheckoutControllerDelegate. If you choose to implement the delegate as a separate object, make sure it's retained until the checkout flow completes.
Did you know?
This view controller is a good place to add a button that starts the contactless reader connect flow using the Reader SDK settings view controller. A Square contactless reader cannot be connected until the Reader SDK is authorized. Authorization is completed in step 8, which means you can now connect a reader. For information about connecting a reader, see Connect a Contactless Reader.
import SquareReaderSDK
extension <#YourViewController#>: SQRDCheckoutControllerDelegate {
func checkoutControllerDidCancel(
_: SQRDCheckoutController
) {
print("Checkout canceled.")
}
func checkoutController(
_: SQRDCheckoutController, didFailWith _: Error
) {
}
func checkoutController(
_: SQRDCheckoutController,
didFinishCheckoutWith _: SQRDCheckoutResult
) {
}
}
10. Add code to start the checkout flow
Create an SQRDCheckoutParameters object. At a minimum, you need to set the amount of money to be charged. You then start the checkout flow by instantiating a Square checkout controller (SQRDCheckoutController) and presenting it.
import SquareReaderSDK
extension <#YourViewController#> {
func startCheckout() {
let amountMoney = SQRDMoney(amount: 100)
let params = SQRDCheckoutParameters(amountMoney: amountMoney)
params.additionalPaymentTypes = [.cash, .manualCardEntry]
let checkoutController = SQRDCheckoutController(
parameters: params,
delegate: self
)
checkoutController.present(from: self)
}
}
11. Add code to handle the checkout result
Implement the success and failure delegate methods. For now, print the checkout result to the Xcode console on success and error information on failure.
The Reader SDK provides error types for all failable operations. For example, errors that occur while presenting the checkout flow are always of the SQRDCheckoutControllerError type. Error objects always contain user displayable details (error codes and descriptions) and debugging information (debug codes and debug messages).
func checkoutController(
_: SQRDCheckoutController,
didFinishCheckoutWith result: SQRDCheckoutResult
) {
print("Checkout completed: \(result.description).")
}
func checkoutController(
_: SQRDCheckoutController, didFailWith error: Error
) {
let checkoutControllerError = error as! SQRDCheckoutControllerError
switch checkoutControllerError.code {
case .sdkNotAuthorized:
print("Reader SDK is not authorized.")
case .usageError:
if let debugMessage = checkoutControllerError.userInfo[SQRDErrorDebugMessageKey],
let debugCode = checkoutControllerError.userInfo[SQRDErrorDebugCodeKey] {
print(debugCode, debugMessage)
}
}
}
Test the Reader SDK on iOS
The Reader SDK provides a testing module that contains additional initializers that aren't exposed in the Reader SDK framework. You can use these initializers to construct mock objects in your tests. For example, you might initialize a SQRDCard object in a unit test and use it to verify the behavior of your application.
import SquareReaderSDK.Testing
func test_updateWithCard() {
let card = SQRDCard(brand: .visa, lastFour: "1111")
self.cardView.updateWithCard(card)
XCTAssertEqualObjects(self.cardView.lastFourLabel.text, "1111")
XCTAssertEqualObjects(self.cardView.brandLabel.text, "Visa")
}