Applies to: Web Payments SDK | Payments API | Cards API | Strong Customer Authentication
Learn how to take card-not-present payments in a web client with the Web Payments SDK.
For card-not-present payment acceptance, Square provides a payment flow with the Web Payments SDK that tokenizes a payment and performs buyer verification. This flow involves:
- Generating a payment token with the Card.tokenize() method. During payment tokenization, Square checks the tokenize request to determine whether buyer verification is needed based on the buyer's information.
- Including the payment token in a Payments API call to process a payment with CreatePayment.
The Web Payments SDK provides secure payment methods and Strong Customer Authentication (SCA) regulatory compliance.
To simplify the operation of authorizing payments, verifying buyer identity, and processing card payments, a Square application calls the Web Payments SDK's Card.tokenize() method and exchanges all necessary information about the buyer in the tokenization request, so that Square can handle all the authentication before returning a payment token. This payment flow allows Square to process the payment and comply with any applicable local regulations or to comply with the seller's preference to trigger 3D Secure (3DS) authentication based on rules that the seller sets in Square Risk Manager.
The payment flow uses additional fields in tokenize() to allow Square to perform payment authentication, which involves:
Running a buyer risk evaluation.
Determining whether a payment will be authenticated with 3DS.
Square authenticates a payment for two reasons:
- Regulatory mandate - Square determines whether the payment is in scope of a mandate and routes the payment through 3DS as needed.
- Seller choice - A seller sets a rule in Risk Manager for when 3DS is triggered for a payment. For more information, see Square Risk Manager seller documentation for 3DS.
Applying 3DS if needed per authentication regulations.
Tokenizing the card payment so that the Web Payments SDK returns a payment token to the application with the buyer's identity verified and authentication completed (if authentication is required by a regulatory mandate or the seller's Risk Manager risk rule).
After getting a payment token, a Square application calls CreatePayment to process and complete the payment.
- You've created a Square account and application.
- You've initialized the Square Web Payments SDK in your client-side code
- You’ve initialized the Square payments object in your client-side code
- Call
payments.card()to get aCardobject.
const card = await payments.card();
- Collect the customer input that you need to pass as
verificationDetailstocard.tokenize().
You need to pass the following properties in a verificationDetails object:
amount- The amount of the card payment to be charged.billingContact- The buyer's contact information for billing.intent- The transactional intent of the payment.sellerKeyedIn- Indicates that the seller keyed in payment details on behalf of the customer. This is used to flag a payment as Mail Order / Telephone Order (MOTO).customerInitiated- Indicates whether the customer initiated the payment.currencyCode- The three-letter ISO 4217 currency code.
Important
Provide as much buyer information as possible for billingContact so that you get more accurate decline rate performance from 3DS authentication.
The following is an example verificationDetails object, for example purposes only. Never hard-code customer information in production.
const verificationDetails = {
  amount: '10.00',
  billingContact: {
    givenName: 'John',
    familyName: 'Doe',
    email: '[email protected]',
    phone: '3214563987',
    addressLines: ['123 Main Street', 'Apartment 1'],
    city: 'London',
    state: 'LND',
    countryCode: 'GB',
  },
  currencyCode: 'GBP',
  intent: 'CHARGE',
  customerInitiated: true,
  sellerKeyedIn: false
};
The verificationDetails fields, when passed to the tokenize() method, allow Square to handle buyer verification and authentication.
| Field name | Type | Example value |
|---|---|---|
| amount | string |
|
| currencyCode | string |
|
| intent | string |
|
| billingContact | BillingContact |
|
| customerInitiated | boolean |
|
| sellerKeyedIn | boolean |
|
- Pass the
verificationDetailsin a call tocard.tokenize().
Declare a token object and include the await parameter with the Card.tokenize() method.
const token = await card.tokenize(verificationDetails);
- Pass the
tokenresult to the server to call the Square CreatePayment endpoint.
Declare a payment object to call the helper createPayment function that passes the token to the server.
const payment = createPayment(token);
Additional code examples from the Web Payments SDK quickstart:
- For an example
createPaymenthelper function and server setup, check out the web-payments-quickstart repository and guide. - For a complete code example of the card payment setup, see the charge card payment file.
If your application makes calls with verifyBuyer() and uses a verification token (as part of the Web Payments SDK card payment method setup to add SCA), continue to the following section.
Modify your application so it can incorporate the payment flow for authentication with the Card.tokenize() method. Your application should then perform fewer operations to authenticate buyers for card payments without calling Payments.verifyBuyer().
If your application currently creates the verificationDetails object for use with verifyBuyer(), you must move the verificationDetails properties to the tokenize() method. Square will be deprecating verifyBuyer() and the verification token, which won't automatically be included in the card tokenization request.
The following procedure describes how to modify the existing payment test flow.
Move the buyer verification test values to the
tokenobject.If your application makes calls with
verifyBuyer(), you can move the test values declared in theverificationDetailsobject to thetokenize()method of the token object and modify the parameter values. The following code examples show a set of test values:Before moving the test values
async function tokenize(paymentMethod) {
  const tokenResult = await paymentMethod.tokenize();
  // ...
}

async function verifyBuyer(payments, token) {
  const verificationDetails = {
    amount: '10.00',
    billingContact: {
      givenName: 'John',
      familyName: 'Doe',
      email: '[email protected]',
      phone: '3214563987',
      addressLines: ['123 Main Street', 'Apartment 1'],
      city: 'London',
      state: 'LND',
      countryCode: 'GB',
    },
    currencyCode: 'GBP',
    intent: 'CHARGE',
  };
  const verificationResults = await payments.verifyBuyer(
    token,
    verificationDetails
  );
  return verificationResults.token;
}
After moving and modifying the test values
 async function tokenize(paymentMethod) {
  const verificationDetails = {
    amount: '10.00',
    billingContact: {
      givenName: 'John',
      familyName: 'Doe',
      email: '[email protected]',
      phone: '3214563987',
      addressLines: ['123 Main Street', 'Apartment 1'],
      city: 'London',
      state: 'LND',
      countryCode: 'GB',
    },
    currencyCode: 'GBP',
    intent: 'CHARGE',
    customerInitiated: true,
    sellerKeyedIn: false,
  };
  const tokenResult = await    paymentMethod.tokenize(verificationDetails);
  if (tokenResult.status === 'OK') {
    return tokenResult.token;
  } else {
    let errorMessage = `Tokenization failed with status: ${tokenResult.status}`;
    if (tokenResult.errors) {
      errorMessage += ` and errors: ${JSON.stringify(
        tokenResult.errors,
      )}`;
    }
    throw new Error(errorMessage);
  }
}
Make sure to add and set the
customerInitiatedandsellerKeyedInfields.Update
createPaymentto take only the token as an argument.async function createPayment(token) { const body = JSON.stringify({ locationId, sourceId: token, idempotencyKey: window.crypto.randomUUID(), }); const paymentResponse = await fetch('/payment', { method: 'POST', headers: { 'Content-Type': 'application/json', }, body, }); if (paymentResponse.ok) { return paymentResponse.json(); } const errorBody = await paymentResponse.text(); throw new Error(errorBody); }Remove instances of the
verificationTokenobject andverifyBuyer()method calls.
Note
While the verifyBuyer() method is deprecated and up until its retirement, Square will continue to perform SCA checks for buyer verification if your application calls verifyBuyer().
- Navigate to http://localhost:3000/ in your browser.
- Complete the card payment form and submit a test payment with a CNP test credit card from Sandbox Payments.
- Use an SCA test card with a challenge type of "Modal with Verification Code".
The following modal launches:
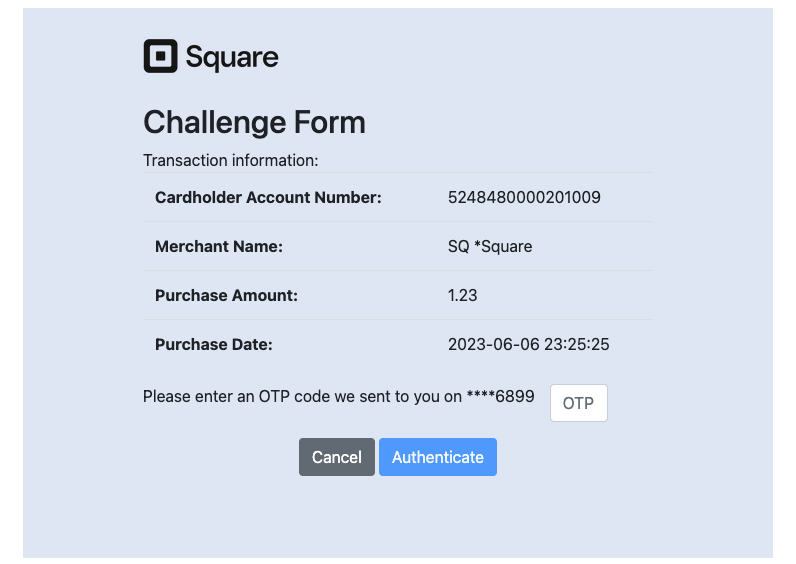
Enter the verification code in the pop-up window and choose Authenticate. After authentication, the application sends the payment request to complete the card payment.
Check the console log in your browser or the returned TokenResult object to confirm that the payment token is generated.
Refresh your browser and use a test card from the Card-not-present success state values table or an SCA test card with no challenge.
Check the console log again in your browser or the returned TokenResult object to confirm that the payment token is generated.
After testing the application to take a card payment, you can update the application to authorize buyers for card-on-file payments. The tokenize() method includes the intent key where you can update the value to one of the following values:
STORECHARGECHARGE_AND_STORE
When your application charges and stores a card on file, the application calls CreateCard to create a new Card object when the application sends the buyer authentication and payment requests to Square. For more information, see Charge and Store Cards for Online Payments.