Applies to: Web Payments SDK | Payments API | Bank Accounts API
Learn how to store and charge a bank account on file with the Web Payments SDK.
The Web Payments SDK and Square APIs enable you to securely store customer bank accounts for one-time or recurring ACH charges, eliminating the need for customers to re-link their accounts on each visit.
Common use cases include gyms processing monthly membership fees, utility companies streamlining recurring billing, or any business that needs to collect regular ACH payments. By integrating the Bank Accounts API with the Web Payments SDK, you can implement these payment features efficiently while maintaining security and compliance.
This guide covers storing bank accounts and processing both one-time and recurring ACH payments. For ACH payments without storing accounts, see Take ACH Bank Transfer Payments.
Did you know?
Bank accounts cannot be deleted once created due to compliance and record-keeping requirements. Instead, use the DisableBankAccount endpoint to prevent future charges while maintaining historical records.
Before implementing bank account storage, ensure your application meets these requirements:
- Location: ACH bank transfers via Web Payments SDK are only supported in the United States. For international bank account storage and payment processing, see International Development
- Permissions: Your application needs:
BANK_ACCOUNTS_WRITEandBANK_ACCOUNTS_READCUSTOMERS_WRITEPAYMENTS_WRITEandPAYMENTS_READ
- Setup: Complete the ACH Bank Transfer Payments setup
- Bank Support: Customer banks must be supported by Plaid (Square's banking partner)
This section walks through linking and storing a customer's bank account to their profile for future use.
Charging a buyer on their linked and stored bank account involves the generation and use of these token types:
| Token | Definition |
|---|---|
BNON | A token returned by Web Payments SDK for a Plaid-authorized bank account. |
BACT | A token returned by Square for a Plaid-authorized bank account stored with Square. |
BAUTH | A token returned by the Web Payments SDK for a buyer-authorized charge on a linked bank account. Use this token with the CreatePayment method. |
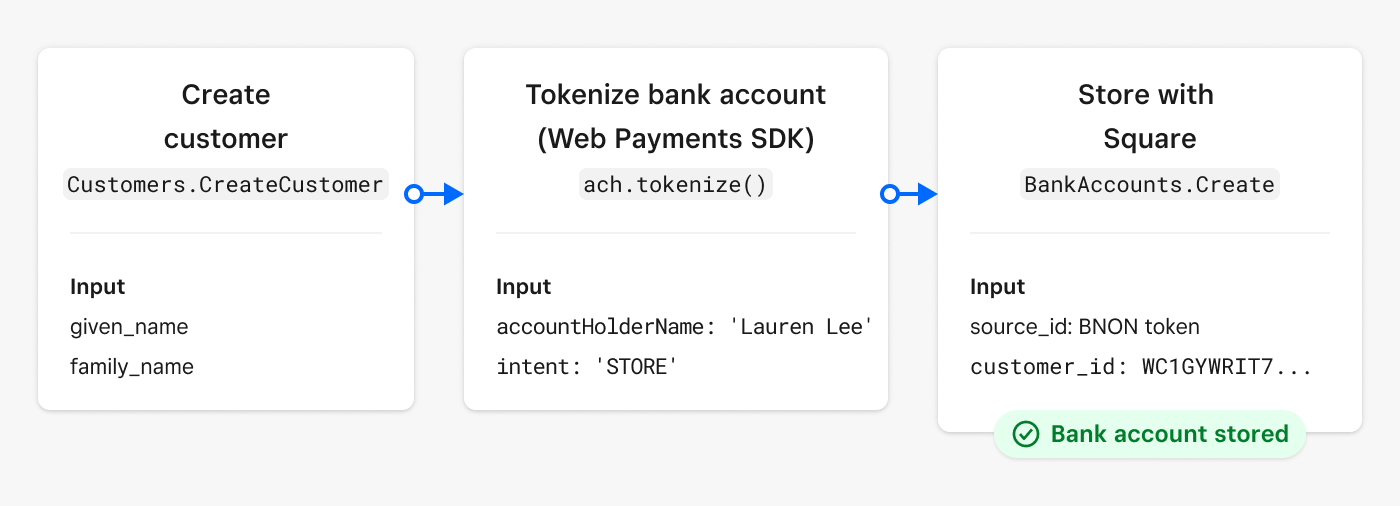
First, create a Square Customer object to associate with the bank account:
Create customer
The ach.tokenize with AchStoreOptions.intent set to 'STORE' presents the customer with Plaid's secure authentication interface. Set up an event listener to capture the BNON token after completion of the tokenize call:
Use the Web Payments SDK to initialize ACH and launch the Plaid authentication flow:
// Initialize ACH payment method
const ach = await payments.ach({
  transactionId: '415111211611',  // Your unique transaction ID
});

ach.addEventListener('ontokenization', async function(event) {
  const { tokenResult, error } = event.detail;

  if (error) {
    throw new Error(`Tokenization failed: ${error}`);
  }

  if (tokenResult.status === 'OK') {
    // Send token to your server
    await fetch('/create-bank-on-file', {
      method: 'POST',
      headers: { 'Content-Type': 'application/json' },
      body: JSON.stringify({ token: tokenResult.token })
    });
  }
});

// Launch Plaid authentication flow
try {
  await ach.tokenize({
    accountHolderName: 'Lauren Noble',
    intent: 'STORE',  // Always use STORE for saving accounts
  });
} catch (e) {
  console.error(e);
}
From your server, create the bank account record using the BNON token and the following parameters:
- source_id - The BNON token sent to your server after the call to ach.tokenize.
- customer_id - The unique ID for the customer generated during customer creation.
Note
Testing with Real Tokens Required
The source_id parameter must be a valid token generated by the Web Payments SDK's ach.tokenize() method. You cannot use placeholder values, example tokens from documentation, or manually created strings for testing.
If you attempt to use an invalid or made-up source_id, you'll receive this error:
{
  "errors": [
    {
      "code": "NOT_FOUND",
      "detail": "Bank nonce not found",
      "category": "INVALID_REQUEST_ERROR"
    }
  ]
}
To test the CreateBankAccount endpoint, you must first:
- Implement the Web Payments SDK on your frontend
- Complete the Plaid bank linking flow
- Call
ach.tokenize()to generate a valid token - Use that token immediately in your
CreateBankAccountrequest
Bank tokens are single-use and expire quickly, so you'll need to generate a fresh token for each test.
curl https://connect.squareupsandbox.com/v2/bank-accounts \
  -X POST \
  -H 'Authorization: Bearer {ACCESS_TOKEN}' \
  -H 'Content-Type: application/json' \
  -d '{
    "idempotency_key": "{UNIQUE_KEY}",
    "source_id": "bnon:Ja85BvcwFYPiDZJV4H",
    "customer_id": "WC1GYWRIT7STE3GU4ZLQ3X76EF"
  }'
Process a single charge to a customer's stored bank account with these steps. These steps assume a bank account has already been linked and stored to the customer's account.
Did you know?
The Payments API automatically rejects attempts to charge seller bank accounts (those without the "bact:" prefix). This prevents accidentally charging business accounts instead of customer accounts.
Retrieve the customer's stored bank accounts using the ListBankAccounts endpoint. Important: You must include the customer_id as a query parameter to filter results to only that customer's accounts. Without this parameter, the endpoint returns all bank accounts associated with the seller's Square account, including the seller's own bank accounts.
List bank accounts
Present the available bank accounts in your UI to let the customer select which account to charge. Display enough information for the customer to identify their account while maintaining security:
Recommended display fields:
holder_name- Account holder's namebank_name- Financial institution nameaccount_type- CHECKING or SAVINGSaccount_number_suffix- Last 3-4 digits (e.g., "...000")
Important: Never display full account or routing numbers. The account_number_suffix provides enough information for identification.
Example UI pattern:
bankAccounts.forEach(account => {
  // Display: "Citizens Bank - Checking (...000) - Lauren Noble"
  const displayText = `${account.bank_name} - ${account.account_type} (...${account.account_number_suffix}) - ${account.holder_name}`;

  // Verify account is ready for payments
  if (account.status === 'VERIFIED' && account.debitable) {
    // Add to payment method selection UI
    addPaymentOption(displayText, account.id);
  }
});
Capture the selected account's id to use in the next step for payment authorization.
Use the ach.tokenize method to generate a BAUTH token for the one-time charge authorization with the following parameters:
- bankAccountId - The stored bank account token (
BACT) that was returned when your application stored the bank account with Square. - intent - The purpose of the authorization. In this case, to
CHARGEthe bank account. - amount - The full price of the purchase, including any taxes and fees.
- currency - The currency of the bank account to authorize.
// Initialize ACH
const ach = await payments.ach({
  transactionId: '415111211611',
});

// Authorize one-time charge
try {
  await ach.tokenize({
    intent: 'CHARGE',  // Use CHARGE for one-time payments
    amount: '5.00',     // Amount as string with dollars and cents
    currency: 'USD',
    bankAccountId: "bact:J71CYCQ789KnZnXi5HC",
  });
} catch (e) {
  console.error(e);
}
Capture the BAUTH token using the same event listener pattern shown earlier.
On your application server, create the payment with the Payments API CreatePayment endpoint using the BAUTH token:
Create payment
Set up automated recurring charges for the same amount at regular intervals.
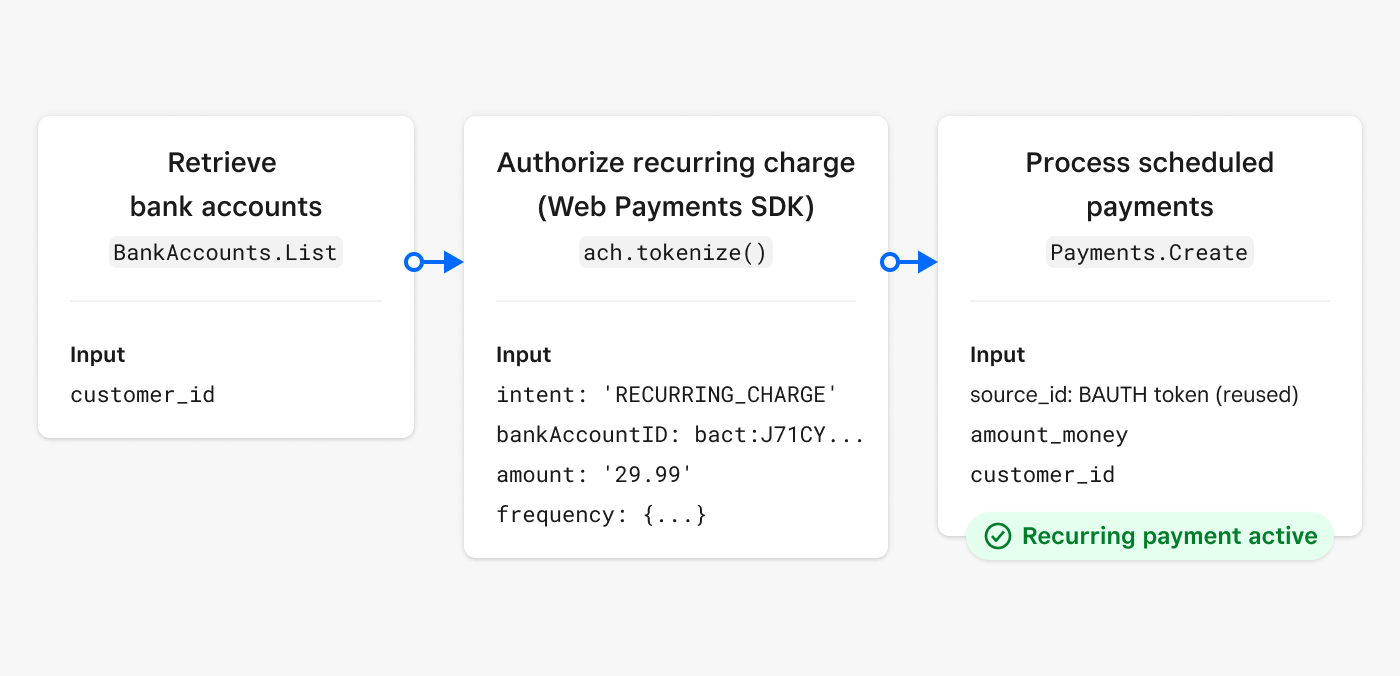
When you use intent: RECURRING_CHARGE with the Web Payments SDK, Square does not automatically charge the customer’s bank account on the specified frequency. The RECURRING_CHARGE operation only creates a reusable BAUTH token that’s authorized for recurring payments according to the schedule you defined. Your application is fully responsible for implementing the scheduling logic and calling the Payments API CreatePayment endpoint with this token whenever a payment is due.
Think of it as getting permission to charge on a schedule, not setting up automatic charges. You’ll need to build your own scheduling system (using cron jobs, scheduled tasks, or a third-party scheduling service) to trigger payments at the appropriate times. The frequency parameters you provide during tokenization are for authorization purposes only—they tell the customer what schedule they’re agreeing to, but don’t create any automatic payment processing on Square’s side.
Note
These steps assume a bank account has already been linked and stored to the customer's account.
Follow the same process as one-time payments to retrieve and display the customer's bank accounts. Consider adding UI elements to capture subscription preferences like frequency and start date.
Configure the recurring payment schedule when generating the BAUTH token:
// Helper function to create daily recurring frequency configuration
function createDailyRecurringFrequency(days) {
  return {
    days: days  // Charge every [x] days
  };
}

// Example: Charge every 3 days
const dailyFrequency = createDailyRecurringFrequency(3);

// Use with ach.tokenize()
await ach.tokenize({
  intent: 'RECURRING_CHARGE',
  bankAccountId: 'bact:J71CYCQ789KnZnXi5HC',
  amount: '9.99',
  currency: 'USD',
  frequency: dailyFrequency,
  startDate: '2024-12-21'
});
Use the BAUTH token to charge the account according to the authorized schedule. The payment process is identical to one-time payments, but you can reuse the BAUTH token for each scheduled charge without re-authorization.
Note
You don't need to charge immediately after obtaining the BAUTH token. Store it securely and use it when each scheduled payment is due.
While you cannot delete stored bank accounts, you can disable them to prevent future charges:
Important
Disabling is permanent for that specific bank account record. To charge the account again, the customer must complete the full onboarding flow as if linking a new account.
curl https://connect.squareupsandbox.com/v2/bank-accounts/bact:J71CYCQ789KnZnXi5HC/disable \
  -X POST \
  -H 'Authorization: Bearer {ACCESS-TOKEN}' \
  -H 'Content-Type: application/json'
Subscribe to these webhook events to track bank account lifecycle changes:
bank_account.created- Triggered when a customer links a new bank accountbank_account.verified- Triggered when account verification completes (account ready for payments)bank_account.disabled- Triggered when an account is disabled
These events help you update your UI, notify customers, and handle account status changes automatically. See Webhooks API for setup instructions.
- Verify account status is
VERIFIEDbefore attempting charges - Ensure sufficient funds in customer's account
- Check that BAUTH token hasn't expired (tokens have limited validity)
- Check the
fingerprintfield of existing accounts before creating new ones - Use
ListBankAccountsto find existing accounts for the customer
- Verify you're using the correct
customer_idwhen listing accounts - Ensure the bank account ID starts with "bact:" prefix
- Check that the account hasn't been disabled
- Implement webhook notifications for payment status updates
- Set up error handling for failed payments
- Configure testing scenarios in the Sandbox environment