An overview of Square GraphQL Explorer and how to use the schema to create queries for Square data.
Developer Tools

GraphQL Explorer Overview Beta release
This is pre-release documentation for an API in public beta and is subject to change.

Square GraphQL Explorer is an interactive web application that lets you write, validate, and send queries for Square data. You can use GraphQL Explorer features (such as code completion, syntax validation, and on-page schema documentation) to help you write queries. You can then run the queries against your own Square data. To access GraphQL Explorer, open https://developer.squareup.com/explorer/graphql and sign in to your Square account.

You can use GraphQL Explorer to:

  • Query the GraphQL endpoint in the Sandbox

    An isolated server environment used for testing.
    or production environment.

  • Browse the schema documentation to find available fields, type information, and query syntax.

  • Retrieve data for a single merchant using a personal or OAuth access token

    Grants permission to access data in a Square account, such as customer, order, and payment information.
    and filtering by the merchant's ID.

    In a single query, you can retrieve data for one or more supported graphs:

    • Cards

    • Catalog

    • Customers

    • Inventory

    • Merchants

    • Orders

    • Payments

    • Refunds

Note

Square GraphQL supports query operations only. Mutations and subscriptions aren't supported. Queries are subject to rate and cost limiting.

To use GraphQL Explorer, enter your query in the left pane and then run the query to see real-time results against your Square data.

A screenshot of GraphQL Explorer with numbered features.

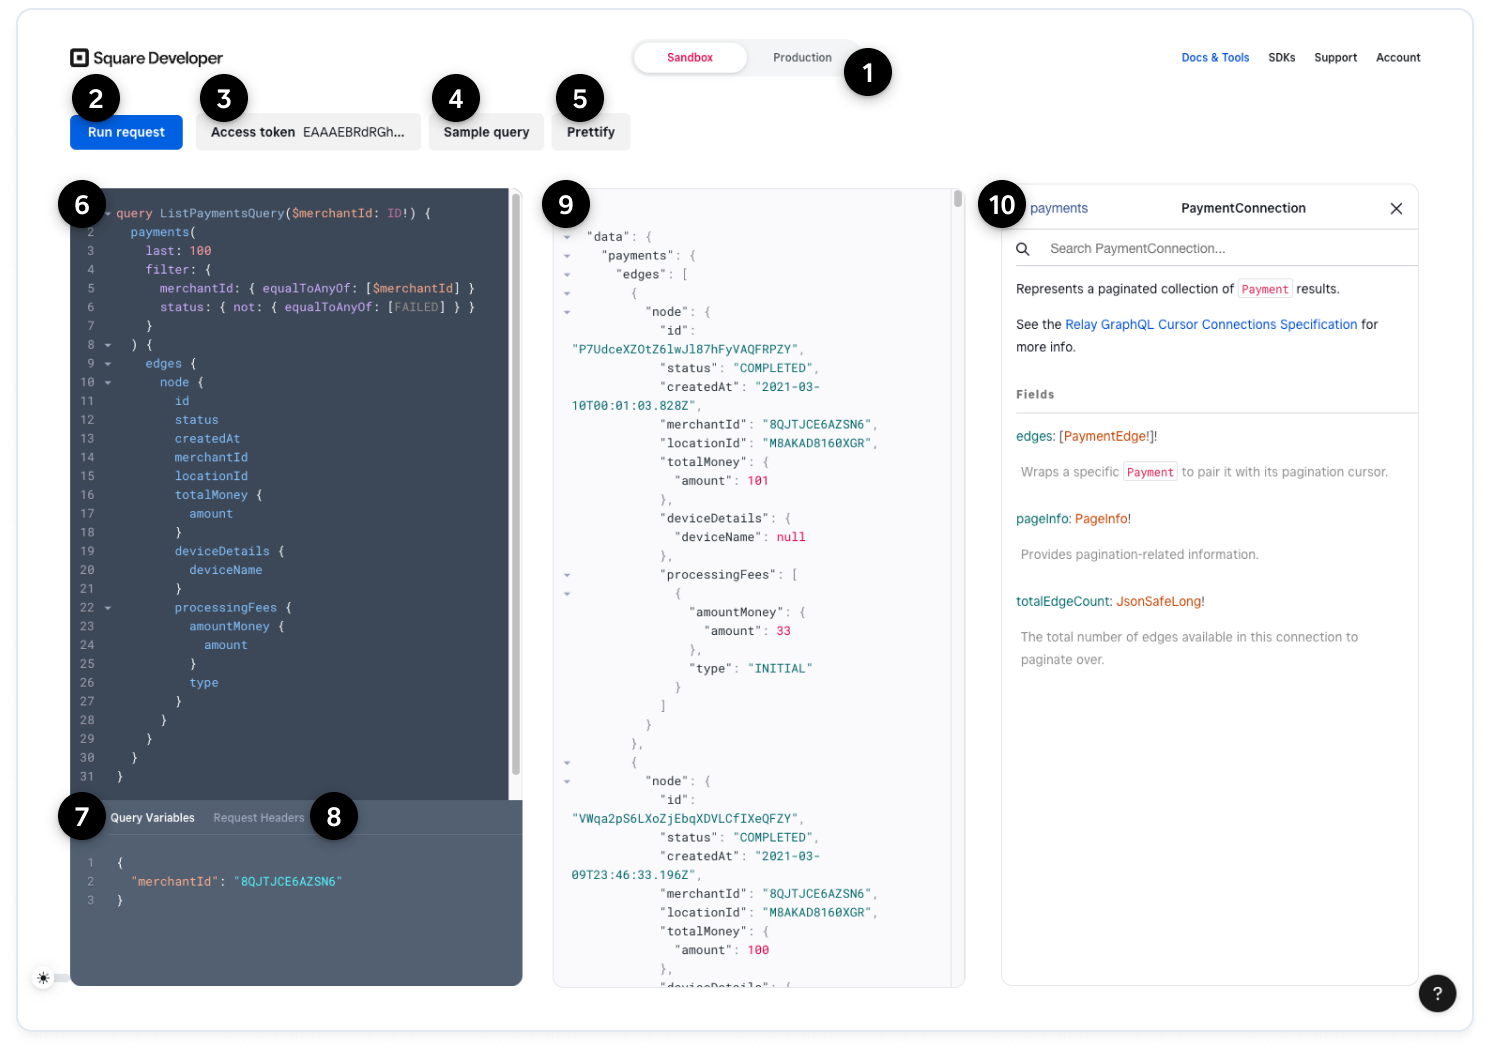
1. Sandbox or Production toggle

Lets you choose between the Sandbox or production environment. This selection determines whether GraphQL Explorer sends queries to the Sandbox endpoint or the production endpoint.

2. Run request button

Sends the current query and any query variables to Square GraphQL. Alternatively, you can use the Ctrl-Enter keyboard shortcut to send the query.

3. Add access token button

Lists the personal access tokens for the signed-in account. When you select an access token, it's added to the Request Headers pane and used for your queries. If you switch between Sandbox and production, you must reselect an access token that's valid for the environment.

4. Sample query button

Lets you select a sample query to load into the query pane. Square provides a sample query for every graph entry point. All sample queries use query variables, so you need to enter valid values into the Query Variables pane before running the query.

5. Prettify button

Applies proper spacing and indentation and removes comments and extra line breaks.

6. Query pane

Lets you enter and edit queries and provides code completion, code hints, and syntax and schema highlighting and validation. For code completion, you can begin typing or use Ctrl-Space to show suggestions.

7. Query Variables pane

Stores the variables used in the query and their values. All sample queries use query variables. For more information, see Variables.

8. Request Headers pane

Stores the request headers for the query. All queries require an Authorization header and bearer access token. If you want to test OAuth permissions, paste the OAuth access token directly into this pane.

You can include "x-graphql-include-debug": 1 in the request headers to return an extensions object with debugging information. Currently, this object contains the query's complexity score and a request ID that you can provide to Square support.

9. Results pane

Shows real-time responses with results and error information for the queries you run.

10. Documentation Explorer

Provides searchable schema documentation. If this pane is hidden, open it using the Docs button. For more information, see Using the schema to create a query.

In addition, you can toggle between light and dark mode or leave feedback using the controls at the bottom of the page.

GraphQL Explorer provides schema documentation in the Documentation Explorer pane. As you write queries, you can check the schema to find available fields, type information, and valid query syntax.

The following steps show how to use the schema documentation to create a query that gets open orders and information about the customer associated with each order.

  1. Sign in to GraphQL Explorer using your Square account. If the Documentation Explorer pane isn't showing, choose the Docs button to open it.

    Note

    Don't have a Square account? It only takes a few minutes to sign up and create a free account.

  2. Choose Add access token and select an access token

    Grants permission to access data in a Square account, such as customer, order, and payment information.
    to add to the Request Headers pane and to use for your queries.

  3. Get your merchant ID to use for the example query. Remove any existing content from the query pane and enter the following query:

    Most Square GraphQL queries have a required merchantId filter.

  4. Choose Run request. You use the returned id in a later step.

    The currentMerchant entry point can also be used to query for other merchant fields, such as businessName, currency, and locations.

  1. In Documentation Explorer, choose the Query root type to see available entry points, and then choose orders.

    You can see that the orders entry point is an OrderConnection object that accepts several arguments.

    A screenshot of GraphQL Explorer with the orders entry point showing in Documentation Explorer.

  2. In the query pane, start writing your query. Remove any existing content and enter the following snippet, which uses "OpenOrders" as the optional operation name:

    The example query you're building only includes orders, but queries can contain multiple entry points.

    Did you know?

    In the query pane, you can hover over the orders field to open a code hint that provides a short description of the field with links to relevant schema documentation. The query pane also provides code completion and syntax validation to help you write queries.

This example query filters orders by merchant ID and the OPEN state.

  1. In Documentation Explorer, choose the OrderFilter type for the filter argument. Scroll down to the merchantId and state filters.

    A screenshot of GraphQL Explorer with the OrderFilter input type showing in Documentation Explorer.

  2. Navigate through the components that make up the merchantId and state filters to find the required syntax.

    • merchantId uses the following syntax:

    merchantId: { equalToAnyOf: [ID!] }

    • state uses the following syntax:

    state: { equalToAnyOf: [OrderState!] }

    The following snippet represents the complete filter argument for the example query:

  3. Add the filter snippet to your query. In the query pane, replace # query arguments go here with the filter argument. Then, replace the merchantId value with your merchant ID and the state value with OPEN.

    Your query should look like the following example (where <YOUR_MERCHANT_ID> is your merchant ID). You can ignore any mismatched indentation.

    The syntax for the filter argument is now added to the query. The next part of the query specifies the order and customer data you want to retrieve.

Queries must explicitly specify the fields to retrieve. This example query gets information about the order and the customer associated with the order. In the following steps, you navigate through the schema to find fields to add to the query:

  1. In Documentation Explorer, return to orders and choose the OrderConnection type. Note that the nodes field is an array of Order objects.

  2. Choose the Order type to see the available order fields. For this query, you want to retrieve the id, createdAt, and customer fields for the order. Note that the customer field is a Customer object.

    A screenshot of GraphQL Explorer with the Order object type showing in Documentation Explorer.

  3. Choose the Customer type to see the available customer fields. For this query, you want to retrieve the familyName, phoneNumber, and address fields for the customer associated with the order. Note that the address field is an Address object.

  4. Choose Address to see the available address fields. For this query, you just want to retrieve the postalCode field of the customer's address.

    The following snippet represents the hierarchical list of fields you want to retrieve, starting with the nodes field:

  5. Add the nodes snippet to your query. In the query pane, replace # requested fields go here with the fields you want to retrieve. Your query should look like the following example:

Choose Run request. The following is an excerpt of an example response:

  • 1
  • 2
  • 3
  • 4
  • 5
  • 6
  • 7
  • 8
  • 9
  • 10
  • 11
  • 12
  • 13
  • 14
  • 15
  • 16
  • 17
  • 18
  • 19
  • 20
  • 21
  • 22
  • 23
  • 24
  • 25
  • 26
  • 27
  • 28
  • 29
  • 30
  • 31
  • 32
  • 33
  • 34
  • 35
  • 36
  • 37
  • 38
  • 39
  • 40
  • 41
  • 42
  • 43
  • 44
  • 45
  • 46
  • 47
  • 48
  • 49
  • 50
  • 51
{
  "data": {
    "orders": {
      "nodes": [
        {
          "id": "o9r5HI1rP4DNu2zZfElQTio8uaB",
          "createdAt": "2023-06-08T06:54:26.332Z",
          "customer": {
            "familyName": "Singhal",
            "phoneNumber": "12065551012",
            "address": {
              "postalCode": "98121"
            }
          }
        },
        {
          "id": "6STgq2h0v1K6smkASQP7kdVuuaB",
          "createdAt": "2023-06-08T06:05:42.874Z",
          "customer": {
            "familyName": "Castillo",
            "phoneNumber": "629-555-9284",
            "address": null
          }
        },
        {
          "id": "CkmasoR7ZXSRG969A0ZEuMMlvaB",
          "createdAt": "2023-06-07T20:50:00.136Z",
          "customer": {
            "familyName": "Nguyen",
            "phoneNumber": "6095553220",
            "address": {
              "postalCode": "08009"
            }
          }
        },
        {
          "id": "QBRic2WOSImQjSFwJMaJsDkCuaB",
          "createdAt": "2023-06-07T18:45:24.973Z",
          "customer": {
            "familyName": "Cohen",
            "phoneNumber": "+12065554871",
            "address": {
              "postalCode": "98101"
            }
          }
        },
        ...
      ]
    }
  }
}

Keep in mind that each tender (payment) for an order might also have an associated customer. The customer associated with the payment might not be the same one that is associated with the order.

Some Square GraphQL graphs (such as Payments and Refunds) follow the GraphQL Cursor Connection Specification. For these graphs, the query specifies a top-level edges list instead of nodes, as shown in the following Payments query:

  • Learn how to use variables to make your queries easier to reuse. For example, instead of specifying the merchant ID directly in the query, you can use a variable in the query and pass in the merchant ID separately.

  • Learn how to use pagination to retrieve paged responses.