Learn about API Explorer features and how to use API Explorer to test Square APIs.
API Explorer is an interactive web application you can use to build, view, and send HTTP requests that call Square APIs. API Explorer lets you test your requests using actual Sandbox or production resources in your account such as customers, orders, and catalog objects.
You can also use API Explorer to quickly populate resources in your account. You can then interact with the new resources in the Square Dashboard. For example, if you use API Explorer to create a customer in the Sandbox, the customer is displayed in the Sandbox Square Dashboard.
To interact with resources in your account using pre-populated access tokens and resource IDs, you must sign in to API Explorer with your Square account. If you don't have an account, follow the Get Started steps to quickly create a free account and an application. Your account must contain at least one application.
Important
Don't share access tokens. They can be used to impersonate the account owner and gain access to account resources.
API Explorer supports only publicly available Square APIs. The following APIs, SDKs, and plugins aren't supported:
- Mobile APIs, SDKs, and plugins:
- Reader SDK
- Point of Sale API
- In-App Payments SDK and plugins
- Web Payments SDK
- Mobile APIs, SDKs, and plugins:
Deprecated Square APIs might not be available.
API Explorer provides many features that help you build and test HTTP requests that call Square APIs.
1. Sandbox and Production toggle
If you're signed in to your Square account, you can choose to work with the Sandbox or the Production environment for your account. The Sandbox is an isolated server environment provisioned for each Sandbox test account. When you created an account, Square created a default test account for you.
Square recommends using the Sandbox for testing. For more information, see Square Sandbox.
2. API and endpoint selector
Select the Square API category and endpoint that you want to try. API Explorer displays the HTTP method, path, and description for the selected endpoint. If the endpoint requires a URL parameter or request body, or if it supports query parameters, API Explorer displays fields where you can provide values.
3. Share API link
Select the icon to create a link that includes the API endpoint and all parameters you entered so you can share the API request with others. Note that the link doesn't include the access token you used.
4. Dynamic requests
API Explorer provides a boilerplate request for each endpoint. As you enter values for the request in the page form, API Explorer automatically updates the contents of the Request pane. This pane also contains copy, expand, and run buttons.
5. Real-time responses
If you're signed in to your Square account, the Response pane displays the response for the requests that you run. This pane also contains copy and expand buttons.
After you run a request, the pane displays a View Logs link that opens the Developer Console and shows the API logs for your application.
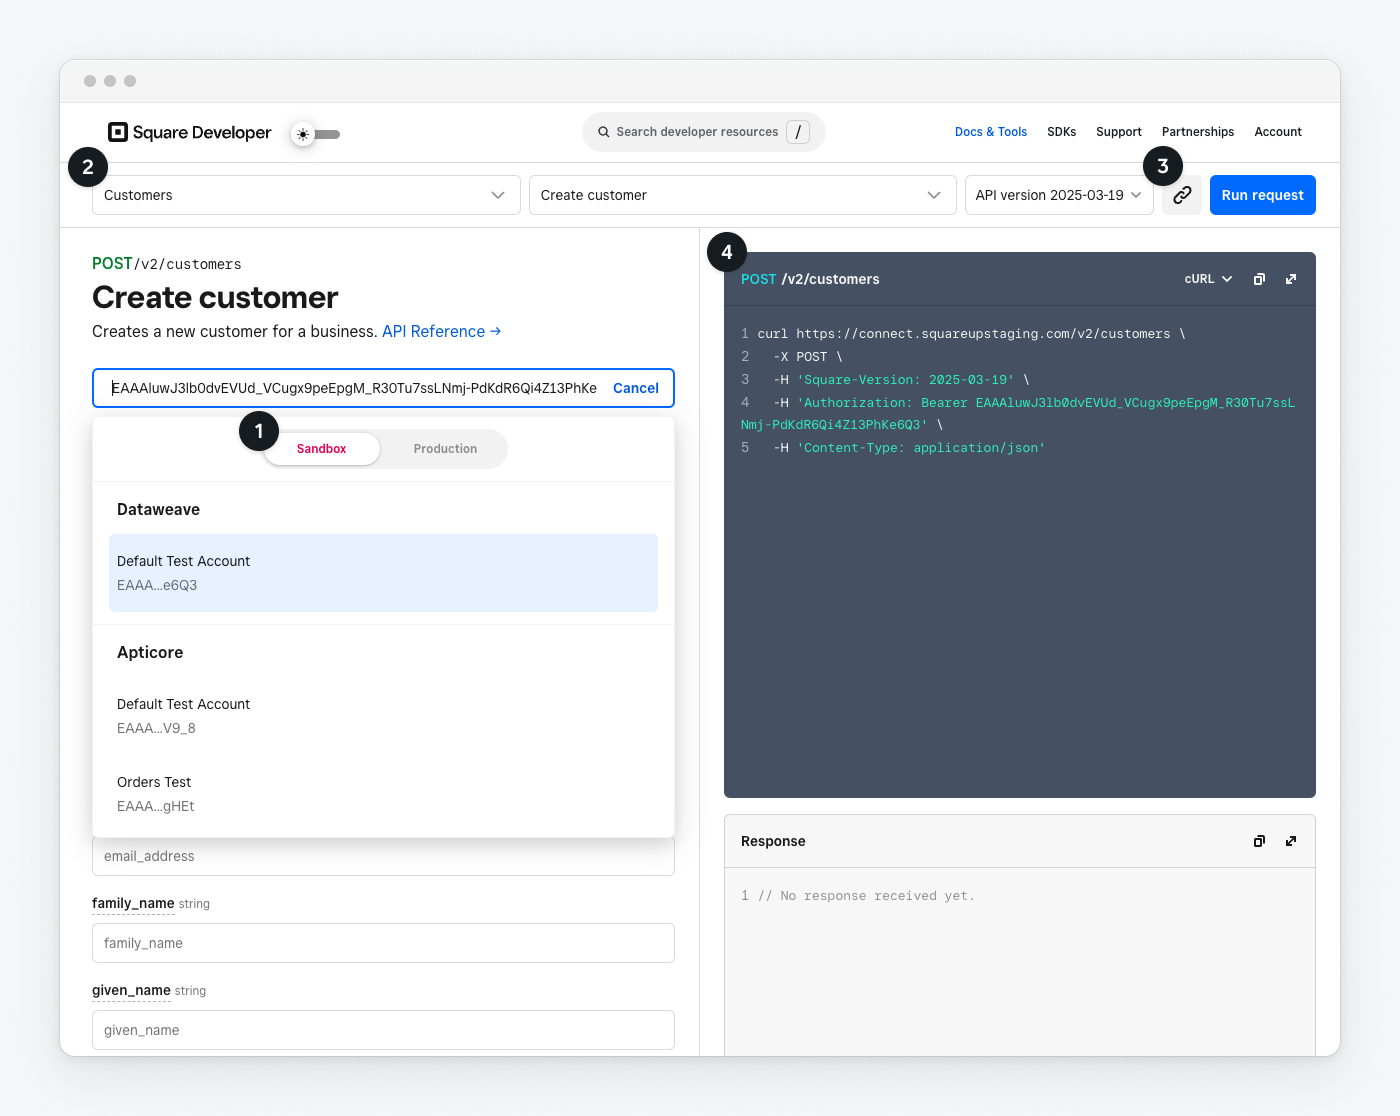
6. Access token selector
If you're signed in to your Square account, you can select an access token to use for your requests in the Square Sandbox or production environment. Access tokens are used to grant read and write permissions to resources in a Square account. For more information, see Test access permissions.
Important
Don't share access tokens. They can be used to impersonate the account owner and gain access to account resources.
7. API version selector
Select the Square API version to use for the request. By default, API Explorer uses the latest API version, but you can choose an earlier version. This feature is useful for testing an application that's based on an earlier API version and for testing API changes before you update an application to a later API version. For more information, see Versioning in Square APIs and Release notes for Square APIs and SDKs.
8. Language selector for requests
Select the programming language that API Explorer uses for the request. API Explorer provides requests in cURL and languages for Square SDK platforms. For more information, see Generate language-specific requests for your applications.
Each endpoint description includes an API Reference link that opens the endpoint documentation in the Square API Reference.
Each parameter and attribute can also display a description in a tooltip:
- For a request, choose the attribute name in the page form. If the attribute is an object data type, you can choose the object name.
- For a response, choose the attribute name in the Response pane.
Did you know?
In the Square API Reference and from code blocks in guides, you can use the Try in API Explorer button to open the endpoint in API Explorer.
Specific field types provide inline tools that make it easier to enter values:
Idempotency key generator - For
idempotency_keyvalues, you can generate a random ID for the request. Using an idempotency key guarantees that Square processes a request only once, even if you send the same request multiple times. For more information, see Idempotency.Payment token and card-on-file test values - When creating a payment in the Sandbox, you can select a test payment token or card on file for the
source_idvalue. You can also enter a payment token that you obtain using one of the Sandbox test values or the ID of a card on file or a gift card. For more information, see Payment tokens for testing the Payments API.Prepopulated resource IDs - API Explorer prepopulates some fields that contain resource IDs, such as
customer_id.File upload utility - Fields that represent image files and other file formats include a file selector that you can use to select and upload a local file.
Typeahead search for enum values - Fields that represent
enumvalues provide typeahead search suggestions that make it easier to find supported values. You can use your mouse to select a value or use the down-arrow key on the keyboard followed by Enter or Return.Formatted timestamp examples - Many fields that represent
timestampvalues display example values that use the supported RFC 3339 format (for example,2022-07-30T21:59:15.286Z). For more information, see Working with Dates.
You can select an API endpoint, enter parameters for the API call, and then send that API request as a link to API Explorer so others can run your request. Note that the link doesn't include the access token you used.
In addition to cURL, API Explorer supports languages that correspond to Square SDK platforms. You can select a programming language in the Request pane to generate language-specific requests that you can paste into your applications. For languages that correspond to strongly typed Square SDKs (such as Java, PHP, and C#), API Explorer uses the appropriate data models and syntax for the requests.
Note
You can also select a programming language on the API Explorer home page to view API requests in your preferred language by default instead of cURL.
Requests generated by API Explorer should work as though in your application, assuming that the application is ready to call the Square APIs. For example, your application must be set up to use the target Square SDK and your code must initialize the SDK client object. After you paste the request from API Explorer into your application, you can add application-specific logic for handling success and failure conditions in your response code blocks.
All Square API requests require a bearer access token in the Authorization header that grants permissions to Square resources, such as orders and customers. If you're signed in to your Square account, the Access Token selector provides a list of access tokens associated with your account.
When the Production environment is selected, the selector displays the production access tokens for your applications. When Sandbox is selected, the selector displays the Sandbox access tokens for the test accounts associated with your applications, including the default test account. If you select an expired access token, you can renew the token with one click.
Important
Don't share access tokens. They can be used to impersonate the account owner and gain access to account resources.
The access token for the default test account is granted full permissions to all of your Sandbox resources. To test the OAuth permissions required by your application, use access tokens that allow specific permissions, check the responses, and make sure that your application handles success and failure scenarios. For this testing, you can select an access token for Sandbox test accounts that you created and configured in the Developer Console. Alternatively, you can paste an access token that you obtain through the OAuth API. For more information, see Access Tokens and Other Square Credentials.
Note
In the Sandbox, the application and default test account are issued the same access token.
The following procedure describes how to use API Explorer to send simple GET and POST requests to Square APIs. For more information about working with Square APIs, see Using the REST API.
In your web browser, sign in to API Explorer with your Square account.
From the Select API menu, choose an API.
From the Select token box, choose an access token to use in the
Authorizationheader of your requests.For this exercise, keep Sandbox selected. Square recommends using the Square Sandbox to test Square APIs when possible. For more information, see Test access permissions.
Now you're ready to send requests to Square APIs.
On the Select API menu, choose Locations. By default, this loads the
ListLocationsendpoint.API Explorer displays the HTTP method and path for the endpoint, along with a description and link to the endpoint documentation in the Square API Reference.
Note the Request and Response panes:
The Request pane displays a cURL request that includes the endpoint URL and required headers. cURL is selected by default, but you can optionally select a language for supported Square SDK platforms. For more information, see Generate language-specific requests for your applications.
The Response pane displays the JSON response after you run the request.
To run the request, choose Run Request at the top of the page:
If the request succeeds, the API returns a
200status code and a JSON object that represents your locations. The response should contain the location that was automatically added to your Sandbox environment.If the request fails, the API returns an error status code and any errors that occurred during the request.
Did you know?
To view the request or response in a larger window, choose the expand button in the Request or Response pane.
Many endpoints accept path parameters, query parameters, or a request body. For these endpoints, API Explorer displays fields where you can provide parameter and property values. The information you provide is dynamically added to the request.
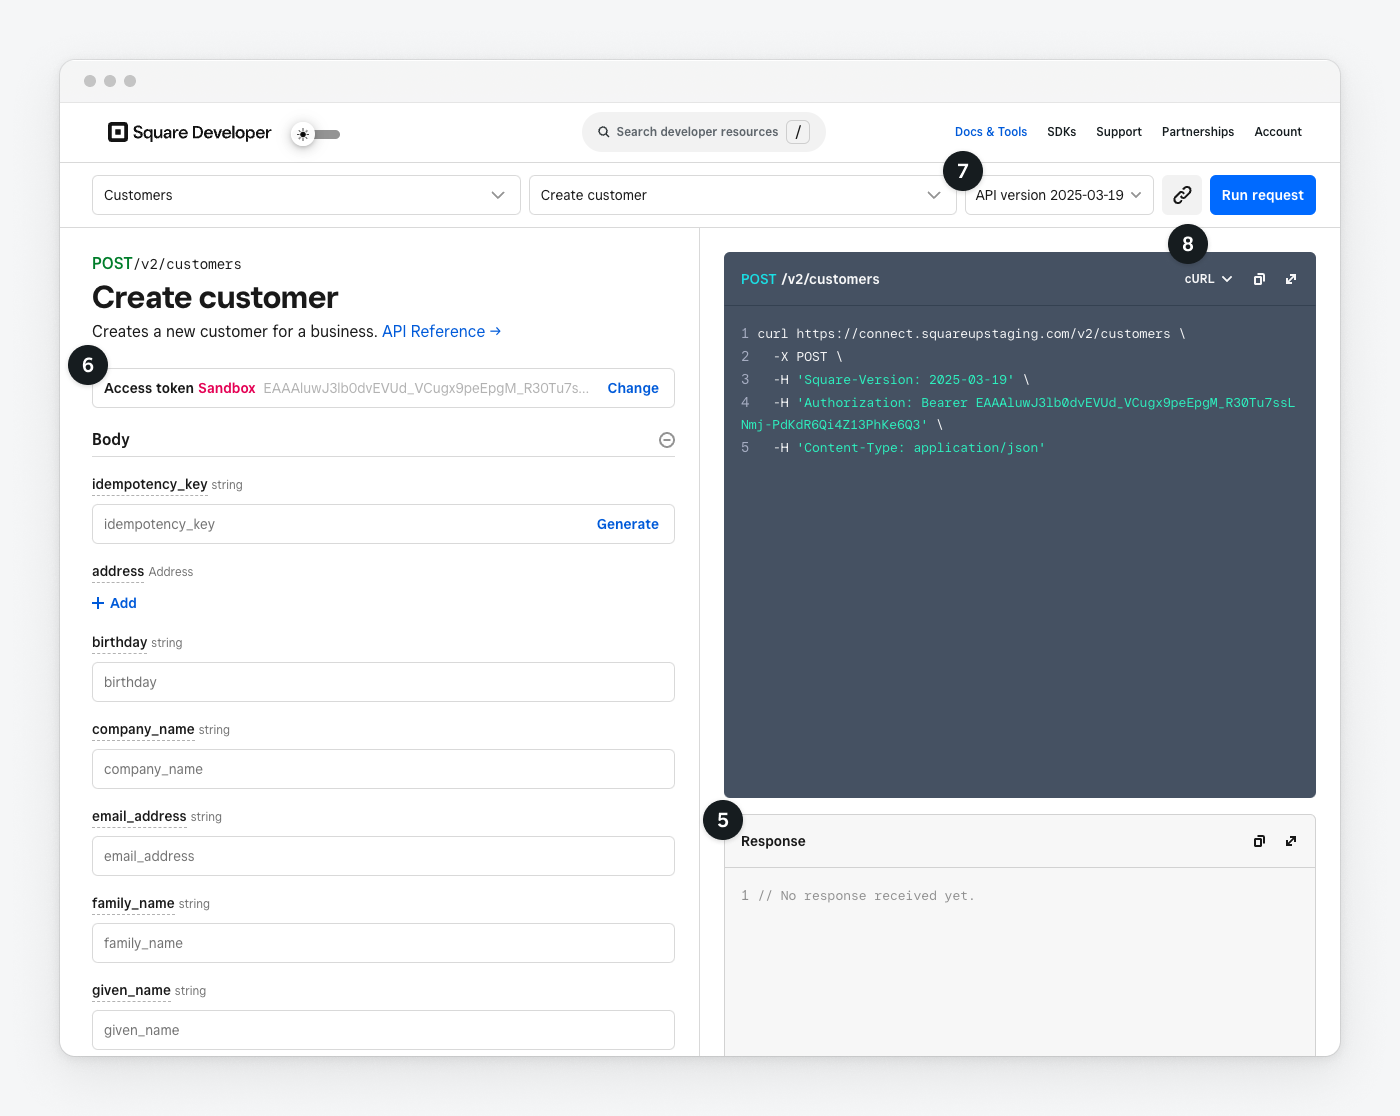
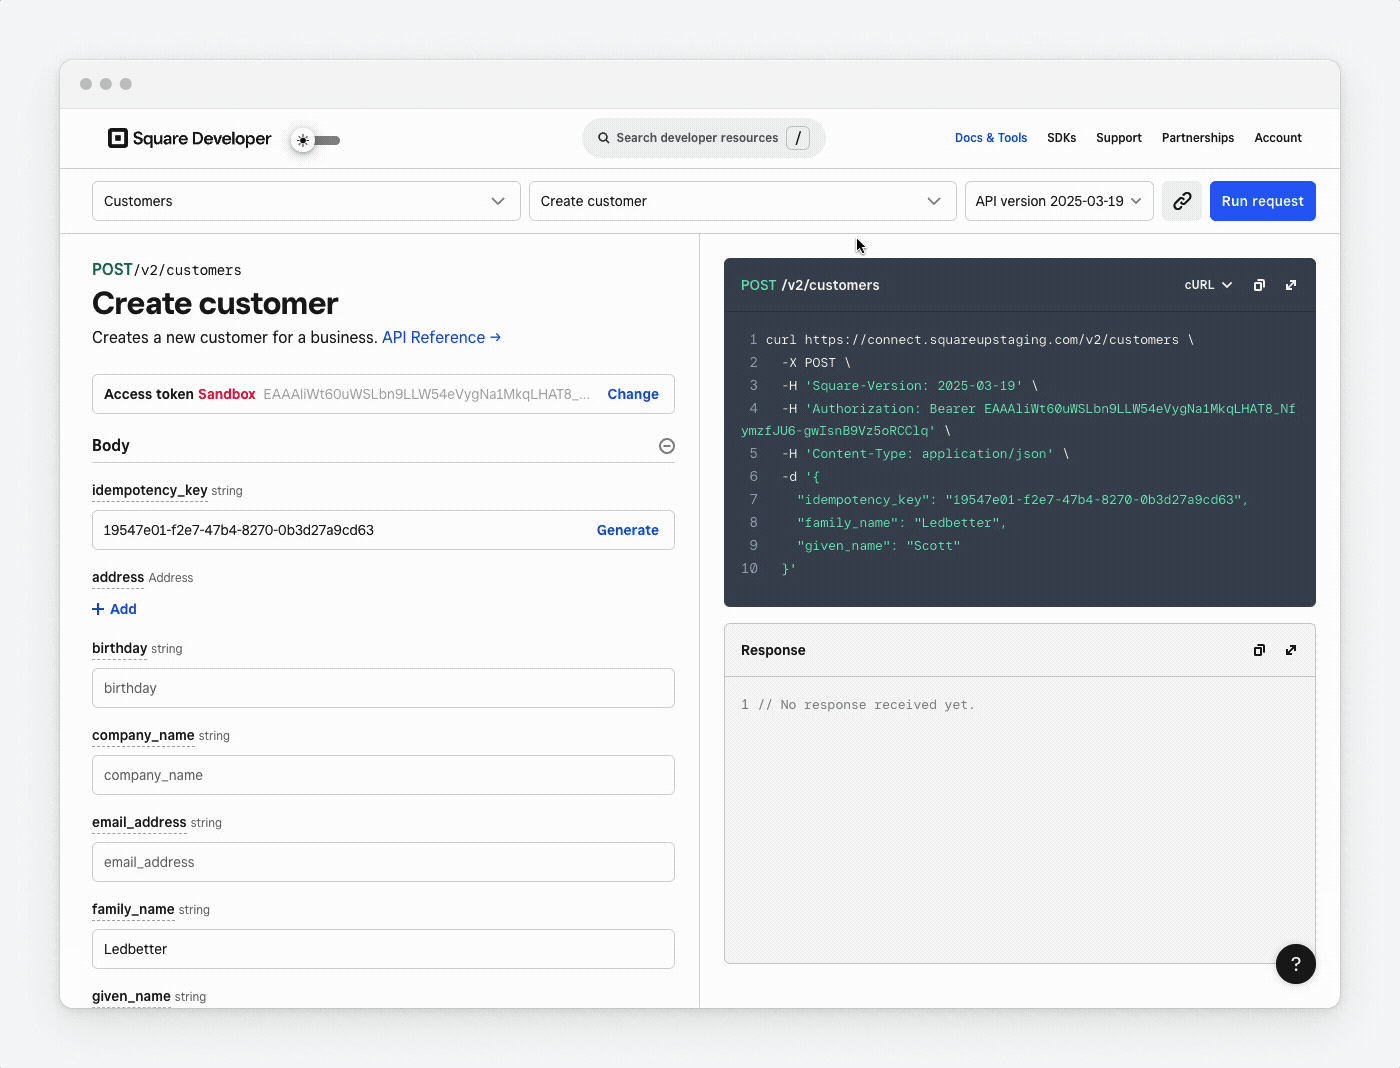
Select Customers and Create customer. Note that the Request pane displays a partial request that contains an empty body.
The page form displays fields for all required and optional properties in the request. If the property is an object data type, choose Add to expand it.
- To see the description for a property, choose the property name.
- To see the description for an object, choose the object name. For example, for the
addressproperty, choose Address.
Enter a value for at least one of the following fields:
given_name,family_name,company_name,email_address, orphone_number.For idempotency_key, choose Generate. This generates a random GUID that represents a unique ID for this request.
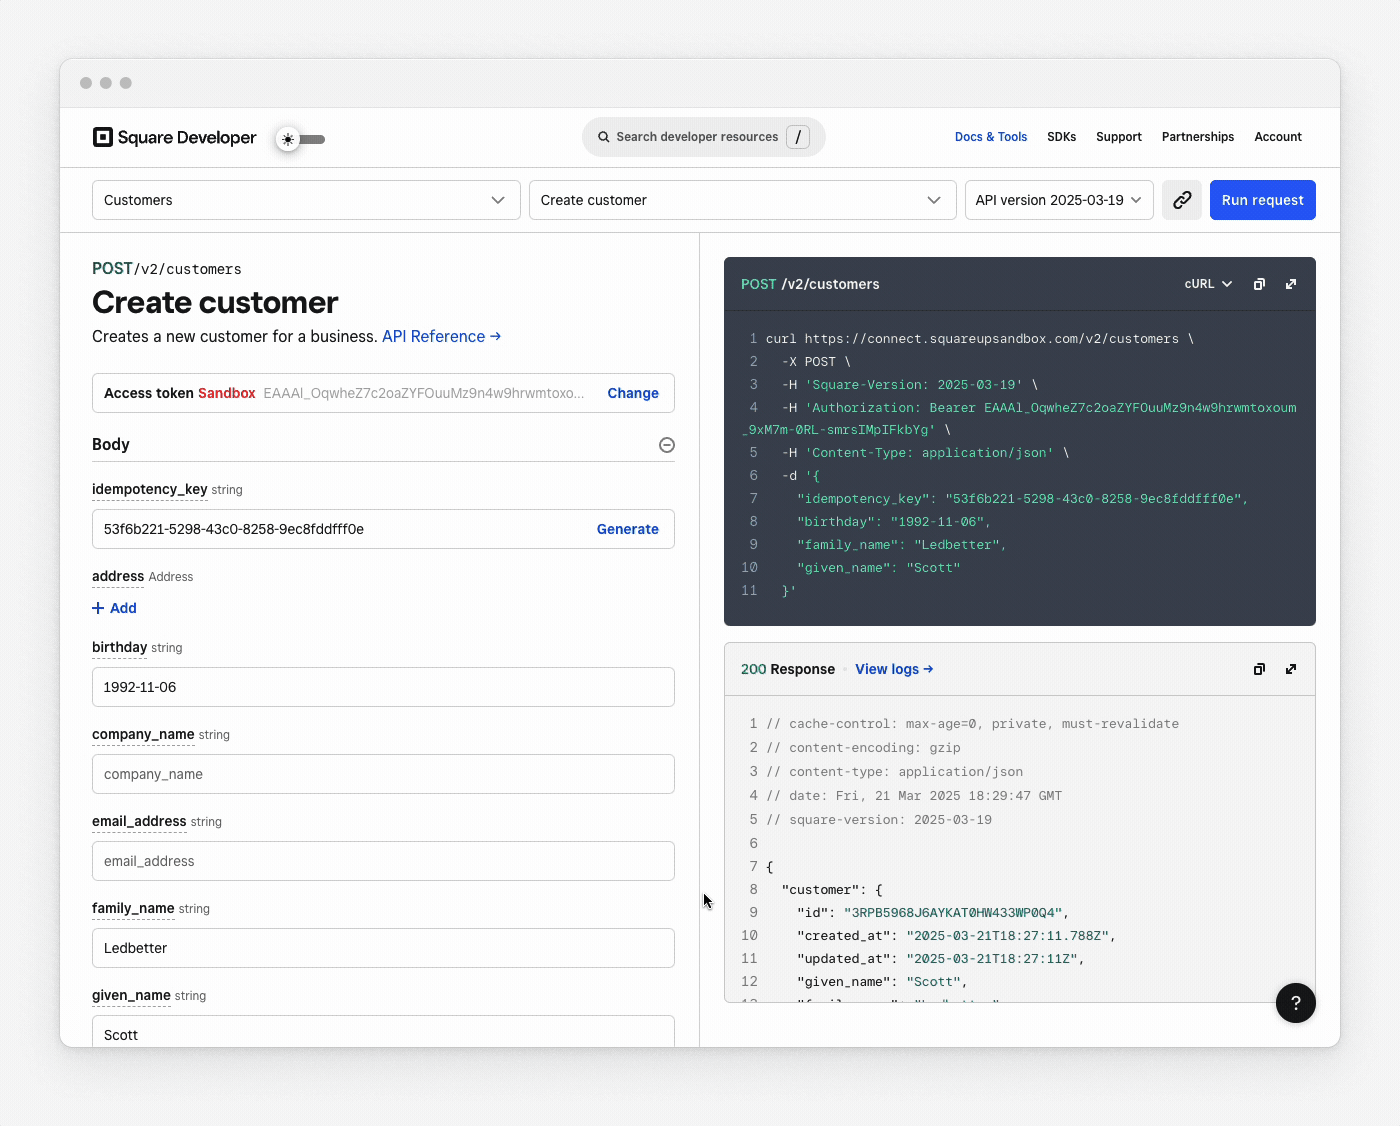
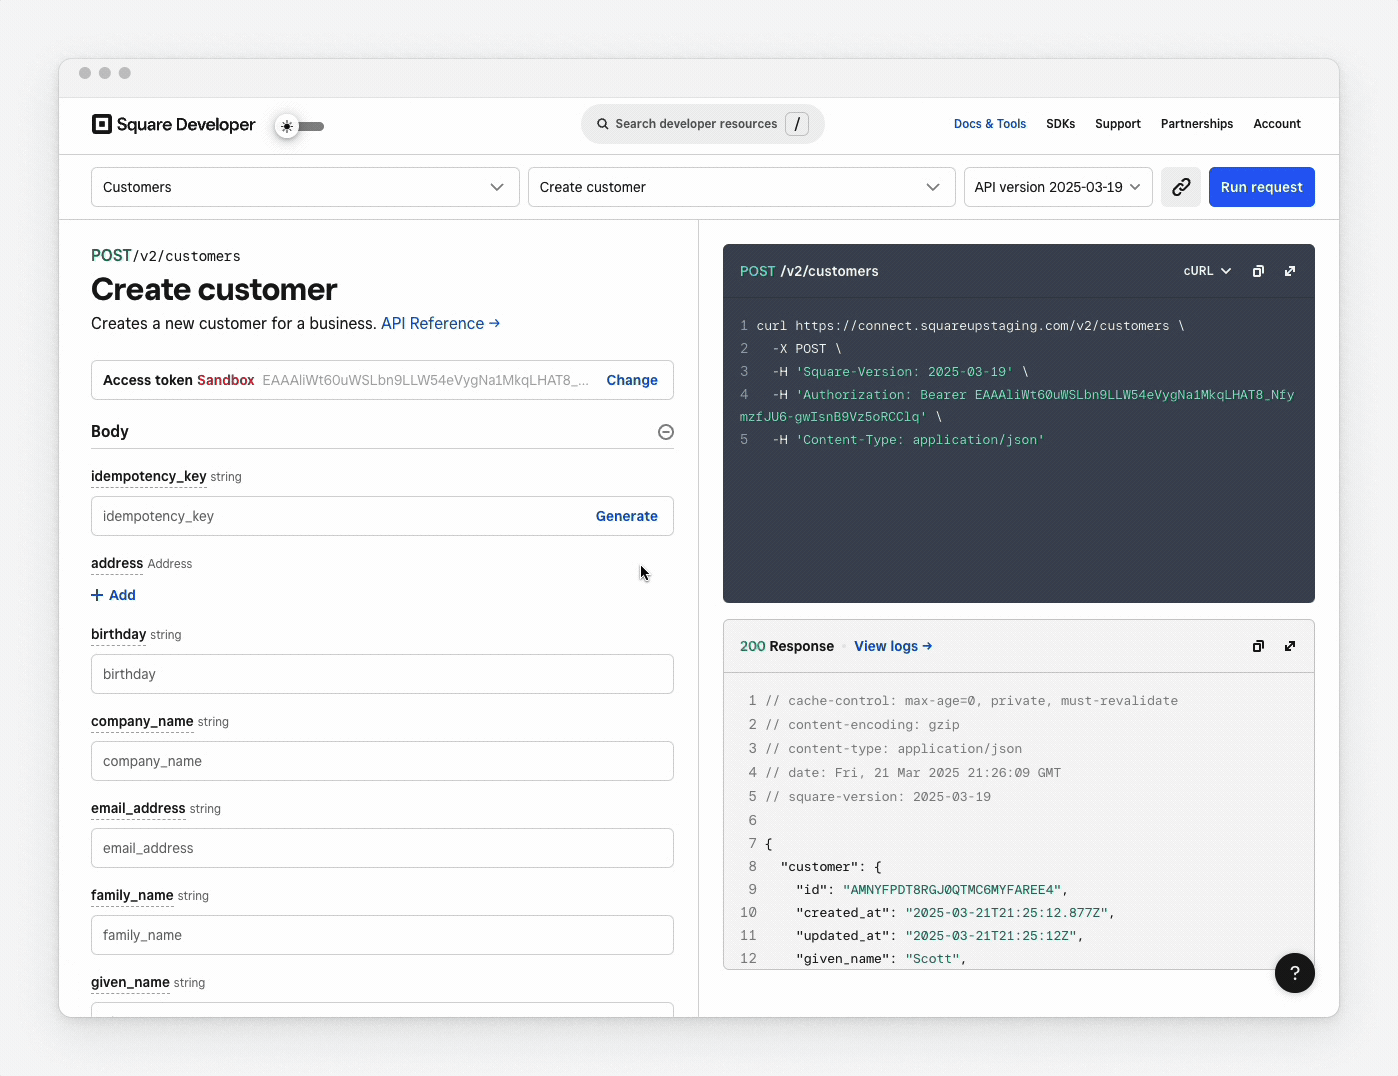
Run the request:
If the request succeeds, the API returns a
200status code and a JSON object that represents the new customer.If the request fails, the API returns an error status code and any errors that occurred during the request.
To view the new customer in the Sandbox Square Dashboard:
- Open the Developer Console.
- On the Sandbox Test Accounts page, choose Open for your test account.
- In the Sandbox Square Dashboard, in the left pane, choose Marketing & loyalty, and then choose Customer directory.