Applies to: Web Payments SDK | Payments API
Learn how to take ACH bank transfer payments in a web client with the Web Payments SDK.
You can add a payment method to the application you built using the quickstart project sample in Web Payments SDK Quickstart to integrate the Web Payments SDK into your application.
The following steps add code to the application you created from the quickstart project sample. If you haven't created an application using the quickstart, you need to do so before completing these steps.
Square supports instant authentication through Plaid for verifying a buyer's bank account before making an ACH payment. Plaid lets your application quickly authenticate the bank account and uses the Web Payments SDK to connect to the ACH network to accept payments.
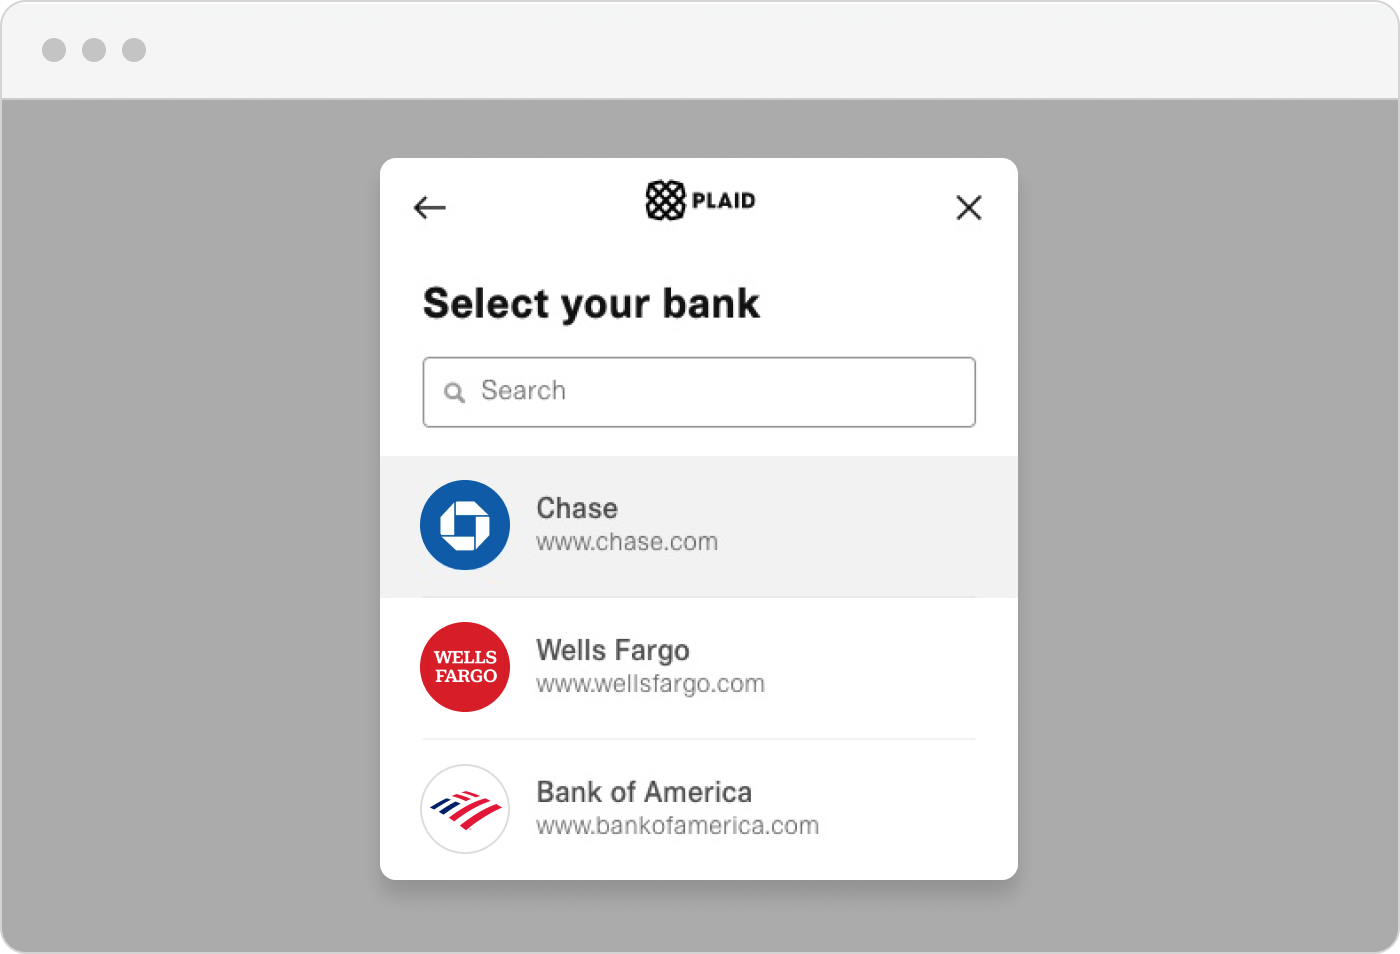
The following is the Plaid window that is rendered by the Web Payments SDK:
You can find a complete example of the code on GitHub.
Important
- ACH bank transfers are only supported by the Web Payments SDK and the Payments API in the United States. For more information, see Supported Payment Methods by Country.
- Square is required to capture authorization for any one-time or recurring ACH payments. This authorization must appear as part of the payment flow for an application. Buyers accept authorizations by interacting with a user interface element of the payment form, such as a “Pay” or “Submit” button.
The following steps involve updating index.html in the root directory of the application to add the ACH payment method.
The following code attaches the ACH method to the page:
Add the following HTML elements to the body of index.html before the existing card payment elements:
 <fieldset class="buyer-inputs">
   <input
     type="text"
     autocomplete="given-name"
     aria-required="true"
     aria-label="First Name"
     required="required"
     placeholder="Given Name"
     name="givenName"
     spellcheck="false"
   />

   <input
     type="text"
     autocomplete="family-name"
     aria-required="true"
     aria-label="Last Name"
     required="required"
     placeholder="Family Name"
     name="familyName"
     spellcheck="false"
   />
 </fieldset>
 <button id="ach-button">Pay with Bank Account</button>
The HTML for the body of index.html should look like the following:
<body>
  <form id="payment-form">
     <fieldset class="buyer-inputs">
      <input
        type="text"
        autocomplete="given-name"
        aria-required="true"
        aria-label="First Name"
        required="required"
        placeholder="Given Name"
        name="givenName"
        spellcheck="false"
      />

      <input
        type="text"
        autocomplete="family-name"
        aria-required="true"
        aria-label="Last Name"
        required="required"
        placeholder="Family Name"
        name="familyName"
        spellcheck="false"
      />
    </fieldset>
    <button id="ach-button" type="button">Pay with Bank Account</button>
   </form>
  <div id="payment-status-container"></div>
</body>
Add the payments object so that the application can instantiate the ACH payment method instance. Substitute the IDs from the Developer Console for the placeholder
({APPLICATION_ID}and{LOCATION_ID})values:const payments = await Square.payments( applicationId: '{APPLICATION_ID}', locationId: '{LOCATION_ID}');Add an
initializeACHfunction after theinitializeCardfunction in the<script>tag.In the options for initializing the ACH payment method, add the redirectURI and transactionId parameters to the
payments.achobject property. TheredirectURIcannot contain query parameters; if they're present, an error is returned.The
redirectURIrepopulates the payment flow and reinitializes the Web Payments SDK payment form from either the URI or thetransactionId. ThetransactionIdis added to the URI as a query parameter.async function initializeACH(payments) { const ach = await payments.ach({ redirectURI, transactionId }); // Note: ACH doesn't have an .attach(...) method // the ACH auth flow is triggered by .tokenize(...) return ach; }In the
DOMContentLoadedevent listener, add code to initialize the ACH payment method:let ach;ach = await initializeACH(payments);
After adding the previous code, the listener should look like the following:
async function initializeACH(payments); {
     let card;
     let ach;
     try {
       card = await initializeCard(payments);
       ach = await initializeACH(payments);
     } catch (e) {
       console.error('Initializing Card or ACH Authorization failed.', e);
       return;
     }
}
Test the application
Start your local test server and navigate to it in your browser. If you're following the quickstart guide steps in the README, the default URL is http://localhost:3000.

Success
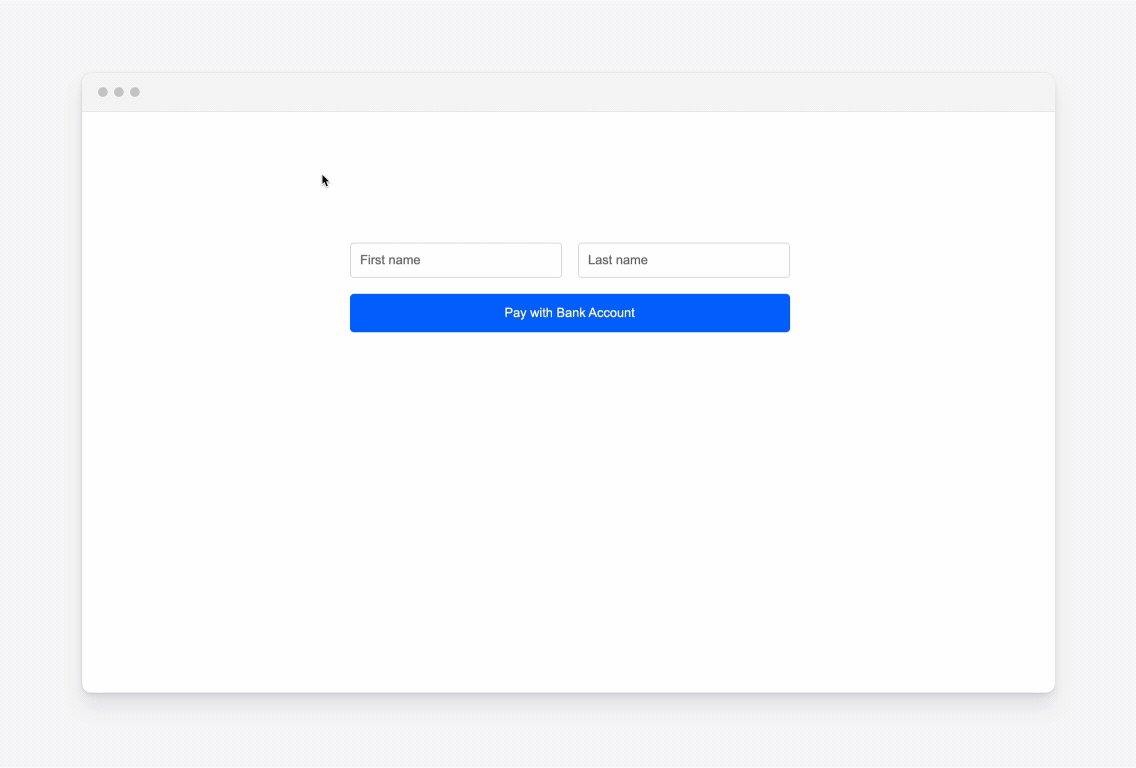
You see a form that collects the buyer's first name and last name along with a button to start an ACH bank transfer.
Include the
ontokenizationevent listener to get access to the payment token result.Add the following code after
// Checkpoint 2in theDOMContentLoadedevent listener function:ach.addEventListener(`ontokenization`, function (event) { const { tokenResult, error } = event.detail; if (error) { // add code here to handle error } else if (tokenResult.status == 'OK') { const paymentResults = await createPayment(tokenResult.token); } });The
ontokenizationevent fires after a buyer authorizes a payment using Plaid.Update the
tokenizefunction to:- Take in a second optional
optionsparameter. - Update the
paymentMethod.tokenizecall to include theoptionsparameter.
function tokenize(paymentMethod, options = {}) { paymentMethod.tokenize(options); }- Take in a second optional
Add the following two helper functions after the
tokenizefunction in the<script>tag:function getBillingContact(form) { const formData = new FormData(form); // It's expected that the developer performs form field validation, // which doesn't occur in this example. return { givenName: formData.get('givenName'), familyName: formData.get('familyName'), }; } function getACHOptions(form) { const billingContact = getBillingContact(form); const accountHolderName = `${billingContact.givenName} ${billingContact.familyName}`; return { accountHolderName, intent: 'CHARGE', amount: '5.00', currency: 'USD' }; }Update the
handlePaymentMethodSubmissionfunction to:- Take in a third
optionsparameter. - Update the
tokenizecall to addoptionsas the second parameter.
async function handlePaymentMethodSubmission( event, paymentMethod, options // Add the options parameter here ) { // update the tokenize function to add an `options` parameter. tokenize(paymentMethod, options); }- Take in a third
Add the following code in the
document.addEventListener('DOMContentLoaded', async function () {function:const achButton = document.getElementById('ach-button'); achButton.addEventListener('click', async function (event) { const paymentForm = document.getElementById('payment-form'); const achOptions = getACHOptions(paymentForm); await handlePaymentMethodSubmission(event, ach, achOptions); // tokenize // ACH with the `accountHolderName` as an option. });Update the
handlePaymentMethodSubmissionfunction to disable theachButtonwhen tokenizing the payment. AddachButton.disabled = true;.async function handlePaymentMethodSubmission(event, paymentMethod, options) { event.preventDefault(); try { // disable the submit button as we await tokenization and make a // payment request. cardButton.disabled = true; achButton.disabled = true; // Add this line. tokenize(paymentMethod, options); } catch (e) { // add code here to handle errors } }Update the
ontokenizationevent listener to re-enable theachButtonduring a failed payment. AddachButton.disabled = false;.ach.addEventListener(`ontokenization`, function (event) { const { tokenResult, error } = event.detail; if (error) { cardButton.disabled = false; achButton.disabled = false; // Add this line. // add code here to handle errors } else if (tokenResult.status === `OK`) { console.log(`got payment token: ${tokenResult.token}`); try { const paymentResults = await createPayment(tokenResult.token); } catch (e) { cardButton.disabled = false; achButton.disabled = false; // add code here to handle errors } } };Add the following
try...catchstatement with theach.tokenize()call to trigger the ACH authentication flow.try { await ach.tokenize({ accountHolderName: 'John Smith', intent: 'CHARGE', amount: '5.00', currency: 'USD' }); } catch (e) { console.error(e); }
Test the application
This test simulates submitting bank account details and confirming the bank debit authorization for the payment.
Navigate to your test service (defaults to http://localhost:3000).
Enter a first and last name.
Choose the Pay with Bank Account button.
In the Plaid dialog box, enter user_good for the name and pass_good for the password. These test values are provided by the Plaid API and might change in the future.
Choose a bank.
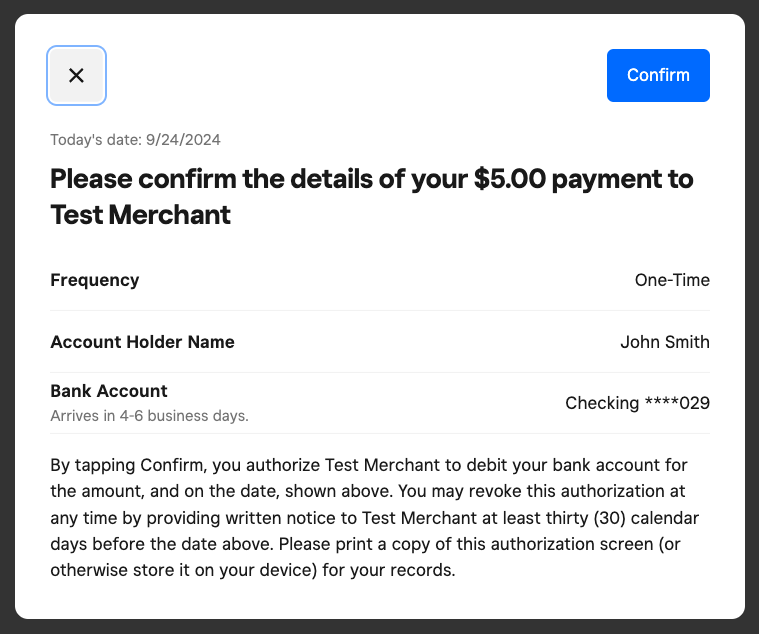
When prompted, confirm the payment details.
Important
If you added your own ACH authorization text in the application, you must remove the text and not add any additional text. The Web Payments SDK provides the ACH authorization text in the user prompt, which contains all the bank transfer authorization instructions for the buyer to follow.
Success
You see the Plaid interface and are able to complete the flow using the test credentials provided at the bottom of the screen. You also confirm the payment details to allow bank account debit authorization. When these steps are completed, your application gets a payment token that's used to take an ACH bank transfer payment on your backend. The payment token that's returned uses the
bauth:prefix.
Add the payment token as the source_id in a new payment request with the amount that the buyer has authorized. Your application can then run the payment request to process the payment.
The following example sends a Payments API CreatePayment request to create a new payment for $5.00 USD:
Create payment
The amount and currency values need to match the payment to be processed with Payments API. The value for amount, unlike the value passed to the ach.tokenize() call, is expressed as a numeric number of cents.
After the application authorizes the buyer's bank account information and processes payments, verify the completed payments with the following developer tools:
Check the Square Dashboard and review the reports on the Transactions page. Note that only completed transactions show up in a report. ACH transactions take about 2-3 days to settle and appear in a report. For more information, see Square Dashboard.
Call the GetPayment endpoint to ensure that bank payments have been processed by reviewing the payment details. For more information about the ACH payment states, see ACH Bank Transfer Payment.
Call the Square GraphQL endpoint to ensure that payments show up in the payments query results. For more information, see Square GraphQL.