
Unlock a Better Mobile Experience with Square GraphQL and PKCE
Streamline the flow of your React Native application
More secure, faster, and streamlined all around.
Now you can build with Square for an improved mobile experience. Functionally, what has historically been impossible to build (or painstakingly time consuming at best) is now easily accessible to all developers with the releases of GraphQL and OAuth Proof Key for Code Exchange (PKCE). With GraphQL and OAuth PKCE you can authorize your app and make API calls directly from the client itself. So bid farewell to “backends for your frontends” and level up your mobile development experience with these new features. PKCE enables your mobile application to retrieve seller access tokens, while GraphQL improves the experience by allowing you to combine multiple API calls into a single request. That’s fewer bytes over the wire, less data munging, and less room for network issues to creep in.
Building your OAuth mobile app with PKCE
In this post, we’ll walk through a sample application that you can clone and use to follow along. This app is built using React-Native, and builds for both iOS / Android. In this example, let’s imagine we are a software company that wants to build a mobile application to help bakeries operate while using Square. This sample app is read-only, but will help the bakeries see some quick information about their different locations and employees, as well as provide a tool to help ensure that all correct items are getting placed into their pickup orders.
You are going to use OAuth PKCE to authorize each new bakery who signs in to get access to your app under their own login in a safe, secure, and reliable way. Then you’ll use GraphQL to make sure the APIs that are called to send over the information to the bakery do so in the thinnest way possible, minimizing load times while maximizing the information they want to see.
Let’s dive in and review some of the basics while we’re at it.
About PKCE: Easily and securely authorize many apps.
In this sample application, called Neon Nexus, we are going to build an onboarding flow that allows multiple bakeries to quickly onboard to your app, connecting securely to Square to sync with all of the data in their merchant account. When Oauth PKCE is supported in your app, any bakery can easily authorize the connection between the information in their Square account and your app.
Let’s look at the steps needed to support PKCE in this app:
Step 1
First, we need a web browser link that a user can click on to take them to the Square sign-in and authorize pages.
The link looks like this:
Application ID
The string sq0idp-0DCsw4zeEMR-LQwExgbdpQ should be the Application ID of your app.
Redirect URL
The http request https://myredirectendpoint.com/callback is the endpoint set up to receive the first callback from Square in the Auth flow.
Authorization Scopes
MERCHANTPROFILE_READ, EMPLOYEES_READ, CUSTOMERS_READ, ORDERS_READ is the list of scopes the app is requesting access for.
State and Code Challenge
The number 12345 is a value created by the client (in this case mobile) that you will need to store for later use, and 123lASDFweraosdifji2341234lksdflj is also a client-generated value.Your client should generate these values using a cryptographic library and adhere to the recommended best Practice in RFC 7636.
The URL Lastly we can use a template string to get all of our values set and construct the URL the user will click on.
Note: In order to have this url exist with the proper dynamic variables (e.g., state and code_challenge), we need to construct those values and place them in the URL when the user clicks on the Authorize Button. The code below demonstrates how we can do this in React-Native.
const triggerLogin = async () => { try { const codeVerifier = generateRandomString(64); const state = generateRandomString(64); const codeChallenge = await sha256(codeVerifier); const authorizationUrl = `${authorizeUrl}&state=${state}&code_challenge=${codeChallenge}`; // The step above, where you set the code verifier, // is super important for the flow to work. // You will setting the values in the application // to be retrieved later on to confirm that it’s you. setLocalParams({codeVerifier, state}); Linking.openURL(authorizationUrl); setOauthError({ didError: false, description: '', }); } catch (e) { setOauthError({ didError: true, description: e, }); console.log('an error happened - check triggerLogin()'); }};
Once the user clicks “authorize”, they will be taken to the Square authorization page:
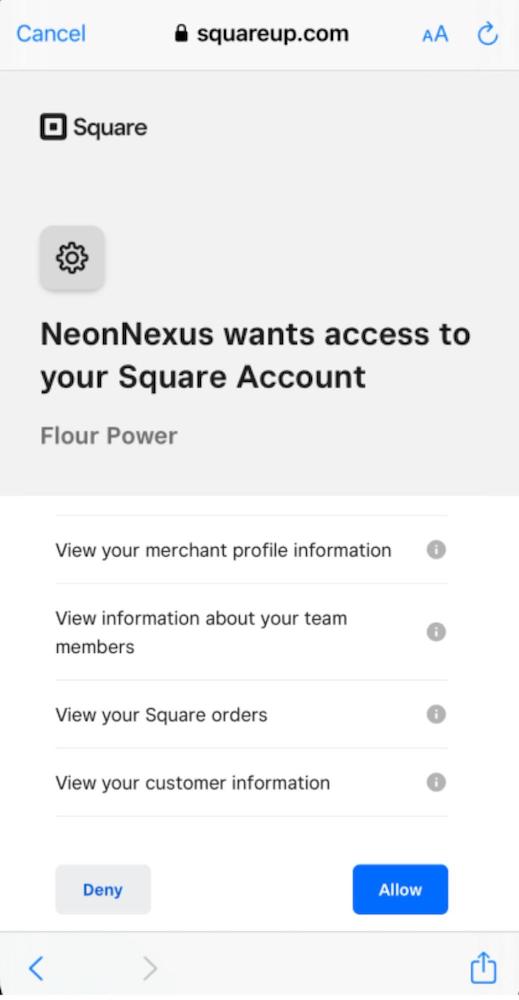
Step 2
This is the step where the bakery owner clicked Allow for the Authorization on the Square authorization gate page, which Square redirects back to our redirect_url. In this case, the redirect points back to our app, and the Square request looks like: https://myredirecturl/callback?code=234lasdkjfals&state=12345.
At this point, Square is sending us back two values: the code and the state. The state value will be used here to check that we are still conversing with Square and have not had our communication interrupted with a “man in the middle” attack or similar. If the state returned by Square does not match the state we created and saved during the previous step, we should stop the flow immediately.
The code value is needed in our request to obtain the token. See the code below:
useEffect(() => { if (routeParams.error) { setOauthError({ didError: true, description: routeParams.error_description, }); } if (routeParams.state !== localParams.state && !hasToken) { setOauthError({ didError: true, description: 'Square state does not match the one we created', }); } if (routeParams.code && !hasToken) { // If we have the Auth Code from the Authorization flow, // we can use this code now to obtain our Access Token // We will also need to use our code verifier that we generated // for the authorization flow. const obtainToken = async () => { const tokenResponse = await fetch( 'https://connect.squareupsandbox.com/oauth2/token', { method: 'POST', headers: { Accept: 'application/json', 'Content-Type': 'application/json', }, body: JSON.stringify({ client_id: config.clientId, grant_type: 'authorization_code', code: routeParams.code, code_verifier: localParams.codeVerifier, redirect_uri: config.redirectUri, short_lived: true, }), }, ); const response = await tokenResponse.json(); // Save some values for use later in our app. SecureSave lets us store these // values encrypted and in a safe manner. // Very important to do for Access and Refresh Token. await SecureSave({ key: 'squareAccessToken', value: response.access_token, }); await SecureSave({ key: 'squareRefreshToken', value: response.refresh_token, }); await AsyncStorage.setItem('merchantId', response.merchant_id); setHasToken(true); setOauthError({ didError: false, description: '', }); routeParams.code = null; }; obtainToken(); }}, [config, localParams, routeParams, setHasToken, hasToken]);
Success! At this point, we have an access token returned from the PKCE flow that is scoped to read the Location, Merchant, Orders, Customers, and Employee data that is pulled from the Square APIs. The access token offers the bakery owner (Flour Power) the permissions to leverage the app for their bakery’s data on Square, including information around the names of the employees assigned at each physical location and their permissions, leveraging the Location API and Employees API. An error would occur if the app builder tried to use the token to query the Square API for anything else.
Summarizing what we just learned about PKCE
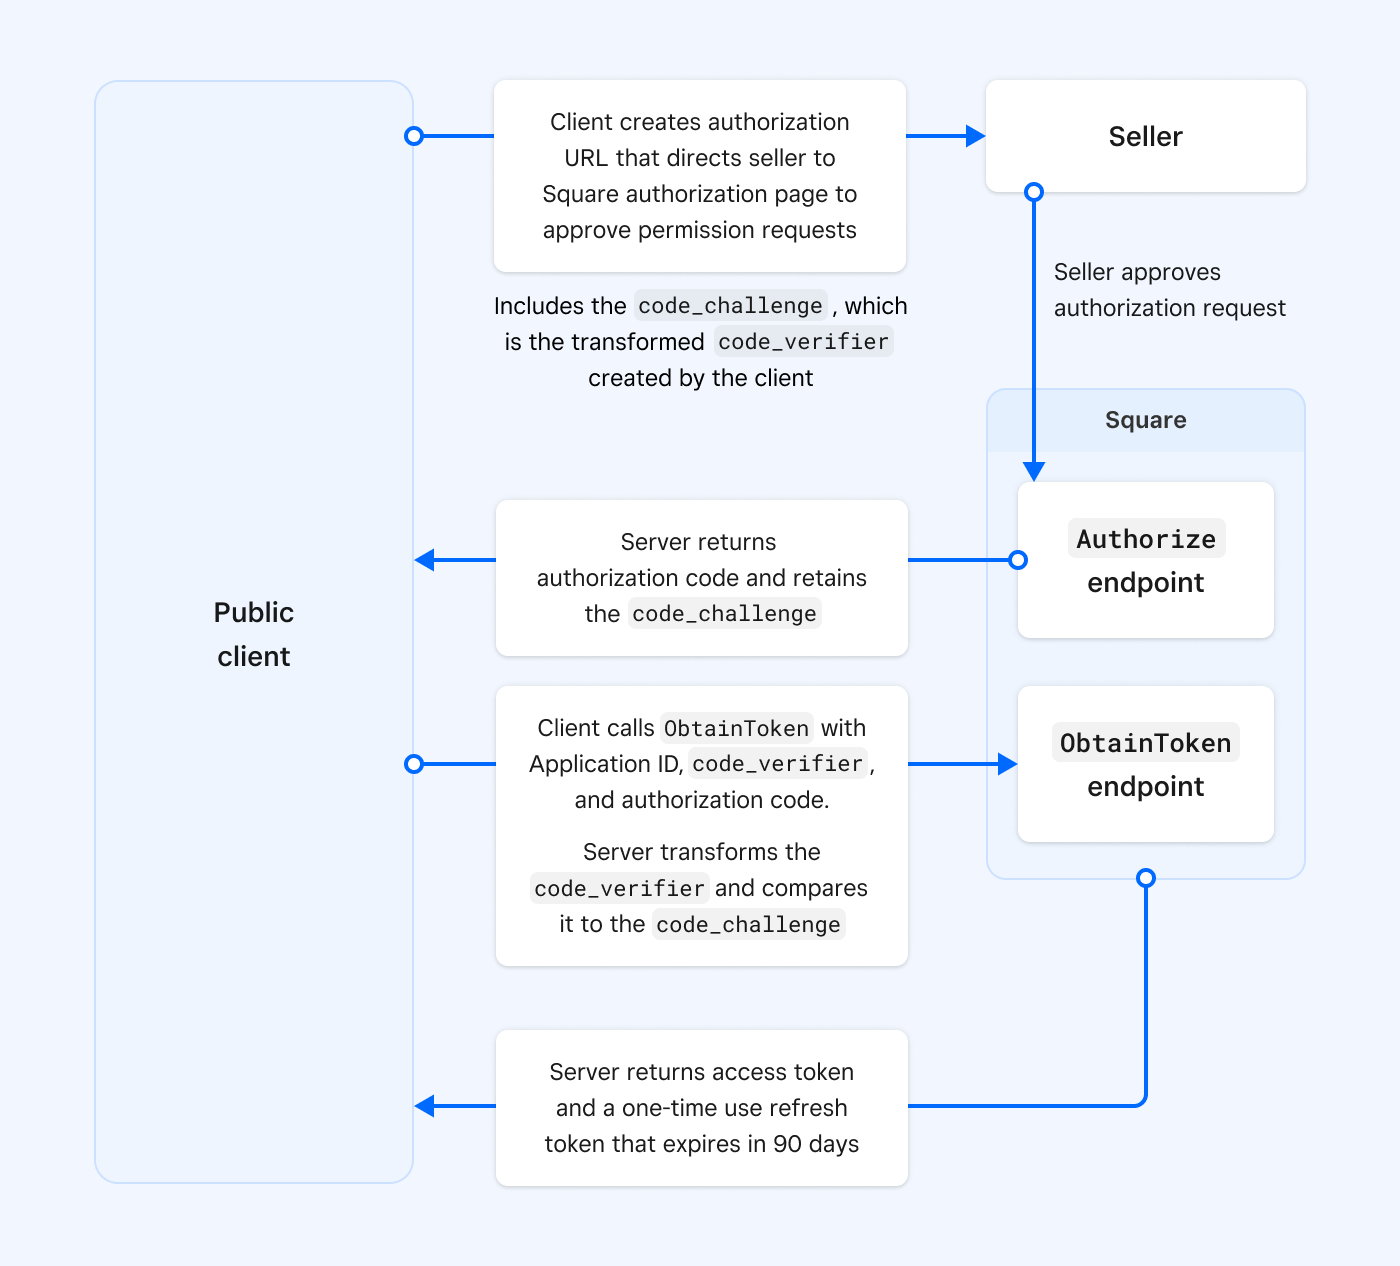
As a little refresher at a high level, Proof Key for Code Exchange (PKCE) is an OAuth extension that enables clients to securely complete the OAuth flow without having to store and use a client_secret , but rather leverage a code_challenge and code_verifier to ensure only the originator of the flow has the keys. This is done by replacing the client secret with the code verifier and code challenge, both created by the client (in this case, Neon Nexus) when getting an authorization code. The code verifier is then tested when redeeming the authorization code for credentials. Because of this, mobile, desktop, and single-page applications (untrusted clients) can take advantage of this flow to securely obtain access tokens directly on the client.
This diagram should help simplify the steps and code we walked through above:
To learn more or get started, check out the docs.
Please keep one limitation in mind: To give the application the keys to access merchant data, you need to be an account owner or admin with permissions to authorize an application. Therefore, using PKCE without a backend server (like we have shown above), is ideal for situations where there is only one owner or admin taking actions. Because the authorization is taking place on the device and not on a trusted backend server, you will not be able to limit the privileges that the authorizing user receives.
For more best practices on OAuth, you can check out our handy OAuth best practices guide.
Building with GraphQL: Leverage data from Square in our app.
Going back to our sample app, your user completes the login flow that you’ve securely enabled for them and they are dropped into the bakery app where they see their merchant, location, and employee data. The app will allow the bakery owner to leverage data from Square to manage their whole operation from your app, letting them look into the different locations of their bakery and manage employees. In the next screen, the bakery owner sees the orders that were placed by customers in each of those locations.
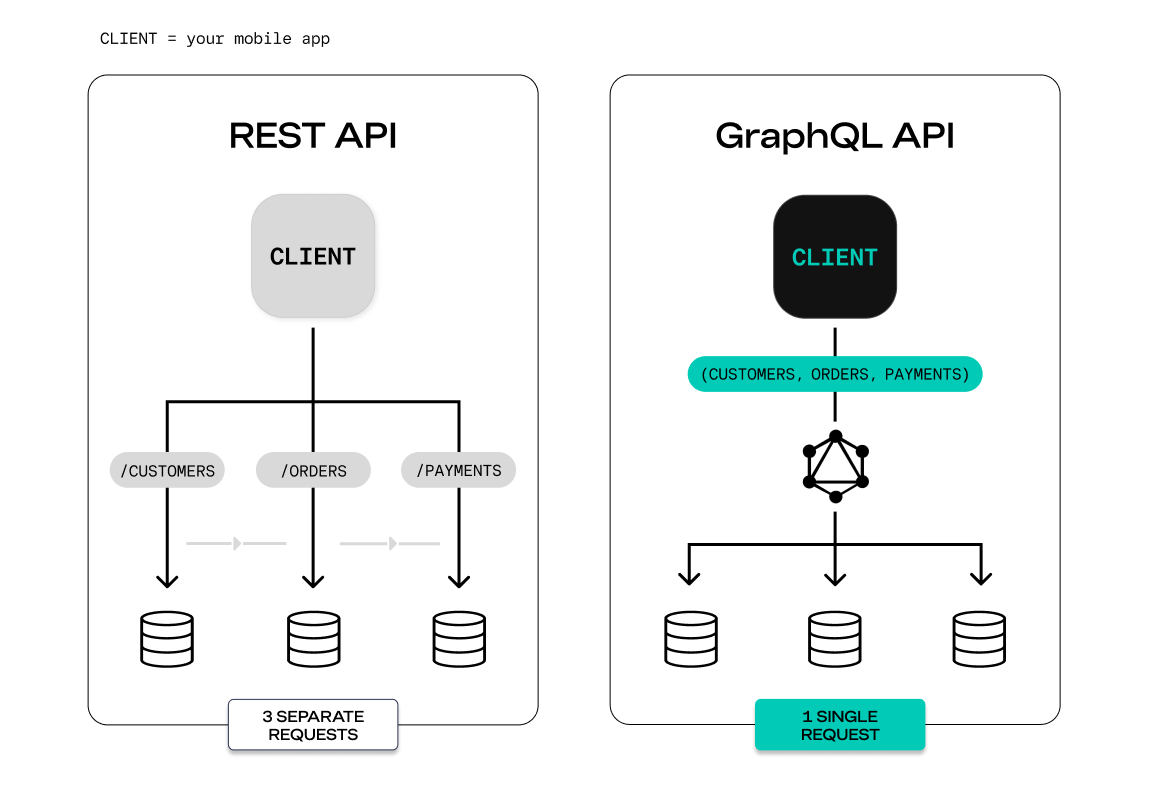
Using GraphQL, the bakery owner can receive all orders, customers, and payment information with one very quick GraphQL request. Using the Square REST API, we would need to chain these requests, making three different API calls from the client. Not only that, but think about all the superfluous data we would be retrieving during those API calls when all we needed was the names from both the Customers API and the Orders API.
In the code block below, the function graphqlRequest() is what makes the actual request.
export const graphqlListOrders = async ({ locationId, merchantId,}: { locationId: string; merchantId: string;}) => { const query = ` { orders(filter: { merchantId: { equalToAnyOf: ["${merchantId}"] } location: { equalToAnyOf: ["${locationId}"] } }) { nodes { id lineItems { uid name quantity } customer { givenName } } } } `; const {orders} = await graphqlRequest(query); return orders;};// In this code snippet, you may notice that 'query' in the previous// snippet is set in the body for this request. // Even though we are only reading data, it's still technically a POST// request because with GraphQL the query goes in the body of the request.
To get the same data using the REST API, the request would look something like this.
export const queryData = async (id: string) => { if (id) { const locationResponse = await fetch( `https://connect.squareupsandbox.com/v2/locations/${id}`, { method: 'GET', headers: { Authorization: `Bearer ${await SecureGet('squareAccessToken')}`, }, }, ); const {location} = await locationResponse.json(); const orderResponse = await fetch( 'https://connect.squareupsandbox.com/v2/orders/search', { method: 'POST', headers: { Authorization: `Bearer ${await SecureGet('squareAccessToken')}`, }, body: JSON.stringify({ location_ids[`${location.id}`] }); }, ); const {orders} = await orderResponse.json(); // Loop thourgh each of the orders and get the customer ID // for the order, then you would need to either loop through all the // customer ID's and call the retrieve customer endpoint for each ID // GraphQL is looking much easier and nicer right now 🥵 }};
As demonstrated in the diagram above with REST, each individual API is called separately and all the endpoints for that API are transferred together. With GraphQL, the request is consolidated into one streamlined request.
About GraphQL: More efficient than REST.
Now that you’ve seen it in action, for a more general overview, GraphQL is a statically typed and declarative query language that is an efficient way to fetch data for your app. A turnkey API at its finest, GraphQL lets you more efficiently get data out of the Square platform by only receiving exactly the information that you need. Since some APIs carry more data than others (and some can carry a lot), leveraging GraphQL helps you to streamline your data transfer to build a more efficient system.
GraphQL’s primary benefit comes from a client (like your app) being able to specify exactly what objects and fields they want in a single API call to a single endpoint. Their query is validated against a shared schema, and the GraphQL Server will return exactly and only the data requested by the client — and not a nibble more. GraphQL is particularly impactful for UI to Service calls, where complex multi-type queries can be combined into a single HTTP call. Clients can ask for multiple kinds of data at once, including, from our example, data from both the Orders API and Customers API together. Lastly, statically typed schemas (like GraphQL) enable an ecosystem of developer tooling, are documentation generating, and overall offer computer science magic that makes it easy to use :).
From the latest release, GraphQL is supported by all subgraphs (recently launched with Cards, Inventory, full schema for Payments, and Refunds) which now allows you to retrieve a wider range of more targeted data from a single GraphQL query. The time it takes for graphql-gateway to process queries is also now even shorter, so that a single GraphQL call will be faster than making multiple REST calls.
Check out our GraphQL Explorer (an integrated schema explorer) to test it in action.
In addition to our GraphQL Explorer, there are a lot of other common and fun ways to play with GraphQL, like GraphiQL or GraphQL-Playground, which will allow you to start authoring queries aided by autocomplete and type-aware documentation.
Some other examples, now unlocked, to get you started.
With these powerful tools, there is no limit to the types of apps you can build for sellers using Square. By integrating with both PKCE and GraphQL, your app becomes more efficient by getting rid of the middle “person.” What used to take manual overhead and slow load times should now be quicker on all accords, for many types of apps. Some examples include but are not limited to:
- A mobile reporting app that offers the general manager of a store a comprehensive, end-of-day summary of their daily sales. Historically, this would be clunky to build as a phone app.
- A native point-of-sale mobile app for businesses to accept card payments using the ReaderSDK, with their catalog and inventory embedded into the experiences on top of the Square APIs.
- An internal tool for a large retailer to receive a single-page application that holds all of their data for internal reporting and visibility. PKCE allows account owners to access their data, and GraphQL streamlines the data flow.
We’re looking forward to seeing what you build. And in the meantime, if you want to start practicing, check out the GitHub repository of our sample app to begin playing around with what you can do with PKCE and GraphQL.
Authored By


