Sandbox Dashboard part 3: Customers
A continuation on how to make a dashboard for your sandbox developer account
This is the third post in our series illustrating how to make a dashboard for your sandbox developer account. For more context, take a peek at Part 1 and Part 2.
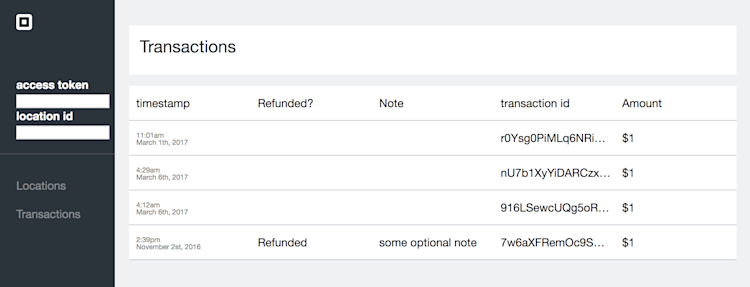
In previous posts, we added the ability to view location information as well as a full record of all transactions. For the third installment of our Sandbox Dashboard series, we’ll add functionality to display and interact with our sandbox customers. Let’s take a look at where we ended up last time:

Adding additional structure
First things first, we’re going to add a new item in the navigation bar so that we can access the customers page, as well as create a new php file for all the code. Now our navbar looks like this:
<div class="nav-item">
	<a href="/locations.php">Locations</a>
	<a href="/transactions.php">Transactions</a>
	<a href="/customers.php">Customers</a>
</div>
To display the customers, we can take a similar approach to the transaction page by using a table of all customers and their associated information. To do this, we can call the ListCustomers endpoint and iterate though the array of customers that gets returned.
<?php
	//Use the access token from the session to access the API
	SquareConnect\Configuration::getDefaultConfiguration()->setAccessToken($_SESSION['at']);
	$customersApi = new SquareConnect\Api\CustomersApi();
	try {
		$result = $customersApi->listCustomers(); ?>

		<div id="table" style="display:flex;flex-direction:column;">
			<div class="row">
			<div>Created at</div>
			<div>Name</div>
			<div>Email Address</div>
			<div>Phone Number</div>
			<div></div>
		</div>
	<?php foreach ($result->getCustomers() as $customer) {
	?>
		<div class="row">
			<div class="timestamp">
			<?php echo date("g:ia \<\b\\r\> F NS, Y", strtotime($customer->getCreatedAt())); ?>
			</div>

			<div>
			<?php echo $customer->getGivenName(),' ',$customer->getFamilyName() ?>
			</div>

			<div>
			<?php echo $customer->getEmailAddress() ?>
			</div>

			<div>
			<?php echo  $customer->getPhoneNumber() ?>
			</div>

			<div style="text-align: center;">
			<a href="#" onclick="deleteCustomer(this)" class="delete" customerId="<?php echo $customer->getId(); ?>">Delete</a>
			</div>
		</div>
	<?php
	}
	?>
Now we have a new page listing all sandbox customers as well as any other contact information customers choose to provide: an email address or phone number, as well as a link to delete the customer. One of the most important uses of a dashboard or any GUI is to give you access to run commands in a way that is usually a little easier than running them from the command line.

Deleting Customers
Whenever you hit the “delete” button, it calls a javascript function that initiates an AJAX request to a PHP script that does the deleting and sends the id of the customer to be deleted as a POST variable. It also creates a dialog to confirm the deletion, as well as some logging to the developer console if something went wrong.
function deleteCustomer(element){
  if(!confirm('Are you sure you want to delete this customer?')){
    return false;
  }
  var location = document.getElementById('location-id').value;
  var xhttp = new XMLHttpRequest();
  xhttp.onreadystatechange = function() {
    if (this.readyState == 4 && this.status == 200) {
      if(this.responseText=='deleted'){
        alert('deleted');
        document.getElementById('table').removeChild(element.parentNode.parentNode)
      }else{
        alert('something went wrong, check the console');
      }
      console.log(this.responseText);
    }
  };
  xhttp.open("POST", "delete-customer.php", true);
  xhttp.setRequestHeader("Content-type", "application/x-www-form-urlencoded");
  xhttp.send("customerId="+element.getAttribute('customerid'));
}
The PHP script that actually deletes a customer is very simple. It does a couple error checks, and then uses Square’s PHP SDK to call the deleteCustomer() method on the supplied id.
<?php
//Start a session with the client
session_start();
require('vendor/autoload.php');
//Check for some basic errors.
if (!isset($_POST['customerId'])) {
    echo "No customer id was supplied";
}
if (!isset($_SESSION["at"])) {
    echo "Access token isn't set";
}
SquareConnect\Configuration::getDefaultConfiguration()->setAccessToken($_SESSION["at"]);
$api_instance = new SquareConnect\Api\CustomersApi();
$customer_id = $_POST['customerId']; // string | The ID of the customer to delete.
try {
    $result = $api_instance->deleteCustomer($customer_id);
    echo "deleted";
} catch (Exception $e) {
    echo 'Exception when calling CustomersApi->deleteCustomer: ', $e->getMessage(), PHP_EOL;
}
?>
That sums it up for our sandbox dashboard customer’s tab!
If you think you might be interested in working on projects like these, take a look at our open positions on Square.com/Careers. Our developer’s team is hiring!


