
Super Simple Serverless eCommerce
Get started by adding some serverless into your eCommerce stack
A lot of companies have been taking the plunge into utilizing serverless eCommerce in order to enhance their tech stacks (e.g., Nordstrom, Netflix, and Coca-Cola). It may seem like serverless is just a growing fad, but that was the same line of thought many people had about Node until Walmart launched a new site before Black Friday. We might be approaching a similar inflection point for serverless to rapidly improve the speed of development and scale that Node has been able to accomplish.
If you haven’t jumped on the serverless eCommerce bandwagon yet, now is the time. We’re going to walk though a simple way to create serverless functions to allow customers to instantly checkout and buy an item from a Square store. We’ll go through creating a static site on S3, creating AWS Lambda functions, and creating AWS API Gateway endpoints to allow customers to instantly checkout using the Square Checkout API.
It’s worth clarifying that there’s a difference between The Serverless Framework and serverless computing. The Serverless Framework is just a tool that can be used to facilitate creating, deploying, and managing your serverless functions that you create with your desired cloud provider. Serverless computing is a reference to a cloud provider dynamically managing the allocation of machine resources.
We’ll be using the The Serverless Framework in this post to facilitate creating and deploying our functions more easily, but we don’t want it confused with serverless computing as a whole. We’ll explore different platforms and different tools in future posts as we build on the concepts covered here.
Things you need to build this:
If you’re looking for a quick and easy way to create your own eCommerce store, without building everything from scratch, checkout Square Online.
Static Site Using S3
The basic structure of our little serverless eCommerce experience will be a static HTML page hosted on S3 and spiffed up with CSS and JavaScript. We’ll then process our checkout through Lambda functions that allow you to just purchase the one item you clicked on. This is intended to be super basic to illustrate how to get things up and running on AWS — we can explore more advanced ways of doing this all in future posts. We’ll start with the HTML and getting that into S3 to create our static website.
<!-- start product -->
<div class='product'>
    <div class='imageContainer'>
        <img class='productImage' src="/0.jpeg" />
        <!-- insert product image url here -->
        <div class='imageOverlay'>
            <button>View Details</button>
        </div>
    </div>
    <div class='modal clearfix'>
        <button class='close'>Close</button>
        <img class='modalImage' src="/0.jpeg" />
        <!-- insert product image url here -->
        <div class='productInfo'>
            <h2 class='productTitle'>Back to Square 1 Sticker</h2>
            <!-- insert product title here -->
            <p class='productDescription'>"If only 88 was a perfect Square..."</p>
            <div class='productMeta'>
                <h2 class='productCost'>
                    <span class='green'>$1.00</span>*
                </h2>

                <!-- insert product cost here -->
                <span class='helperText'>*We're not actually going to charge you.</span>
                <form action='https://UNIQUE_ID.execute-api.us-east-1.amazonaws.com/prod/checkout' method='post'>
                    <input name='itemVarID' type='hidden' value="IBXSHR4PIMEAHHSOAKNBC5PQ" style='display: none' />
                    <input name='price' type='hidden' value="100" style='display: none' />
                    <input name='name' type='hidden' value="Back to Square 1 Sticker" style='display: none' />
                    <button type='submit' class='productPurchase'>Buy This</button>
                </form>
            </div>
        </div>
    </div>
</div>
<!-- end product -->
Take a look at the meat of our index.html by just looking at the product div elements. We’re hard coding our item’s variant id to each div and stuffing that into a hidden input field as well. This will let us easily pass this to our Lambda function with a POST request. My main reason for this approach is entirely the simplicity of it. We don’t need to write any JavaScript to handle passing the information — we can just use the native behavior of a form element to POST our item info to our function.
If we put in our 12 products, we get something similar to what we have below:
<!DOCTYPE html>
<html>

<head>
    <title>Square Swag Shop</title>
    <meta name="description" content="A Simple eCommerce Store">
    <link id="favicon" rel="icon" href="/favicon.ico" type="image/x-icon">
    <meta charset="utf-8">
    <meta http-equiv="X-UA-Compatible" content="IE=edge">
    <meta name='viewport' content='width=device-width, initial-scale=1'>
    <link rel='stylesheet' href='/normalize.css'>
    <link rel='stylesheet' href='/main.css'>
</head>

<body>
    <div id="cocoon">
        <header class="container">
            <div id="square-logo">
            </div>
        </header>
        <div id="products" class="container clearfix">
            <div class='product'>
                <!-- Our other product html tags here -->
            </div>
            <div class='product'>
                <!-- Our other product html tags here -->
            </div>
            <div class='product'>
                <!-- Our other product html tags here -->
            </div>
            <div class='product'>
                <!-- Our other product html tags here -->
            </div>
        </div>
        <div class="veil"></div>
    </div>
    <script src='/modernizr-3.5.0.min.js'></script>
    <script src='https://code.jquery.com/jquery-3.2.1.min.js' integrity='sha256-hwg4gsxgFZhOsEEamdOYGBf13FyQuiTwlAQgxVSNgt4=' crossorigin='anonymous'></script>
    <script src='/plugin.js'></script>
    <script src='/main.js'></script>
</body>

</html>
We’ll skip over the stylings and the jQuery used to make modals, since that’s not really the focus here. All we have to do is upload all of our files to S3 and enable “Static website hosting” in Properties to have a publicly accessible site.
Now we should have a nice page for everyone to see our products, but we need to have a way to allow everyone to buy those products. Now we finally start digging into creating our AWS Lambda functions (serverless functions). This is what we’ll create to place in the form “action” attribute so that our form POSTs to our function.
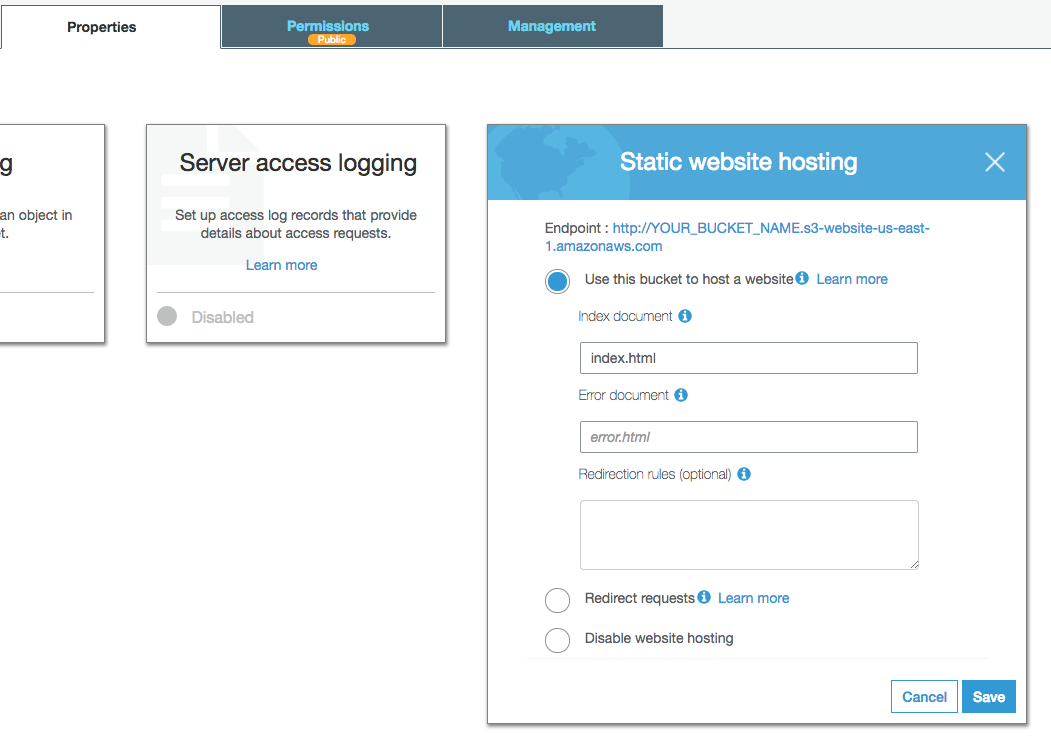 I should hope it's clear you have your own bucket name for the URL.
You should be able to access your static site by visiting the URL provided by AWS and you can see all your wonderful items on display.
Serverless Functions using AWS Lambda
For our serverless function, we’ll process the Square catalog variant ID that is being sent from our form in our static site, and then create a checkout URL to redirect our user to. To do this, we’ll use Square’s JavaScript SDK inside our function to more easily generate the URL we need. You’re more than welcome to attempt using just AWS tools for creating and deploying the function, but we’re going to just use Serverless for managing deploying the function and linking it to AWS API Gateway.
If you, too, want to use serverless to create your own functions, they have great tutorials over here. You need to have Node on your machine and install serverless with npm install -g serverless (or if you don’t want it installed globally, just use [npx](https://medium.com/@maybekatz/introducing-npx-an-npm-package-runner-55f7d4bd282b)).
You can run serverless create --template aws-nodejs to get a template going, but it creates a lot more than what’s needed. Feel free to just copy the handler.js and serverless.yml to modify into your own templates. We’ll start out with a basic function to test that our deployment is working as intended, then add in functionality for our checkout.
'use strict';
const SquareConnect = require('square-connect');

module.exports.checkout = (event, context, callback) => {
  let response = "Success! Our function is running!";
  callback(null, response);
};
This is just our example to test. Next, we want to create our serverless.yml file for deploying our function and creating the AWS API Gateway endpoint.
service: serverless-checkout # NOTE: update this with your service name

provider:
  name: aws
  runtime: nodejs8.10
  stage: prod
  memorySize: 256

package:
  include:
    - node_modules/square-connect/**
    - node_modules/superagent/**
  excludeDevDependencies: true

functions:
  checkout:
    environment:
      ACCESS_TOKEN: YOUR_ACCESS_TOKEN
      LOCATION_ID: YOUR_LOCATION_ID
    handler: handler.checkout
    events:
      - http:
          path: /checkout
          method: any
Now, it’s as simple as running serverless deploy to launch our functions into the cloud. You should see something similar to the below when you deploy:
Serverless: Packaging service...
Serverless: Excluding development dependencies...
Serverless: Uploading CloudFormation file to S3...
Serverless: Uploading artifacts...
Serverless: Uploading service .zip file to S3 (742.81 KB)...
Serverless: Validating template...
Serverless: Updating Stack...
Serverless: Checking Stack update progress...
..............
Serverless: Stack update finished...
Service Information
service: serverless-checkout
stage: prod
region: us-east-1
stack: serverless-checkout-prod
api keys:
  None
endpoints:
  ANY - https://UNIQUE_ID.execute-api.us-east-1.amazonaws.com/prod/checkout
functions:
  checkout: serverless-checkout-prod-checkout
Serverless: Removing old service versions...
You should be able to visit the URL that Serverless logged out to the console in your browser and find our message, “Success! Our function is running!” showing up in the browser. We just need to refactor our Lambda function to handle the catalog variant ID in order to request our checkout URL and redirect the user.
const SquareConnect = require('square-connect');
const crypto = require('crypto');
const querystring = require('querystring');

module.exports.checkout = (event, context, callback) => {
  (SquareConnect.ApiClient.instance).authentications["oauth2"].accessToken = process.env.ACCESS_TOKEN;
  const formData = querystring.parse(event.body);
  const locationId = process.env.LOCATION_ID;
  const checkoutRequest = {
    idempotency_key: crypto.randomBytes(48).toString('base64'),
    order: {
      idempotency_key: crypto.randomBytes(48).toString('base64'),
      reference_id: Date.now().toString(),
      line_items: [
          {
            catalog_object_id: formData.itemVarID,
            quantity: "1"
          }
      ]
    },
    merchant_support_email: "[email protected]"
  };
  const checkoutApi = new SquareConnect.CheckoutApi();

  checkoutApi.createCheckout(locationId, checkoutRequest).then((checkoutResponse)=>{
    const response = {
      statusCode: 302,
      headers: { Location: `${checkoutResponse.checkout.checkout_page_url}` }
    };
    callback(null, response);
  }).catch(error => {
      console.log(JSON.stringify(error, null, 2));
      callback(error)
  });
};
Here we have our fully functioning (pun intended) Lambda function that can create checkout URLs to allow users to buy our products.
Again, it’s worth reminding that this is intentionally a minimal implementation that would only work for something like a digital good (that requires no tax), but demonstrates how easy it is to create your checkout and redirect a customer without having to spin up our own servers. In fact, if you were to append your catalog variant ID as query string parameters to your function URL, you could just parse those out in your function to essentially have your own serverless eCommerce “buy it now” link. Additionally, you could add a line item for shipping costs to easily handle flat rate shipping and even capture the customer’s shipping details in the checkout (see here for more details on that).
 A preview of our serverless eCommerce store. These are our stickers we give away at developer conferences.
Serverless Misunderstandings
There seems to be widespread misunderstanding around serverless computing: Is it pay per invocation? Pay per Mb/s of memory? Just like Node, serverless is suffering a bit from the same desire to “do all the things.” True, it’s a new technology that needs to be explored, but a lot of weird uses are cropping up that come across as anti-patterns (in my opinion). Node was and is known for being really bad at handling CPU-intensive tasks due to its single-threaded nature, and the same goes for using serverless for user facing interactions or APIs. Users expect things to be responsive, and cold starts kill the expected responsiveness. You can certainly try to circumvent this by keeping your functions warm as a solution to this, but that smells like an anti-pattern. The whole benefit of serverless eCommerce is to not have to be as concerned with your infrastructure, yet people are writing more code to modify their infrastructure’s behavior that they don’t really have control over.
If you plan to use serverless for user-facing applications, look carefully at your user traffic patterns to your endpoints, since that would play heavily into overall user experience. A constant amount of traffic would be relatively fine — functions would stay warm and a very small percentage of users would be impacted by a slow response — but if you have particularly spiky traffic, the user experience will suffer as your platform provider is spinning up additional instances of your function to service your traffic.
There are many possibilities to explore with serverless computing as the technology continues to mature, and today’s problems will diminish with time. The real reason to start now is so you can be really condescending to all the new serverless adopters of the future and tell them how much harder serverless programming was back in your day. So get started now and build something serverless!
To follow along with this post, you’ll need to sign up for a Square Developer account. Even if you don’t want to follow along, sign up anyways, its free!


