Applies to: OAuth API | Payments API
Learn how to use the OAuth code flow to authorize your application to access a Square account.
Applications use OAuth access tokens to call Square APIs on behalf of Square sellers. Token acquisition includes the following high-level stages:
- Get authorization from the seller - Provide the authorization URL to the seller, which you simulate by signing in using a Sandbox test account. The authorization URL sends the seller to the Square authorize page where they can grant permissions to your application.
- Callback and token request - Set up a redirect URL for your application to receive the authorization code. Use this code to obtain OAuth access and refresh tokens.
- Refresh and revoke OAuth tokens - Sandbox tokens behave like production tokens, allowing you to maintain access using the refresh token. Remember, an OAuth access token expires after 30 days.
Square provides sample applications that demonstrate OAuth basics. This walkthrough uses the PHP sample in the Sandbox so you can test the OAuth flow without impacting the production environment or production accounts. After obtaining an access token, you refresh and then revoke the access token using API Explorer.
Important
In-production applications are required to securely store and manage OAuth tokens, which is outside the scope of the sample application.
You have a Square account and an application.
You created a Sandbox seller account to simulate the OAuth flow. This test account is different from your Default Test Account and must be configured to manually authorize your applications.
To create a Sandbox seller account for this walkthrough:
- Open the Developer Console.
- In the left pane, choose Sandbox test accounts.
- Choose New sandbox test account.
- In the Account Name box, enter Seller Test Account.
- In the Country box, choose any country.
- Clear the Automatically create authorizations for all my current apps checkbox.
- Choose Create.
You downloaded or cloned the Square OAuth Examples repository. This walkthrough uses the Square OAuth Flow Example (PHP) sample application, which is a PHP web server project. Set up instructions are provided in the following sections.
To download or clone the repository, do one of the following:
- Download the repository as a ZIP file and unzip the contents to a local directory.
- Clone
https://github.com/Square-Developers/oauth-examples.gitto a local directory.
All of the OAuth sample applications in the repository have the same high-level workflow and concepts, even though the code and implementation differs by language.
This walkthrough configures the sample application to use the Sandbox environment, which doesn't work with production application credentials or production Square accounts. To test the sample application in production, configure the
.envfile to use theproductionenvironment, provide your production application ID and secret, and test with a production seller account. See the next section for more information about testing in production.
To implement the OAuth code flow in production, you need to use your production redirect URL and authentication URL, your production application ID and secret, and test with a production seller account.
- Register the redirect URL for your application in the Developer Console for the production environment. This public endpoint is where your application receives the authorization code from the authorization response after the seller authorizes your application.
- Build the authorization URL to sends the seller to Square authorization page where they can approve or deny your authorization request. This URL uses the production base URL (
https://connect.squareup.com/oauth2/authorize) of theAuthorizeendpoint and includes your production application ID and the required permissions you're requesting from sellers. - Get the access token and refresh token using the
ObtainTokenendpoint, the authorization code from the authorization response, and your production application ID and secret. An OAuth access token obtained using the code flow expires after 30 days, so you'll need to callObtainTokenlater to get a new access token before it expires.
For more information, see Create the Redirect URL and Square Authorization Page URL, Receive Seller Authorization and Manage Seller OAuth Tokens, and Refresh, Revoke, and Limit the Scope of OAuth Tokens.
Some values used for OAuth differ between the production and Sandbox environments:
| Production | Sandbox | |
|---|---|---|
Protocol and domain | HTTPs is required; localhost isn't supported Example: https://my-server:3000/callback | HTTP and localhost supported Example: http://localhost:3000/callback |
| Authorize endpoint base URL | https://connect.squareup.com/oauth2/authorize | https://connect.squareupsandbox.com/oauth2/authorize |
|
Example: https://connect.squareup.com/v2/authorize?client_id={YOUR_APP_ID}&scope={PERMISSIONS_LIST}&session=false&state={RANDOM_STRING} | Only |
Application ID (also called client ID) | Prefixed with "sq0idp" Example: sq0idb-LB1Rr4Iob0hGXvAwlv7HIP | Prefixed with "sandbox-sq0idp" Example: sandbox-sq0idb-ioiyW39PwreFzgXoGyLtYq |
Application secret (also called client secret) | Prefixed with "sq0csp" Example: sq0csp-iiWQf_JFiv8Z5t__7T6y2CBALOEtEVE9k_cLotSY0F4 | Prefixed with "sandbox-sq0csp" Example: sandbox-sq0csb-desU-1-gr4wkeC2P2JP1Bxi5WrOgS4m6elVPG5ZffVL |
Sign in to the Developer Console and open an application.
At the top of the page, set the environment toggle to Sandbox.
In the left pane, choose OAuth.
Register your redirect URL:
- In the Redirect URL box, choose Update.
- Enter http://localhost:8000/callback.php (the callback endpoint for this sample application), and then choose Confirm.
Important
Using HTTP and localhost is supported for testing in Sandbox. For in-production applications, you must provide the HTTPS URL to your actual web server.
Copy your application ID and secret:
- In the Application ID box, copy the application ID.
- In the Application Secret box, choose Show, and then copy the application secret.
For this walkthrough, you set up a simple web server that responds to a seller's authorization and gets an OAuth access token and refresh token.
Install Composer and the sample dependencies to the local directory:
- In the local directory, open a command line and change to the
/phpsubdirectory. - Install Composer.
- Run the following command line to install the Square PHP SDK and other project dependencies:composer install
- In the local directory, open a command line and change to the
Note the following key sample files:
- request_token.php - A web page that displays an Authorize button to a seller. When the seller clicks the button, they're directed to the Square-hosted authorization page (using the authorization URL) where they can authorize your application.
- callback.php - The redirect URL target that receives the authorization response and gets the OAuth tokens. After a seller authorizes your application, Square sends the authorization code to this endpoint, which then sends the application ID, application secret, and authorization code to the ObtainToken endpoint to get the OAuth access token and refresh token.
- messages.php - Contains helper functions to access tokens and display error messages.
Note
On a Mac, file names starting with "." are hidden by default. To view hidden files in Terminal, use the
ls -acommand. To view hidden files in Finder, hold down Cmd + Shift + .(period).Configure the sample to use the Sandbox environment with your Sandbox application credentials:
- Make a copy of the
.env.examplefile and rename it to.env. - In the
.envfile, replace the placeholder values:- Replace
your-environmentwithsandbox. - Replace
your-application-idwith your Sandbox application ID. - Replace
your-application-secretwith your Sandbox application secret.
- Replace
- Make a copy of the
Run the following command to start the server:
php -S localhost:8000
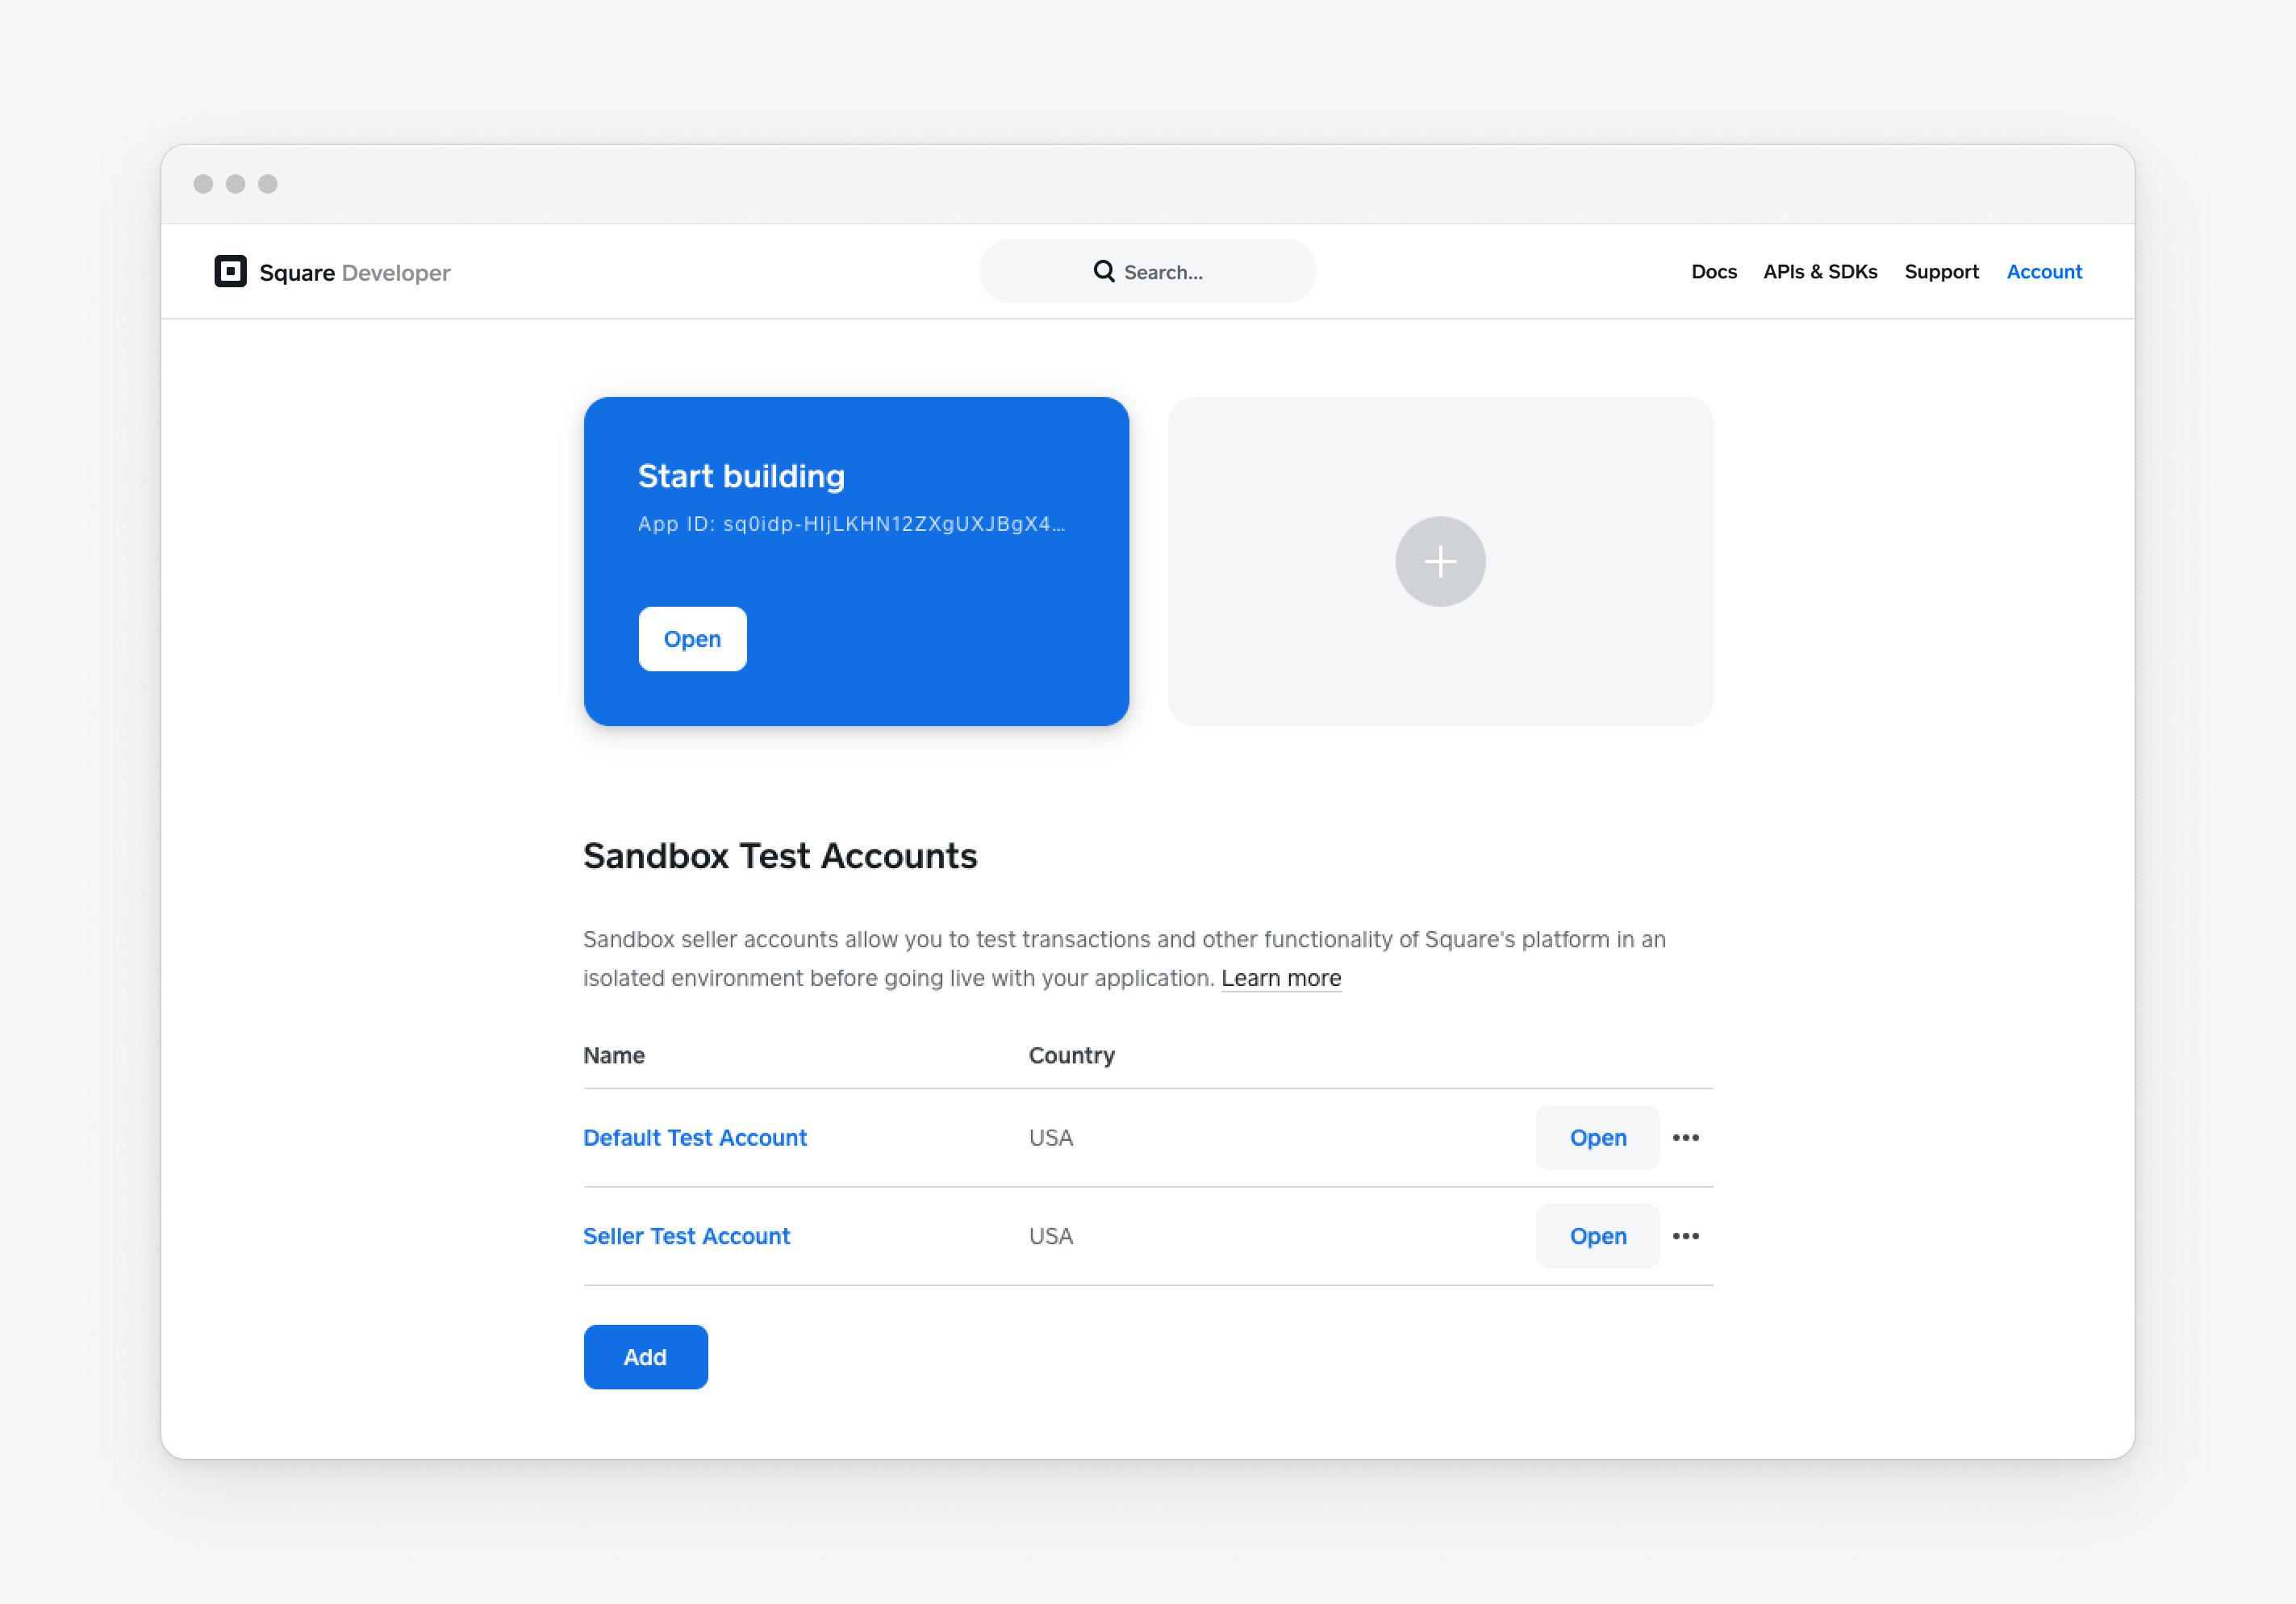
Your Square developer account comes with a default test account in the Sandbox. To simulate third-party application development, you need to create a second Sandbox account to act as a seller account.
In the Sandbox, the seller must be signed in to see the Square authorization page. Sign in to a seller test account by opening the Square Dashboard. In production, you can also control whether you force the seller to sign in explicitly by setting the session parameter to false (recommended).
Create a Sandbox account as a seller test account:
Open the Developer Console.
In the left pane, choose Sandbox test accounts.
Choose New sandbox test account.
In the Account Name box, enter Seller Test Account.
In the Country box, choose any country.
Clear the Automatically create authorizations for all my current apps checkbox.
Choose Create.
The Developer Console should look like the following:
Choose Open in Square Dashboard for the new seller account. This opens the Square Dashboard for the account. Leave this page open in your browser.
Open a new browser window and enter
http://localhost:8000/request_token.php. You should see the following: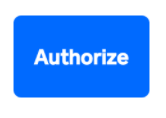
Important
When testing in the Sandbox, you need to have a Square Dashboard open so the request_token.php code can send the request to it. You're simulating what the seller does in a production environment when they receive the authorization request and approve it.
Choose the Authorize button.
The page shows the authorization request for the new account. Choose Allow.
The page shows that the authorization succeeded. The callback.php code got the authorization code from the seller's authorization, submitted the OAuth API
ObtainTokencall, and received the access token and refresh token.The authorization returns the following parameters:
stateis the CSRF token your application passed in thestateparameter for the Square authorization page. Use this value to verify that this is a valid request.response_typeiscode. This indicates that an authorization code was returned.codeis the authorization code. Use this value when you callObtainTokento get the access token and refresh token for the seller account. The value you provide to theObtainTokencall must match this value exactly.
For more information about the values returned in the seller authorization, see Receive Seller Authorization and Manage Seller OAuth Tokens.
You've now completed the OAuth process by obtaining the access token and refresh token for the test seller. The next steps show you how to use the access token and refresh token.
After you get the seller OAuth tokens, use the access token to call the Square API endpoints that your application has permissions for. To keep this simple, use API Explorer to call the CreatePayment endpoint to take a $100.00 payment, with a $5 application fee going to your Square developer account and $95 going to the seller.
Go to API Explorer.
Make sure Sandbox is selected at the top of the page, paste the access token that you obtained in the OAuth process into the Access token box, and then choose Save.
API Explorer uses this access token to make calls on behalf of the seller.
Set the following parameters in the body:
For
amount_money, choose Add, enter 10000 for the amount, and then set the currency to the country you selected when you created your Square account.Note that money is represented in the lowest denomination for a currency, which for USD is cents. So the amount of 10000 is $100.00.
For
idempotency_key, choose Generate to create a unique value to ensure that this payment is only made once. For more information, see Idempotency.For
source_id, choose cnon:card-nonce-ok. This simulates a card payment token that represents a credit card that can be used for payment. For more information about card tokens, see Online Payment Solutions.For
app_fee_money, choose Add, enter 500 for amount, and then set the currency to your Square account country.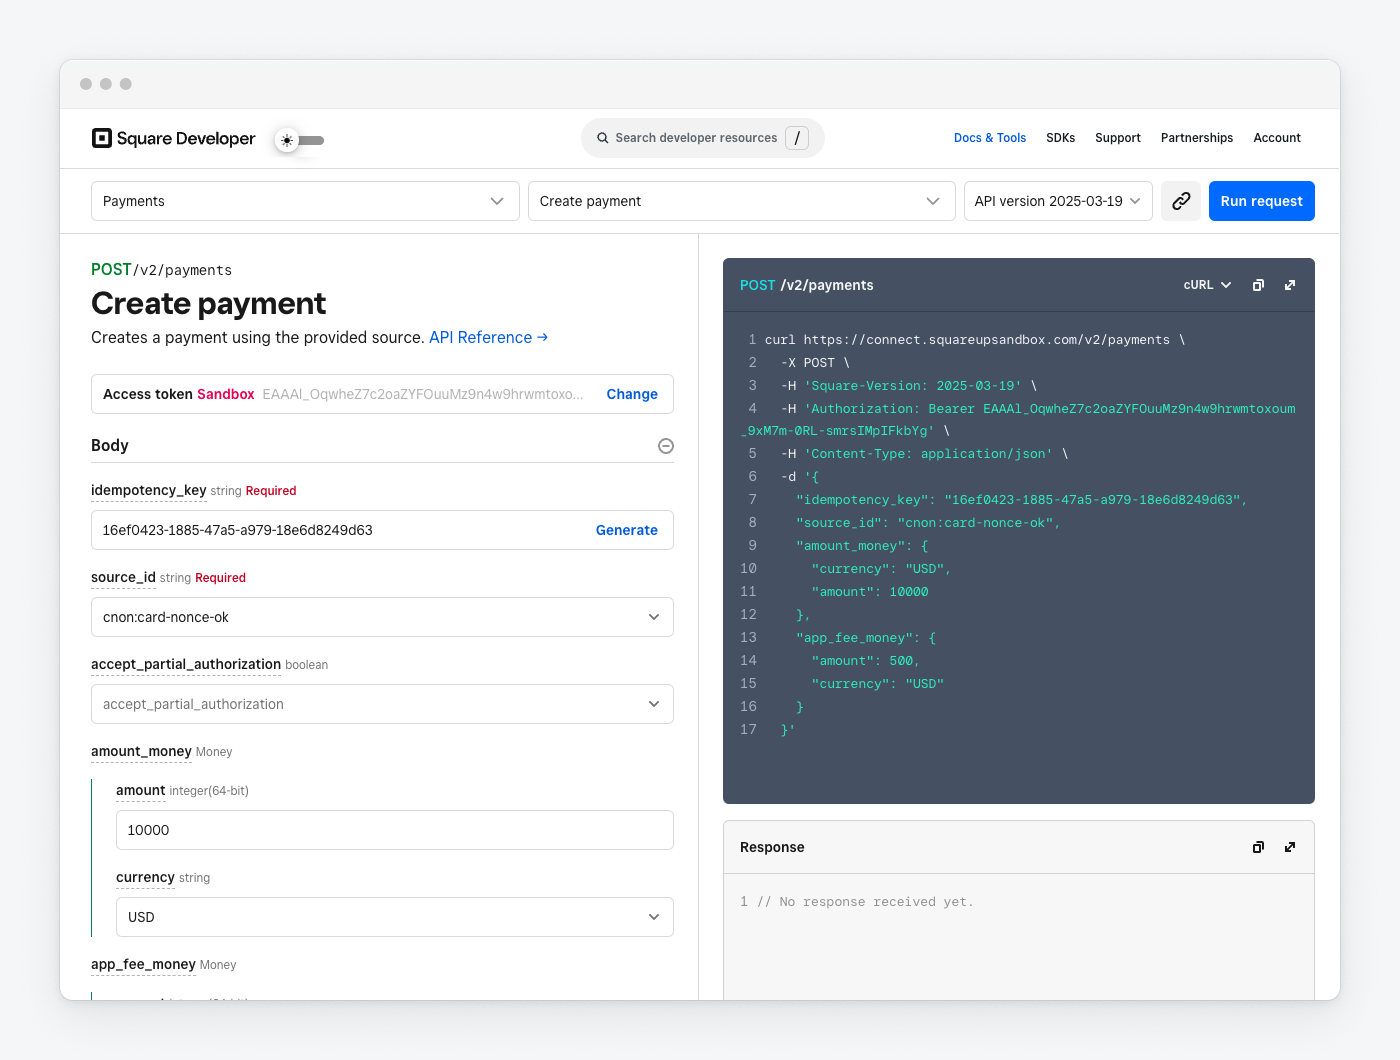
Choose Run Request. The Response box displays a
200response code and returns details about the payment in the body of the response. The payment has anidvalue that you can use to identify this particular payment when calling ListPayments or you can get it directly using GetPayment.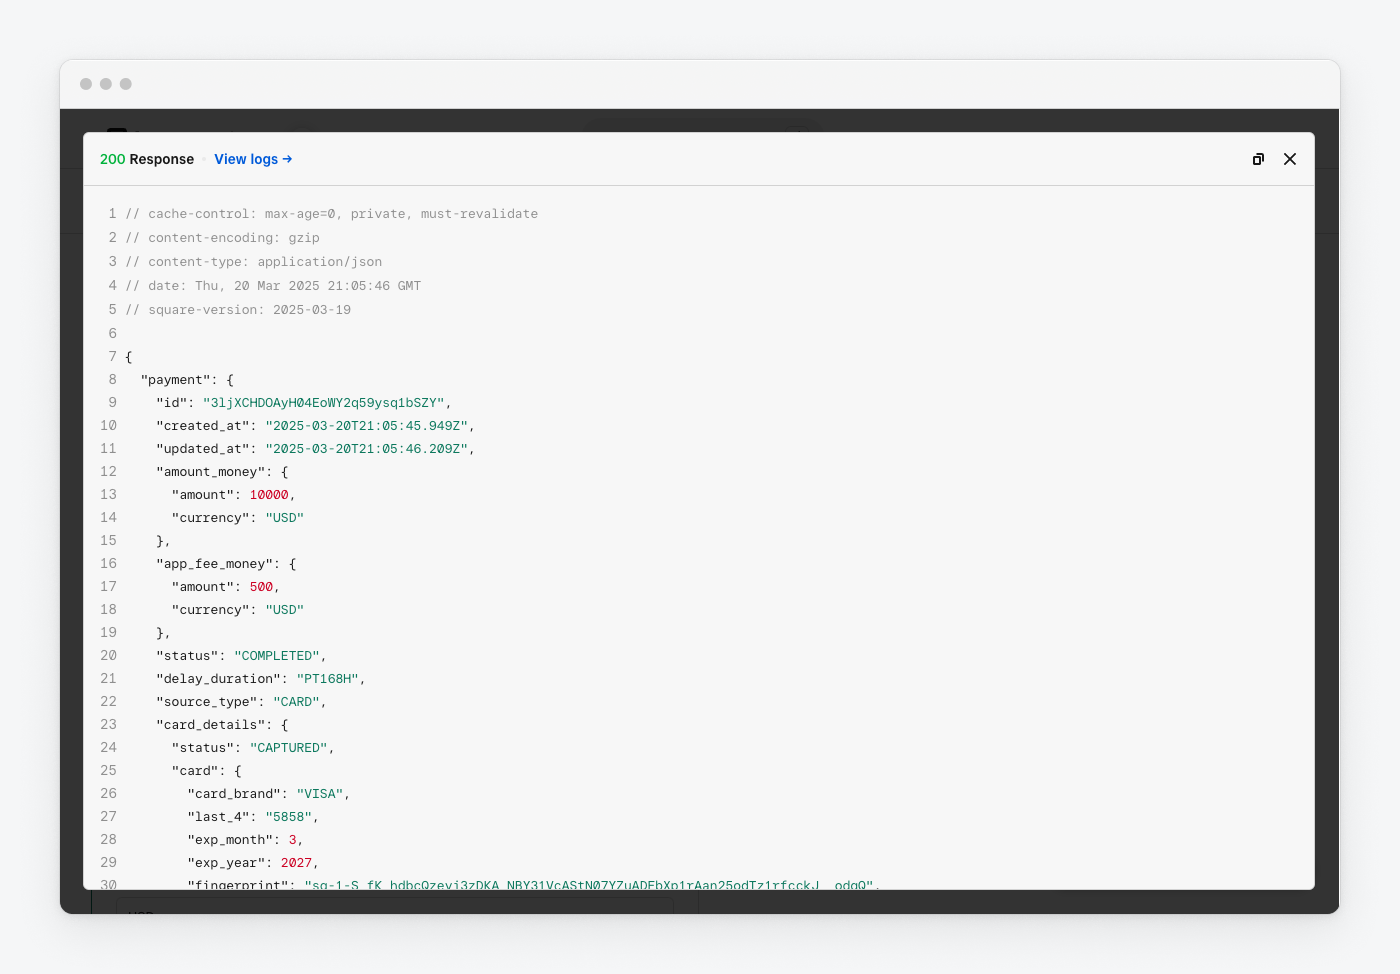
You've successfully taken a payment using the Square API on behalf of a seller. Look at the Square Dashboard to see what it looks like from the seller's point of view.
Open the Developer Console, find the seller test account you created earlier in the Sandbox Test Accounts section, and then choose Open.
In the Sandbox Square Dashboard, choose Transactions in the left pane, and then choose the most recent transaction. The transaction details appear in a pane on the right.
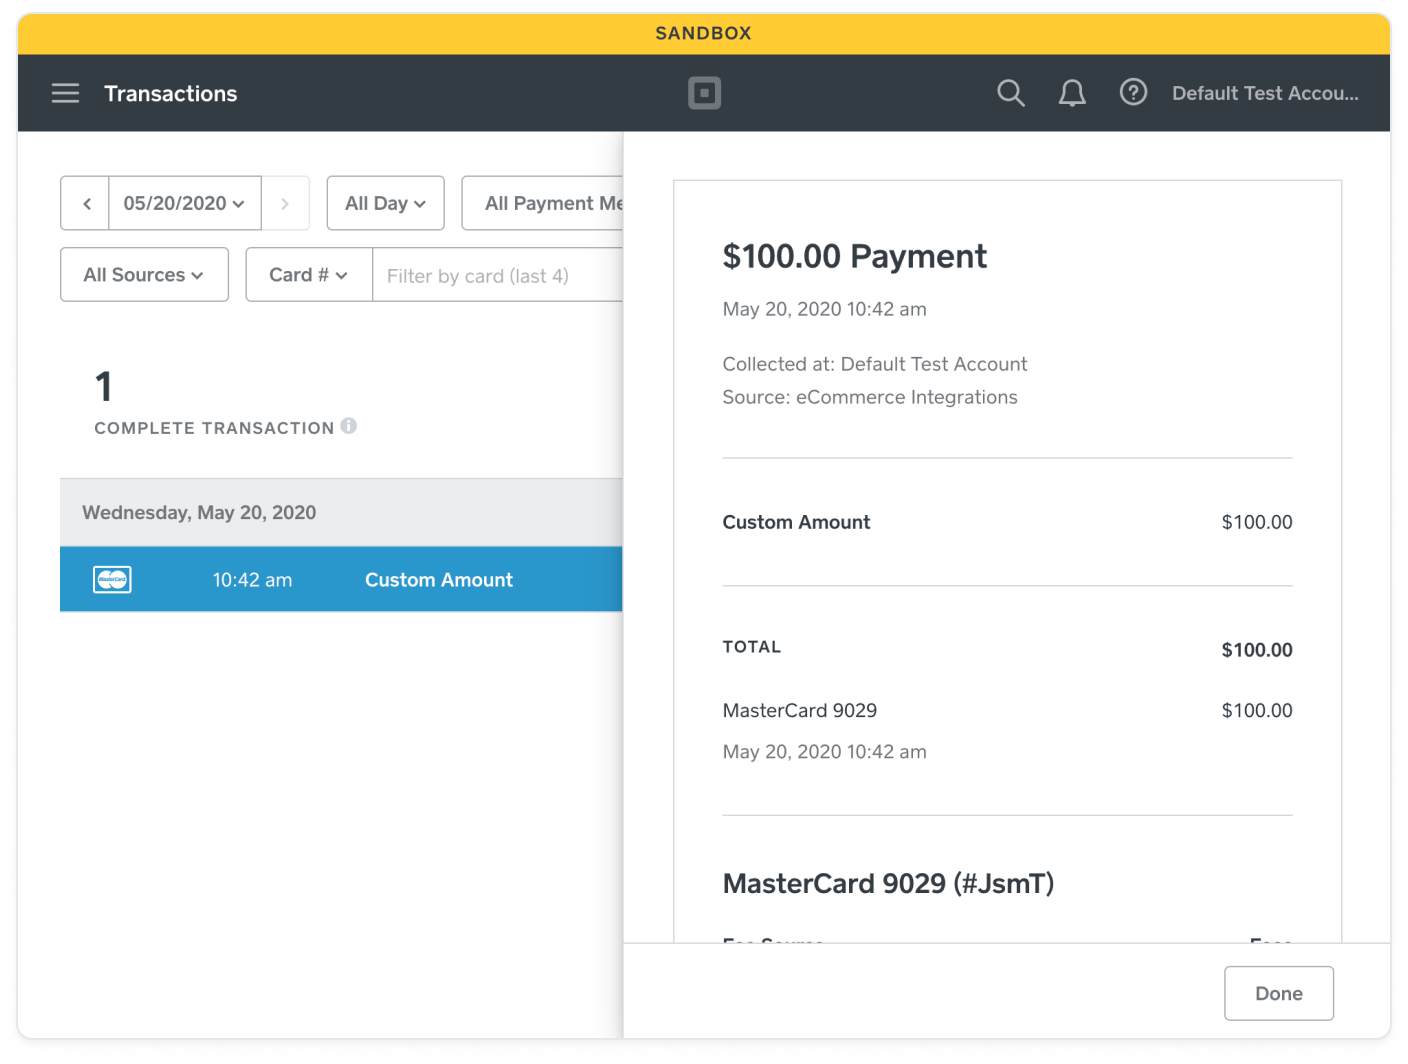
You see the $100 payment that was completed and the $5 application fee that your application collected and credited to your Sandbox developer account.
In the Other row, you see the $5.00 application fee from the CreatePayment call.
When you've completed the previous step, you know that you can use the seller's OAuth access token to make API calls on their behalf. Your application should be able to refresh the access token before it expires. To keep this simple, use API Explorer to call the ObtainToken endpoint to refresh the seller token.
- Go to Square API Explorer.
- Make sure Sandbox is selected at the top of the page, paste the seller's access token in the Access token box, and then choose Save.
- Set the following parameters in the body:
- For
client_id, enter your application's Sandbox application ID. - For
client_secret, enter your application's Sandbox application secret. - For
grant_type, enterrefresh_token. - For
refresh_token, enter the seller's OAuth refresh token.
- For
- Choose Run Request. The Response box displays a 200 response code and returns information about the new access token. Use this new access token to call the Square APIs on the seller's behalf.
Your application should enable sellers to revoke the access token if they choose to. To keep this simple, use API Explorer to call the RevokeToken endpoint to revoke the seller token.
- Go to API Explorer.
- Make sure Sandbox is selected at the top of the page, paste the seller's access token into the Access token box, and then choose Save.
- Set the following parameters in the body:
- For
client_secret, enter your application's Sandbox application secret. - For
access_token, enter the seller's access token. - For
client_id, enter your application's Sandbox application ID.
- For
- Choose Run Request. The Response box displays a
200response code and returns"success":true.
The request_token.php code creates the URL link to the Square authorization page that you give to the seller so they can authorize your application. The code uses your developer application ID and secret and requests several permissions that are then incorporated into the URL. The permissions in the list are separated by a URL-encoded space (%20 or +).
The md5 function generates a random string that is stored in the session cookie and passed in the state parameter. The state parameter is returned by the Square authorization page. The callback compares the state value with the string stored in the session cookie and rejects the request if they don't match. The state parameter helps protect against cross-site request forgery (CSRF).
The session parameter is omitted because the Sandbox only supports a default setting of true. For production, this value should be false.
The {APPLICATION_ID} placeholder value for the client_id parameter is the Sandbox application ID you got from the Developer Console for your application.
The completed URL looks like the following. For a complete review of the parameters used in the URL, see Create the Redirect URL and Square Authorization Page URL.
https://squareupsandbox.com/oauth2/authorize?client_id={APPLICATION_ID}&scope=ITEMS_READ+MERCHANT_PROFILE_READ+PAYMENTS_WRITE_ADDITIONAL_RECIPIENTS+PAYMENTS_WRITE+PAYMENTS_READ&state=0499178ad6fdf1946bcb184aeae355cdbf90fed7faf60dde36e35de6d2d91b09
<?php
  session_start();
  if (empty($_SESSION['auth_state'])) {
    $_SESSION['auth_state'] = bin2hex(random_bytes(32));
  }
?>
<link rel="stylesheet" href="public/style.css" type="text/css">
<meta name="viewport" content="width=device-width">
<?php
require 'vendor/autoload.php';
require_once('messages.php');

use Dotenv\Dotenv;

$dotenv = Dotenv::create(__DIR__);
$dotenv->load();

// Specify the permissions and url encode the spaced separated list.
$permissions = urlencode(
                  "ITEMS_READ " .
                  "MERCHANT_PROFILE_READ " .
                  "PAYMENTS_WRITE_ADDITIONAL_RECIPIENTS " .
                  "PAYMENTS_WRITE " .
                  "PAYMENTS_READ"
               );

// Set the Auth_State cookie with a random md5 string to protect against cross-site request forgery.
// Auth_State will expire in 60 seconds (1 mins) after the page is loaded.
$application_id = getenv('SQ_APPLICATION_ID');
$environment =  getenv('SQ_ENVIRONMENT');

if ($environment == "sandbox") {
  $base_url = "https://connect.squareupsandbox.com";
} else if ($environment == "production") {
  $base_url = "https://connect.squareup.com";
} else {
  displayError("Unsupported SQ_ENVIRONMENT", "Set the SQ_ENVIRONMENT variable in .env file to 'sandbox' or 'production'.");
}

// Display the OAuth link.
echo '
<div class="wrapper">
  <a class="btn"
   href="' . $base_url . "/oauth2/authorize" .
     '?client_id=' . $application_id .
     '&scope=' . $permissions .
     '&state=' . $_SESSION['auth_state'] .'">
     <strong>Authorize</strong>
  </a>
</div>';
?>
The callback.php code parses the query string that is returned after the seller allows (or denies) your application the requested permissions the Square authorization page redirects to the redirect URL. This is the URL that you set on the OAuth page of your application in the Developer Console. The POST request on your callback page includes a query string with an authorization code or a denial error.
The code block parses the query string. If there's an authorization code, the obtainOAuthToken function is called to exchange the authorization code for OAuth tokens.
The code block performs three functions:
- Validates the state parameter - The first
ifstatement checks thestateparameter against the value stored in the cookie. If the values don't match, thedisplayStateErrorfunction is called to display a message indicating that thestatecheck failed and this block is exited. - Checks for authorization - If the
statecheck succeeds, the block checks for theresponse_typeparameter. If theresponse_typeparameter value iscode, an authorization code is returned in thecodeparameter. - Calls ObtainToken to get the access and refresh tokens - The
obtainOAuthTokenfunction takes the authorization code and calls the ObtainToken endpoint to get the OAuth access token and refresh token. TheObtainTokenendpoint takes your application ID, your application secret, agrant_typeofauthorization_code, and the authorization code. For this walkthrough, these tokens are displayed on the web page so you can get them easily. In production, you should never display the tokens. Instead, you should encrypt them and store them securely. For more information, see OAuth Best Practices.
If there's no response_type parameter set, error states are handled (including the case where the seller chooses Deny) and an error message is displayed.
<?php
  session_start();
?>
<link rel="stylesheet" href="public/style.css" type="text/css">
<?php
require 'vendor/autoload.php';
require_once('messages.php');

use Square\Exceptions\ApiException;
use Square\SquareClient;
use Square\Environment;
use Square\Models\ObtainTokenRequest;
use Dotenv\Dotenv;

$dotenv = Dotenv::create(__DIR__);
$dotenv->load();

// The obtainOAuthToken function shows you how to obtain an OAuth access token
// with the OAuth API with the authorization code returned to OAuth callback.
function obtainOAuthToken($authorizationCode) {
  // Initialize Square PHP SDK OAuth API client.
  $environment = getenv('SQ_ENVIRONMENT') == "sandbox" ? Environment::SANDBOX : Environment::PRODUCTION;
  $apiClient = new SquareClient([
    'environment' => $environment
  ]);
  $oauthApi = $apiClient->getOAuthApi();

  // Initialize the request parameters for the ObtainToken request.
  $body_grantType = 'authorization_code';
  $body = new ObtainTokenRequest(
    getenv('SQ_APPLICATION_ID'),
    getenv('SQ_APPLICATION_SECRET'),
    $body_grantType
  );
  $body->setCode($authorizationCode);

  // Call obtainToken endpoint to get the OAuth tokens.
  try {
      $response = $oauthApi->obtainToken($body);

      if ($response->isError()) {
        $code = $response->getErrors()[0]->getCode();
        $category = $response->getErrors()[0]->getCategory();
        $detail = $response->getErrors()[0]->getDetail();

        throw new Exception("Error Processing Request: obtainToken failed!\n" . $code . "\n" . $category . "\n" . $detail, 1);
      }
  } catch (ApiException $e) {
      error_log($e->getMessage());
      error_log($e->getHttpResponse()->getRawBody());
      throw new Exception("Error Processing Request: obtainToken failed!\n" . $e->getMessage() . "\n" . $e->getHttpResponse()->getRawBody(), 1);
  }

  // Extract the tokens from the response.
  $accessToken = $response->getResult()->getAccessToken();
  $refreshToken = $response->getResult()->getRefreshToken();
  $expiresAt = $response->getResult()->getExpiresAt();
  $merchantId = $response->getResult()->getMerchantId();

  // Return the tokens along with the expiry date/time and merchant ID.
  return array($accessToken, $refreshToken, $expiresAt, $merchantId);
}

// Handle the response.
try {
    // Verify the state to protect against cross-site request forgery.
    if ($_SESSION["auth_state"] !== $_GET['state']) {
      displayStateError();
      return;
    }

    // When the response_type is "code", the seller clicked Allow
    // and the authorization page returned the auth tokens.
    if ("code" === $_GET["response_type"]) {
      // Get the authorization code and use it to call the obtainOAuthToken wrapper function.
      $authorizationCode = $_GET['code'];
      list($accessToken, $refreshToken, $expiresAt, $merchantId) = obtainOAuthToken($authorizationCode);
      // Because we want to keep things simple and we're using Sandbox,
      // we call a function that writes the tokens to the page so we can easily copy and use them directly.
      // In production, you should never write tokens to the page. You should encrypt the tokens and handle them securely.
      writeTokensOnSuccess($accessToken, $refreshToken, $expiresAt, $merchantId);
    }
    elseif ($_GET['error']) {
      // Check to see if the seller clicked the Deny button and handle it as a special case.
      if(("access_denied" === $_GET["error"]) && ("user_denied" === $_GET["error_description"])) {
        displayError("Authorization denied", "You chose to deny access to the app.");
      }
      // Display the error and description for all other errors.
      else {
        displayError($_GET["error"], $_GET["error_description"]);
      }
    }
    else {
      // No recognizable parameters were returned.
      displayError("Unknown parameters", "Expected parameters weren't returned");
    }
} catch (Exception $e) {
  // If the obtainToken call fails, you'll fall through to here.
  displayError("Exception", $e->getMessage());
}

?>