
Welcome to the (Color) Matrix
Combining Picasso with color matrices to transform images.
Written by Pierre-Yves Ricau.
This post started as an internal email thread to share a cool trick. I have little formal knowledge on the matter described below and took an empiric approach. Feedback is welcome in the comments!
Specs
I was working on a new screen that showed a downloaded image with a title on top and these constraints:
-
the screen should to be themed with a color determined at runtime;
-
the image should be tinted to that color;
-
the text on top should be readable and the image should not steal the user attention; and
-
the details of the image should still be visible.
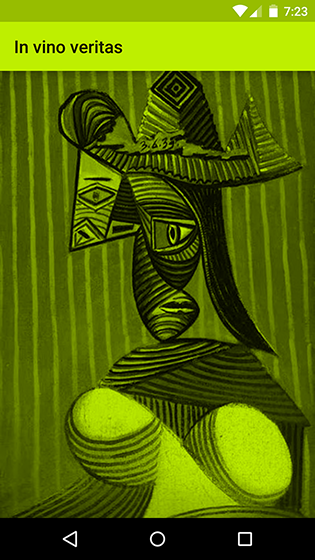
A designer sent me a few example mockups:
Example background image

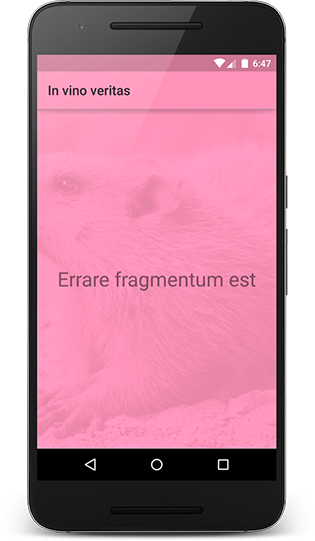
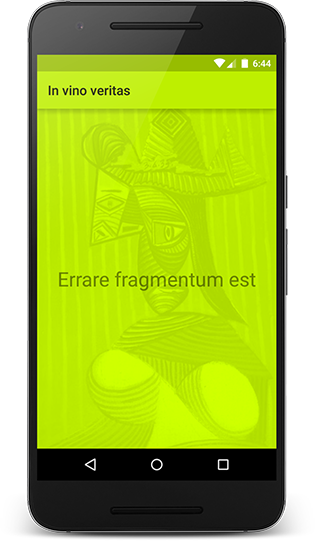
Expected result for theme color #beef00

Example background image
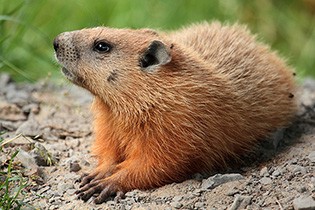
Source: Wikipedia, License: Attribution-Share Alike 3.0 Unported
Expected result for theme color #ff93b9
How could we dynamically tint those images?
Overlay
My first instinct was to add a layer of the target color on top of the image with alpha transparency.
Loading and transforming an image is easy with Picasso:
Picasso.with(this)
    .load(imageUrl)
    .fit()
    .centerCrop()
    .transform(new ColorLayer(0xffbeef00))
    .into(imageView);
Here is how to draw a color on top of the bitmap:
public class ColorLayer implements Transformation {
  private final int destinationColor;

  public ColorLayer(int destinationColor) {
    this.destinationColor = destinationColor;
  }

  @Override public Bitmap transform(Bitmap source) {
    Canvas canvas = new Canvas(source);
    int dr = Color.red(destinationColor);
    int dg = Color.green(destinationColor);
    int db = Color.blue(destinationColor);
    canvas.drawColor(Color.argb(220, dr, dg, db));
    return source;
  }

  @Override public String key() {
    String hexColor = String.format("#%08x", destinationColor);
    return "color-layer(destinationColor=" + hexColor + ")";
  }
}

It’s ok but not great. The colors from the original image are bleeding in, and for instance, you can see the hints of red in the woman’s face.
I sat down with the designer to understand how the mockup was assembled. He was using blending modes to merge the image with a colored layer — with some degree of opacity. He was tweaking each example to find the perfect mode and values that made the result look nice.
While it’s a great empiric approach, it’s hard to translate to code. We tried more examples but could never come up with generic mode and values that would look great for all cases.
Let’s take a step back: we want to tint an image. We could first build a grayscale version of that image, and then tint it (thanks Romain Guy for the idea!).
Grayscale
In grayscale, the RGB channels of a pixel all share the same value. One common way is to compute the luminance as a weighted average that favors green, because human eyes are more sensitive to green.
int color = Color.CYAN;
int grayChannel = (int) (0.2126f * Color.red(color)
    + 0.7152f + Color.green(color)
    + 0.0722f * Color.blue(color));
int colorInGrayscale = Color.rgb(grayChannel, grayChannel, grayChannel);
We could loop on every pixel, as shown in a previous post, but that wouldn’t be very efficient. Instead, we’ll use a ColorMatrix to draw on a canvas with a color filter.
ColorMatrix Javadoc
4x5 matrix for transforming the color and alpha components of a bitmap. The matrix can be passed as single array and is treated as follows:
[ a, b, c, d, e,
  f, g, h, i, j,
  k, l, m, n, o,
  p, q, r, s, t ]
When applied to a color [R, G, B, A], the resulting color is computed as:
R’ = a*R + b*G + c*B + d*A + e
G’ = f*R + g*G + h*B + i*A + j
B’ = k*R + l*G + m*B + n*A + o
A’ = p*R + q*G + r*B + s*A + t
Let’s apply our grayscale formula. Here’s what we want:
R’ = 0.2126*R + 0.7152*G + 0.0722*B
G’ = 0.2126*R + 0.7152*G + 0.0722*B
B’ = 0.2126*R + 0.7152*G + 0.0722*B
A’ = 1
So our color matrix should be:
[ 0.2126, 0.7152, 0.0722, 0, 0,
  0.2126, 0.7152, 0.0722, 0, 0,
  0.2126, 0.7152, 0.0722, 0, 0,
  0,      0,      0,      0, 1 ]
We can apply the color matrix by drawing the bitmap onto a canvas using a paint with a color matrix color filter:
public class Grayscale implements Transformation {
  @Override public Bitmap transform(Bitmap source) {
    float lr = 0.2126f;
    float lg = 0.7152f;
    float lb = 0.0722f;

    ColorMatrix matrix = new ColorMatrix(new float[] {
        lr, lg, lb, 0, 0, //
        lr, lg, lb, 0, 0, //
        lr, lg, lb, 0, 0, //
        0,  0,  0,  0, 255, //
    });

    ColorMatrixColorFilter filter = new ColorMatrixColorFilter(matrix);
    Paint paint = new Paint();
    paint.setColorFilter(filter);

    int width = source.getWidth();
    int height = source.getHeight();
    Bitmap destination = createBitmap(width, height, ARGB_8888);

    Canvas canvas = new Canvas(destination);
    canvas.drawBitmap(source, 0, 0, paint);
    source.recycle();
    return destination;
  }

  @Override public String key() {
    return "grayscale()";
  }
}

Tint
To apply a tint, we just need to multiply each channel by the corresponding channel in the tint.
Rtint = red(tint) / 255
Gtint = green(tint) / 255
Btint = blue(tint) / 255

R’ = Rtint * (0.2126*R + 0.7152*G + 0.0722*B)
G’ = Gtint * (0.2126*R + 0.7152*G + 0.0722*B)
B’ = Btint * (0.2126*R + 0.7152*G + 0.0722*B)
A’ = 1
In other words, we need to concatenate our grayscale matrix with the following tint matrix:
[ Rtint, 0,     0,     0, 0,
  0,     Gtint, 0,     0, 0,
  0,     0,     Btint, 0, 0,
  0,     0,     0,     0, 1 ]
Here’s how it translates to code:
public class Tint implements Transformation {
  private final int destinationColor;

  public Tint(int destinationColor) {
    this.destinationColor = destinationColor;
  }

  @Override public Bitmap transform(Bitmap source) {
    float lr = 0.2126f;
    float lg = 0.7152f;
    float lb = 0.0722f;

    ColorMatrix grayscaleMatrix = new ColorMatrix(new float[] {
        lr, lg, lb, 0, 0,   //
        lr, lg, lb, 0, 0,   //
        lr, lg, lb, 0, 0,   //
        0,  0,  0,  0, 255, //
    });

    int dr = Color.red(destinationColor);
    int dg = Color.green(destinationColor);
    int db = Color.blue(destinationColor);
    float drf = dr / 255f;
    float dgf = dg / 255f;
    float dbf = db / 255f;

    ColorMatrix tintMatrix = new ColorMatrix(new float[] {
        drf, 0,   0,   0, 0, //
        0,   dgf, 0,   0, 0, //
        0,   0,   dbf, 0, 0, //
        0,   0,   0,   1, 0, //
    });

    tintMatrix.preConcat(grayscaleMatrix);

    ColorMatrixColorFilter filter = new ColorMatrixColorFilter(tintMatrix);
    Paint paint = new Paint();
    paint.setColorFilter(filter);

    int width = source.getWidth();
    int height = source.getHeight();
    Bitmap destination = createBitmap(width, height, ARGB_8888);

    Canvas canvas = new Canvas(destination);
    canvas.drawBitmap(source, 0, 0, paint);
    source.recycle();

    return destination;
  }

  @Override public String key() {
    String hexColor = String.format("#%08x", destinationColor);
    return "tint(destinationColor=" + hexColor + ")";
  }
}
The image was tinted as expected, however the result was still not great. We wanted the text on top to be readable and didn’t want the image below it to steal the user attention.
Roman Nurik wrote a great article on how he came up with blurred wallpaper images for Muzei, and I thought we could try blurring. However, our design team wanted the image details to be visible.
Contrast
What’s going on? There’s simply too much black and overall too much contrast.
The luminance of each pixel is between 0 (black) and 255 (white), and we multiply that by our channel color (say red). So, we’re effectively scaling it to [0, channel value], which means that blacks will stay black, and whites will change into our target color.
Thinking about it more, what we actually want is for each pixel to be of the custom color, plus / minus some variation that’s going to let the image details surface in the background through contrast.
In other terms, we want to rescale the grayscale image to have a lower contrast, and shift its tint to be centered on the target color.
For example, if my custom color has red = 100, and I want a contrast amplitude of only 20%, we want to transform the the [0, 255] red channel to only 0.2 * 255 = 51 values centered around 100, (i.e. we should transform the red channel from [0, 255] to [75, 126]).
Let’s apply that scale and translate to our color matrix:
public class Scaled implements Transformation {
  private final int destinationColor;

  public Scaled(int destinationColor) {
    this.destinationColor = destinationColor;
  }

  @Override public Bitmap transform(Bitmap source) {
    float lr = 0.2126f;
    float lg = 0.7152f;
    float lb = 0.0722f;

    ColorMatrix grayscaleMatrix = new ColorMatrix(new float[] {
        lr, lg, lb, 0, 0,   //
        lr, lg, lb, 0, 0,   //
        lr, lg, lb, 0, 0,   //
        0,  0,  0,  0, 255, //
    });

    int dr = Color.red(destinationColor);
    int dg = Color.green(destinationColor);
    int db = Color.blue(destinationColor);
    float drf = dr / 255f;
    float dgf = dg / 255f;
    float dbf = db / 255f;

    ColorMatrix tintMatrix = new ColorMatrix(new float[] {
        drf, 0,   0,   0, 0, //
        0,   dgf, 0,   0, 0, //
        0,   0,   dbf, 0, 0, //
        0,   0,   0,   1, 0, //
    });

    tintMatrix.preConcat(grayscaleMatrix);

    // Contrast amplitude of 20%
    float scale = 0.2f;
    float translate = 1 - scale * 0.5f;

    ColorMatrix scaleMatrix = new ColorMatrix(new float[] {
        scale, 0, 0, 0, dr * translate, //
        0, scale, 0, 0, dg * translate, //
        0, 0, scale, 0, db * translate, //
        0, 0, 0, 1, 0, //
    });

    scaleMatrix.preConcat(tintMatrix);

    ColorMatrixColorFilter filter = new ColorMatrixColorFilter(scaleMatrix);
    Paint paint = new Paint();
    paint.setColorFilter(filter);

    int width = source.getWidth();
    int height = source.getHeight();
    Bitmap destination = createBitmap(width, height, ARGB_8888);

    Canvas canvas = new Canvas(destination);

    canvas.drawBitmap(source, 0, 0, paint);
    source.recycle();
    return destination;
  }

  @Override public String key() {
    String hexColor = String.format("#%08x", destinationColor);
    return "scaled(destinationColor=" + hexColor + ")";
  }
}
Jed Parson pointed out that the contrast felt softer for dark target colors, and he suggested that the contrast amplitude should vary according to the relative luminance of the target color.
I changed the scale factor to be 1 minus the luminance of the target color:
public class ScaledConstrast implements Transformation {
  private final int destinationColor;

  public ScaledConstrast(int destinationColor) {
    this.destinationColor = destinationColor;
  }

  @Override public Bitmap transform(Bitmap source) {
    float lr = 0.2126f;
    float lg = 0.7152f;
    float lb = 0.0722f;

    ColorMatrix grayscaleMatrix = new ColorMatrix(new float[] {
        lr, lg, lb, 0, 0, //
        lr, lg, lb, 0, 0, //
        lr, lg, lb, 0, 0, //
        0, 0, 0, 0, 255, //
    });


    int dr = Color.red(destinationColor);
    int dg = Color.green(destinationColor);
    int db = Color.blue(destinationColor);
    float drf = dr / 255f;
    float dgf = dg / 255f;
    float dbf = db / 255f;

    ColorMatrix tintMatrix = new ColorMatrix(new float[] {
        drf, 0, 0, 0, 0, //
        0, dgf, 0, 0, 0, //
        0, 0, dbf, 0, 0, //
        0, 0, 0, 1, 0, //
    });

    tintMatrix.preConcat(grayscaleMatrix);

    float lDestination = drf * lr + dgf * lg + dbf * lb;
    float scale = 1f - lDestination;
    float translate = 1 - scale * 0.5f;

    ColorMatrix scaleMatrix = new ColorMatrix(new float[] {
        scale, 0, 0, 0, dr * translate, //
        0, scale, 0, 0, dg * translate, //
        0, 0, scale, 0, db * translate, //
        0, 0, 0, 1, 0, //
    });

    scaleMatrix.preConcat(tintMatrix);

    ColorMatrixColorFilter filter = new ColorMatrixColorFilter(scaleMatrix);
    Paint paint = new Paint();
    paint.setColorFilter(filter);

    int width = source.getWidth();
    int height = source.getHeight();
    Bitmap destination = createBitmap(width, height, ARGB_8888);

    Canvas canvas = new Canvas(destination);

    canvas.drawBitmap(source, 0, 0, paint);
    source.recycle();
    return destination;
  }

  @Override public String key() {
    String hexColor = String.format("#%08x", destinationColor);
    return "scaled-contrast(destinationColor=" + hexColor + ")";
  }
}

Text
All we needed to do now was add a TextView with the right text color on top of our image. Lucky for us, the support library provides ColorUtils to do just that.
Here’s a simple implemention inspired from Palette.Swatch.ensureTextColorsGenerated():
private int computeTitleColor(int destinationColor) {
  int titleAlpha = ColorUtils.calculateMinimumAlpha(Color.WHITE, destinationColor, 3.0f);
  int titleColor;
  if (titleAlpha != -1) {
    titleColor = ColorUtils.setAlphaComponent(Color.WHITE, titleAlpha);
  } else {
    titleAlpha = ColorUtils.calculateMinimumAlpha(Color.BLACK, destinationColor, 3.0f);
    titleColor = ColorUtils.setAlphaComponent(Color.BLACK, titleAlpha);
  }
  return titleColor;
}
Conclusion

By combining Picasso with color matrices, we were able to quickly iterate on our image transformation to get to an output that suited our needs.
Feel free to provide feedback and additional insight in the comments! Pierre-Yves Ricau (@Piwai) | Twitter The latest Tweets from Pierre-Yves Ricau (@Piwai). Android baker @Square. Paris / San Franciscotwitter.com
Authored By


