Creating a Chatbot with Square Checkout and Twilio Studio
Learn how to create a bot to talk to your customers and help make sales!
Try it out! Text (479)-888–5188 to talk to the bot 📲
From voice commands to chatbots, consumers are engaging with (and buying) things in totally new ways. But this isn’t something only for multi-billion dollar tech companies. New tools make chatbots achievable for even the smallest developer, so anyone can leverage this to provide unique buying and ordering experiences. Let’s create a basic conversation-based purchasing experience over SMS that you can use as a template for your own message based buying experience.
💡 The idea 💡
Our initial goal is an online store that advertises a number that you can text to finish up your shopping. When a customer messages the number, they’ll receive a scripted message with the different products they can buy. From there, they can select an item and get a link to a checkout page to complete the purchase.
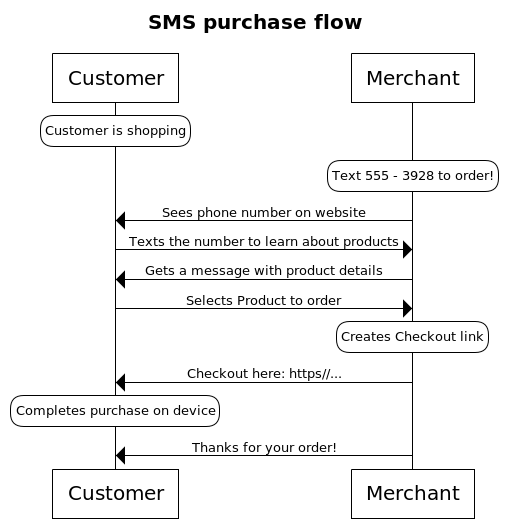
For this, we’ll build out an example chatbot to help people order fake hats from my fictional store Tristan’s Awesome Hats. We sell three sizes of hats (small, medium, & large) and I advertise my chatbot number, (479)-888–5188, on my fictional website: this blog post.
Twilio Studio
I chose SMS for this project because it is one of the most pervasive forms of communication both in the US and around the world, but it should be pretty easy to port over into any other transactional messaging platform as well. Twilio just so happened to release a new product in beta that could be a perfect fit for this use-case: Twilio Studio, a visual tool that utilizes many of the other messaging and telephony services that Twilio offers, but streamlines the setup and configuration. It’s a good choice because much of the send and receive logic can be handled with the studio flow directly and not require as much development time.
Implementing the Flow:
Triggers
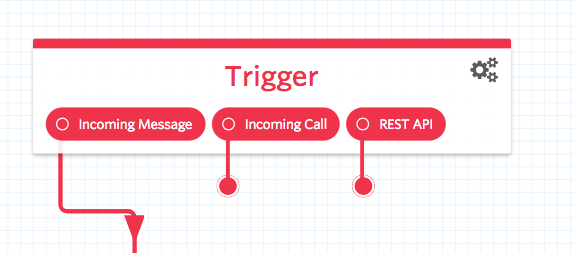 SMS’s will go through the flow, but voice calls and HTTP requests will fail by design.
Individual projects in Twilio Studio are called Flows. Each flow has a trigger — in this case, it will be receiving an incoming SMS message. This is how my customers will enter a conversation with the bot: by texting the number I have attached to this flow.
Sending the welcome Message

After the customer messages the number, it is time for the sales pitch! Tristan’s Awesome Hats only sells one kind of hat, but in the welcome message I’ll ask a basic question confirming the the size for the order. I’ll do this with one of the pre-made Send & Wait For Reply widget. Connected to my Incoming Message trigger, this widget will send my customer:
Hey, I hope you are looking for an Awesome Hat! Would you like a small, medium, or large hat?
Handling the response
There are three possible outcomes from sending a message and waiting for a response: getting a reply, not getting a reply, and the message failing.
-
If the message fails, I’ll assume that there is something fishy going on & just end the flow.
-
If I don’t get a response, perhaps my customer was distracted, so I’ll send out another message after a delay asking them to confirm their size.
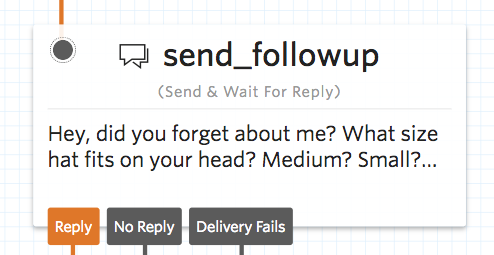 If your memories are leaking out of your head, you might want to buy two!
- If they don’t respond to that, then I’ll assume they’re no longer interested — we can end the flow.
If we do get a response, either from the follow up, or from the first message, we need to figure out if the customer actually ordered a hat, or if they responded with something random. To do some basic conditional evaluation of the message, we can use the Split Based On… widget. This widget gives us quite a few conditional operators to use on the customer’s message body such as equal to, contains, or even a regex. In this case we will use three “Contains” transition looking for the words small, medium, or large in the message.
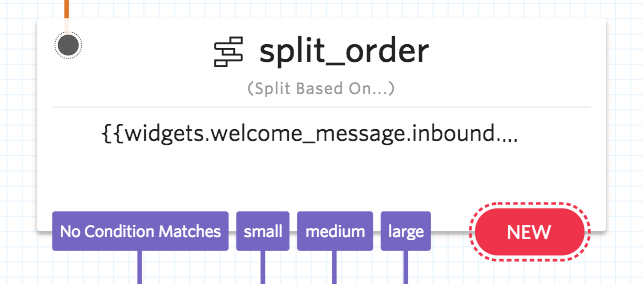
If the message does not have a specified size in it, we can send a response that asks for more clarity with another Send & Wait For Reply Widget:
I was actually looking for a hat size. Tell me your size, either "medium", "small" or "large".
If we do get a size, then it is time for the checkout magic to happen. We’ll use a new widget for this, the Run Function. This will pipe our flow to execute a Twilio function that we have setup.
 Wow! Serverless really is easy!
The Checkout Function
Twilo functions are a fairly new serverless environment that you can program in JavaScript. We won’t have to stand up a server who is only going to be waiting around for someone to text it, and Twilo can handle more of the authentication and runtime setup. I won’t go into creating the function, since Twilio has great documentation, and I have talked about them before, but one thing to be sure to remember is that you need to add the square-connect package under Functions->Configure in the Twilio console to have access to Square’s Javascript SDK.
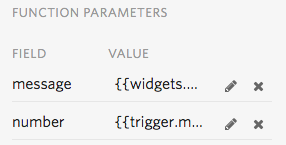
The function widget in Twilio Studio allows you to pass in extra data from the flow to the function, so I’ll pass in the text of the message that the customer specified the hat size in and the number that they are texting from so that I can store that alongside the transaction in Square.
Here is what my function code looks like in its entirety:
exports.handler = function(context, event, callback) {
    var SquareConnect = require('square-connect');
    var Twilio = require('twilio');

    var accessToken = context.accessToken;
    var locationId = context.locationId;

    var messageBody = event.message;
    var number = event.number;

    // Configure authorization for the SDK
    var defaultClient = SquareConnect.ApiClient.instance;
    var oauth2 = defaultClient.authentications['oauth2'];
    oauth2.accessToken = accessToken;
    var checkoutApi = new SquareConnect.CheckoutApi();

    var orderRequest ={
      idempotency_key: new Date().getTime().toString(),
      line_items: [{
        quantity: '1',
        base_price_money:{
          amount: 1500,
          currency: 'USD'
        },
        note:"Ordered via SMS: " + number,
      }]
    } ;

    var itemName
    if (messageBody.toLowerCase().includes("small")) {
      itemName = "Awesome Hat (small)";
    } else if (messageBody.toLowerCase().includes("medium")) {
      itemName = "Awesome Hat (medium)";
    } else if (messageBody.toLowerCase().includes("large")) {
      itemName = "Awesome Hat (large)";
    } else {
      console.error("Something has gone wrong!");
      callback(null, twiml);
    }
  orderRequest.line_items[0].name = itemName

    var checkoutRequest = {
      idempotency_key: new Date().getTime().toString(),
      order: orderRequest,
      ask_for_shipping_address: true
    }

    checkoutApi.createCheckout(locationId, checkoutRequest).then(function(data) {
      let twiml = new Twilio.twiml.MessagingResponse();
      twiml.message('Awe-some! finish up checking out here: '+ data.checkout.checkout_page_url);
      callback(null, twiml);
    }, function(error) {
      console.error(error.response);
      callback(null, error.response);
    });
};
Let’s walk through some of the different sections:
var SquareConnect = require('square-connect');
var Twilio = require('twilio');

var accessToken = context.accessToken;
var locationId = context.locationId;

var messageBody = event.message;
var number = event.number;
In this first section, we first initialize Square’ Javascript SDK as well as Twilio’s, and then set up a couple variables that we will use later with our location and access token. These credentials are stored as environmental variables in the config page of my function for better security. They get passed to the function at runtime with the context parameter.
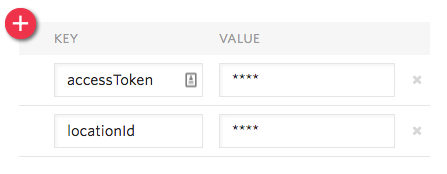 My environment configuration for the checkout function.
You can see that I am using my sandbox access token and location, because I don’t want to actually charge anyone, nor have to get any hats to ship! The data that I passed in from the Studio flow gets assigned to couple variables as well.
var defaultClient = SquareConnect.ApiClient.instance;
var oauth2 = defaultClient.authentications['oauth2'];
oauth2.accessToken = accessToken;
var checkoutApi = new SquareConnect.CheckoutApi();
Here we do the rest of the SDK setup, setting up authentication and initialize the code for Square Checkout.
var orderRequest ={
  idempotency_key: new Date().getTime().toString(),
  line_items: [{
    quantity: '1',
    base_price_money:{
      amount: 1500,
      currency: 'USD'
    },
    note:"Ordered via SMS: " + number,
  }]
};
This orderRequest holds the data for the Order that will be created for the checkout form. This order has only one item, and we are creating the item ad hoc instead of specifying a item from our catalog. A good expansion for this bot could be to list items from my store’s item catalog, or let customers search for the items and variations they want via SMS.
var itemName;
if (messageBody.toLowerCase().includes("small")) {
  itemName = "Awesome Hat (small)";
} else if (messageBody.toLowerCase().includes("medium")) {
  itemName = "Awesome Hat (medium)";
} else if (messageBody.toLowerCase().includes("large")) {
  itemName = "Awesome Hat (large)";
} else {
  console.error("Something has gone wrong!");
  callback(null, twiml);
}
A naive if-else block dynamically sets the name of the item in the order. If the customer specified an item using the words small, medium, or large then they should see that reflected on the order. We could just as easily use logic like this to select specific items from our time catalog as well.
With the order set up, we can flesh out the rest of the checkout request with an idempotency key and another option asking for shipping addresses in the form:
var checkoutRequest = {
      idempotency_key: new Date().getTime().toString(),
      order: orderRequest,
      ask_for_shipping_address: true
    }
We then pass that checkout request, including the order we created above, to the createCheckout method of our checkoutApi object, like this:
checkoutApi.createCheckout(locationId, checkoutRequest)
The createCheckout function (along with all of the functions in the SDK that make a http request) return a promise that helps us control the flow of execution. We want to message back to the customer with a link to pay for the product, but only after we have created that link to the checkout page. To do this we include the logic for sending the message inside of a then() chained to the createCheckout() call:
    checkoutApi.createCheckout(locationId, checkoutRequest).then(function(data) {
      let twiml = new Twilio.twiml.MessagingResponse();
      twiml.message('Awe-some! finish up checking out here: '+ data.checkout.checkout_page_url);
      callback(null, twiml);
    }
Because this function runs inside of Twilio’s environment, it already has access to the core Twilo functionality, so all that is required for the response message is passing some TwiML with the body of the message to the callback function. The customer should get amessage with the checkout link that they can use to buy one of my awesome hats.
The Complete Flow
With all the components in place, here is the complete Studio flow:
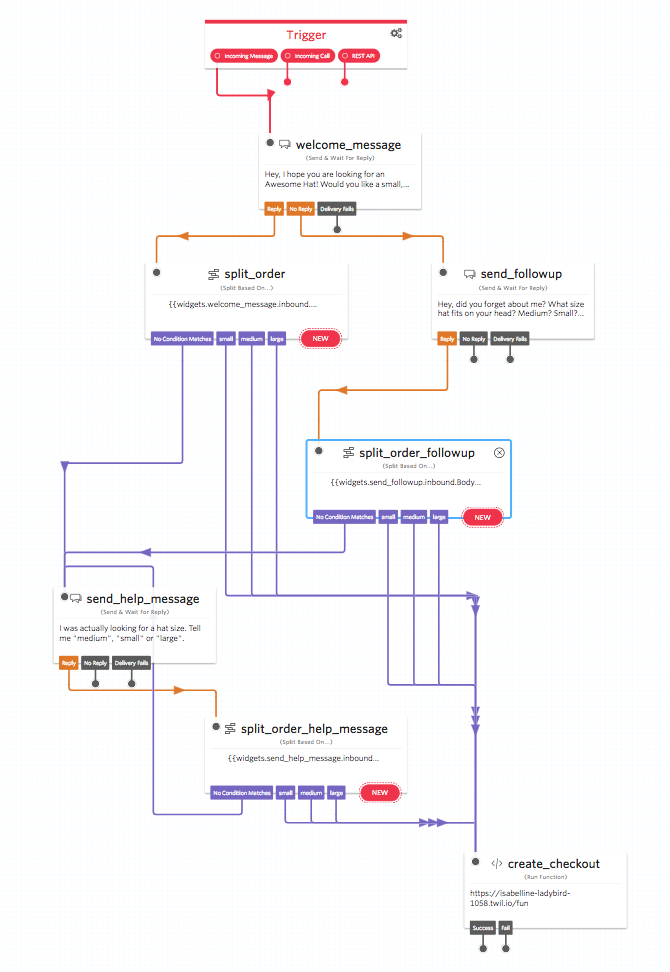
Customers can talk to my store, select a hat size, and complete their purchase all from the comfort of their messages. Try it yourself! Text (479)-888–5188 to talk to enter the flow and maybe even buy a fake hat! (Don’t worry, you definitely won’t be charged, and you almost certainly will not get a hat 😉.)
I hope that you found this post interesting! You can keep in touch by Signing up for our monthly developer newsletter. Please do try out the flow, and try out creating your one messaging ordering experiences, and share them with either @SquareDev on Twitter or in our Slack community.
Authored By
