The Ember Run Loop and Asynchronous Testing
You can’t run away from the Run Loop
This summer, I interned on the Square Seller Dashboard team, which works on the web application that Square merchants use for everything from checking sales, to managing their payroll, to signing up for Square Capital. For some context, I’m a rising senior at the University of Chicago and before this summer I’d never worked on a web application.
 Image: A screenshot of the Square Seller Dashboard
Dashboard is built with Ember — an open-source web framework for single-page web applications. Working on a team that focused on such a large app meant that I could dive deeply into Ember — and one thing I kept noticing throughout the summer was the special, powerful, and at times, confusing way that Ember handles asynchronous work.
My Project
One project I worked on was displaying a warning before merchants were logged out due to inactivity.
This required monitoring different state throughout the life of the application, and rendering components accordingly. I used an Ember Service, which allowed me to set global state on the app based on code that was executed every 250 milliseconds. Removing the API calls and some of the complexity of a service, the code looked something like this:
import Ember from 'ember';

export default Ember.Component.extend({
  millisecondsElapsed: 0,

  didInsertElement(...args) {
    this._super(...args);
    this.set('initialTime', Date.now());
    Ember.run.later(() => this.monitorTimeWithEmberRun(), 250);;
  },

  monitorTimeWithEmberRun() {
    const dateNow = Date.now();
    // component renders the millisecondsElapsed
    this.set('millisecondsElapsed', dateNow -
                                   this.get('initialTime'))
   Ember.run.later(() => this.monitorTimeWithEmberRun(), 250);
  },
});
In development, it worked great. But when I ran acceptance tests, they would hang and then timeout, throwing a bunch of unpredictable errors. You can see that by running the tests in this EmberTwiddle.
Even though this was supposed to be the simple part of the project, I couldn’t get a single acceptance test to finish running, much less pass. Turns out, the reason my tests were breaking was because of the way I used Ember.run.later, which is supposed just run the callback function after the given milliseconds. Finding the solution to my problem revealed a lot about how (awesome) the Ember Run Loop is, and the way it interacts with asynchronous testing.
 Gif: Actress Meryl Streep waving her hand, with the text “Whoa, whoa, whoa, whoa..” (Source)
Wait wait, back up. What’s the Ember Run Loop?
It’s nearly impossible to work in the Ember World without running into some mention of the Run Loop, though the docs indicate that many developers won’t deal with it directly—
“working with [the Ember Run] API directly is not common in most Ember apps,”
Whether or not you work with the Ember Run API directly, the Run Loop is fundamental to Ember applications, and is often at the heart of figuring out strange errors and unexpected side effects.
In general terms, the Run Loop efficiently organizes and schedules work associated with events. The work triggered by user events (i.e. mouseDown, keyPress, etc) is often asynchronous. Ember can do other work before all the side effects are executed. The Ember Run Loop schedules these side effects and organizes any asynchronous work. Which sounds awesome, but needs some more context.
A bit of a misnomer, the Ember run loop isn’t really a loop — and there doesn’t have to be just one of them. Rather, a run “loop” has six different queues that organize work triggered by events. So, the Run Loop (capitalized) is more of a concept, and an app will have multiple run loops running at once.
The docs list the priority order of the queues as:
Ember.run.queues
// => [“sync”, “actions”, “routerTransitions”, “render”, “afterRender”, “destroy”]
The docs also give a short explanation of each queue
The** sync queue **contains binding synchronization jobs The **actions queue **is the general work queue and will typically contain scheduled tasks e.g. promises The routerTransitions queue contains transition jobs in the router The render queue contains jobs meant for rendering, these will typically update the DOM The **afterRender queue **contains jobs meant to be run after all previously scheduled render tasks are complete. This is often good for 3rd-party DOM manipulation libraries, that should only be run after an entire tree of DOM has been updated The destroy queue contains jobs to finish the teardown of objects other jobs have scheduled to destroy
My short interpretation of the job scheduling “algorithm” is that the Run Loop executes jobs with the highest priority first, based on queue. These jobs may add work to other queues, and the Run Loop will loop back to the highest priority jobs until all jobs are completed.
I really love Katherine Tornwall’s explanation of the Ember Run Loop! It has a wonderful in-depth explanation of each queue, and I used some of her descriptions and examples to help with this illustration of a run loop.
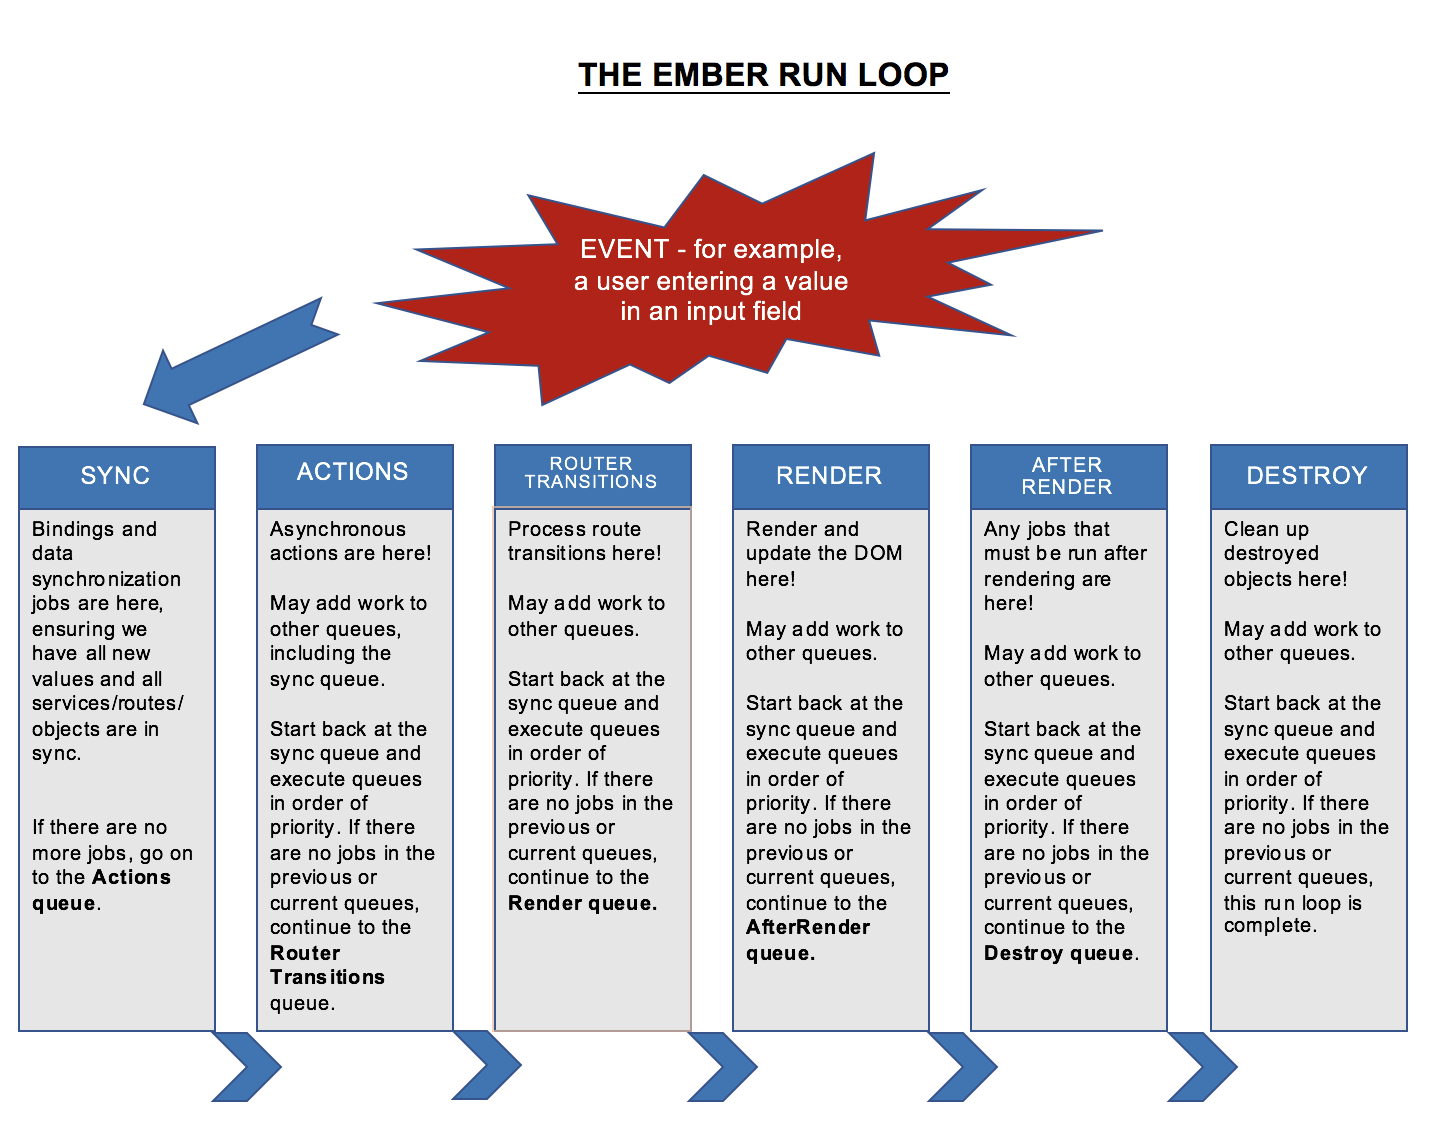 Flowchart: The Ember Run Loop, Illustrated. Link to plaintext version of chart.
The inner details of each queue are interesting, but the most important detail is that events trigger a run loop and may place various asynchronous work into different queues. For example, a mouseDown event could start a run loop, and other work associated with it would be placed in the appropriate queues. Ember ensures work related to data synchronization happens before any rendering. If data synchronization happened after rendering, it might change the rendering of templates that are bound to that data. Then, more expensive re-rendering would be required!
For an interactive demo, check out Machty’s Run Loop visualization or the simple example in the Ember docs.
Ember.run.later
The way my service took advantage of the run loop was Ember.run.laterone of the many Ember.run API’s.
Ember.run.later() : Invokes the passed target/method and optional arguments after a specified period of time. The last parameter of this method must always be a number of milliseconds. You should use this method whenever you need to run some action after a period of time instead of using setTimeout(). This method will ensure that items that expire during the same script execution cycle all execute together, which is often more efficient than using a real setTimeout.
Ember.run.later does has an advantage over setTimeout or other alternative timers— it lives in the “Ember World,” so it can take advantage of all the run loop has to offer (efficiency, organization). Ember.run.later also respects Ember’s internal queue of timers (which can’t be said of normal javascript timers).
If we look back at my component, we see that I call Ember.run.later recursively in one of the methods:
...
monitorTimeWithEmberRun() {
   const dateNow = Date.now();
   // component renders the millisecondsElapsed
   this.set('millisecondsElapsed', dateNow -
                                   this.get('initialTime'))
  Ember.run.later(() => this.monitorTimeWithEmberRun(), 250);
  },
...
Ultimately, as I’d discover later, it was these recursive calls to Ember.run.later that caused the tests to timeout.
So why did my tests hang?
 Gif: A monkey puppet looking wide-eyed and confused (Source)
I had a hunch that Ember.run.later was causing my problem, since replacing it with setTimeout stopped the tests from hanging (more on the drawbacks of that later). As I googled around, I realized that my tests failed for the same reason that makes Ember.run.later awesome — because there was always work scheduled for a future run loop.
How did I figure that out? I wasn’t sure what the problem was at first, so after some searching around, I checked in the source. In the source code, we can see that the wait() test helper checks to make sure all run loops are completed and there are no queued timers.
 Image: Screenshot of source code where wait() checks for run loops or scheduled timers. (Source)
But why? Initially, it seems inconvenient. As it turns out, Ember tests want to make sure all asynchronous work to complete before they finish. Internally, this means that Ember wait() helper checks to make sure that all run loops are completed and there are no more queued timers — if this check fails, clearly there’s still work to be done.
Since I was calling Ember.run.later recursively, there was always either a job in the run loop or a scheduled timer, so the tests would never finish.
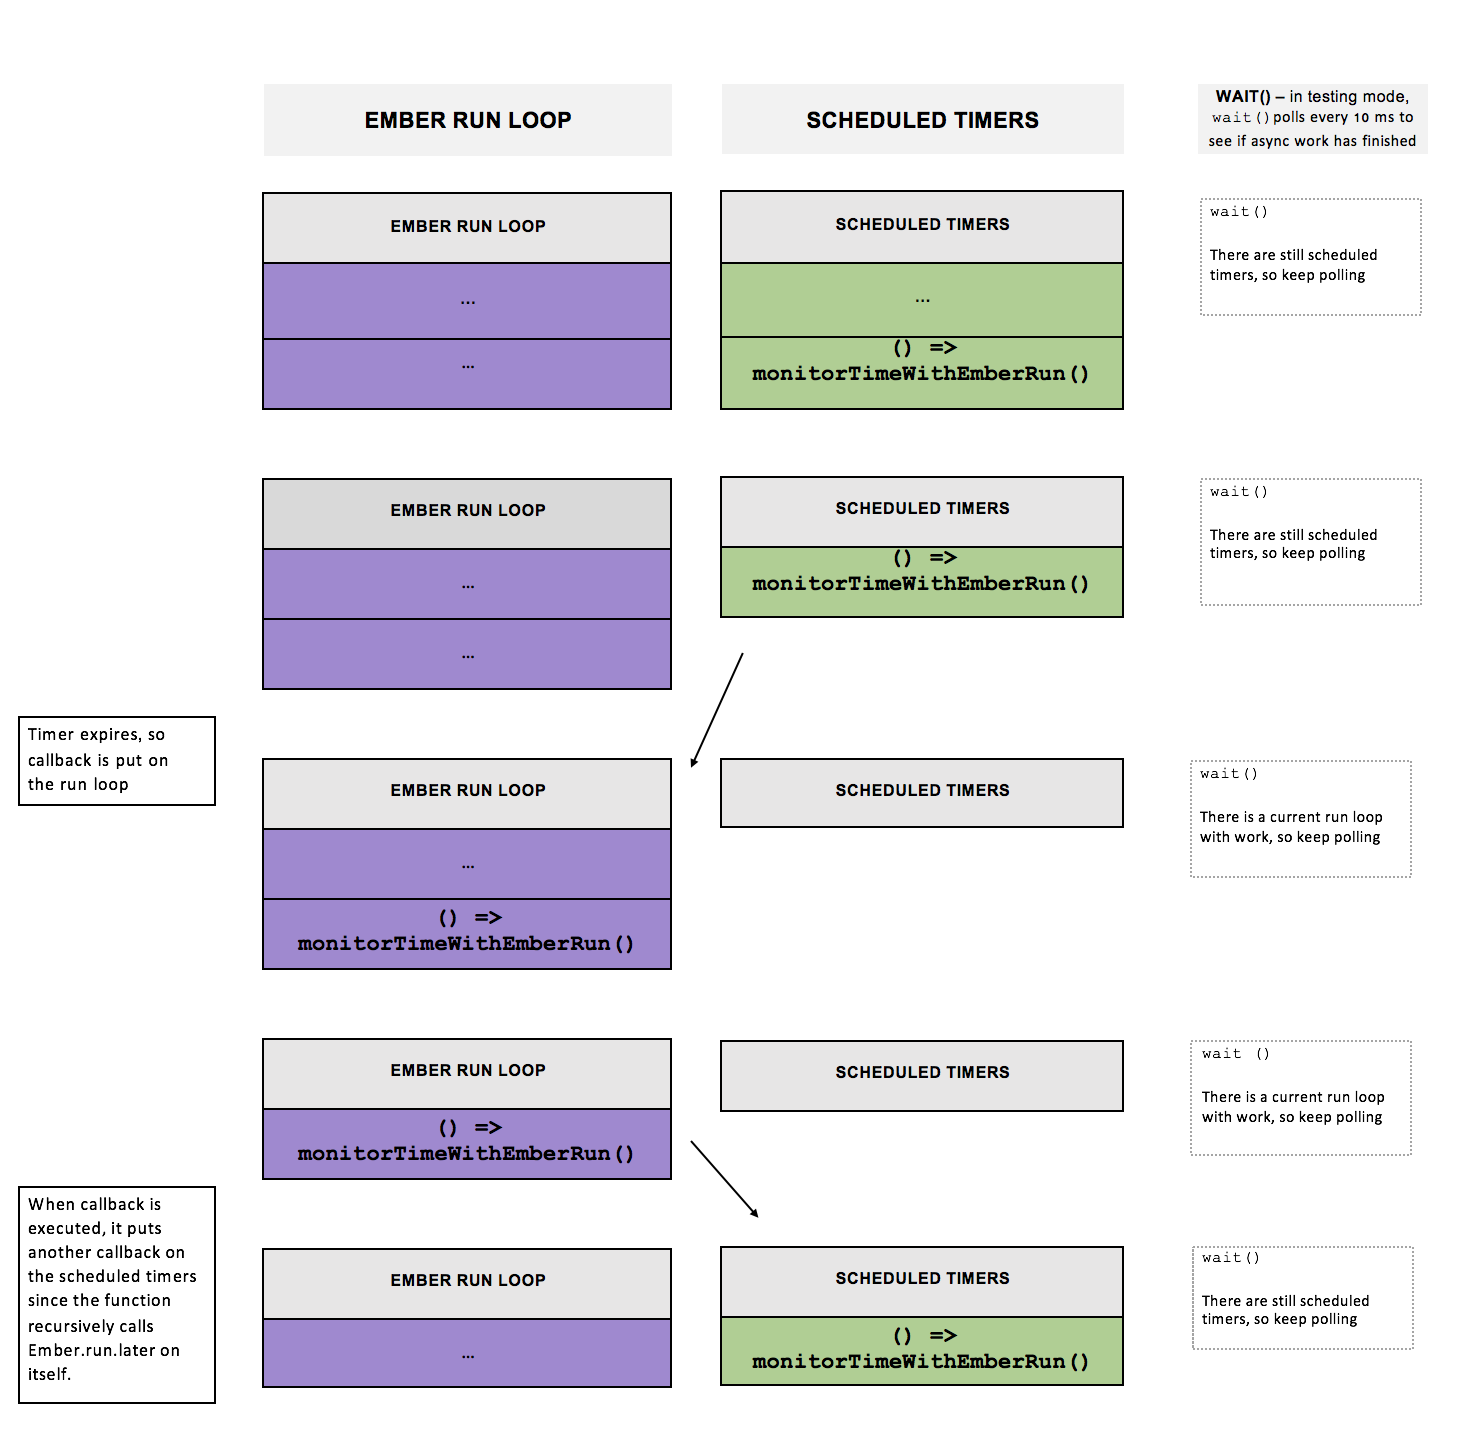 Flowchart: Recursive Ember.run.later. Link to plaintext version of chart.
A Feature, Not a Bug.
Waiting for all work to finish is fundamental to the way that Ember tests asynchronous code. Of course, it’s not the only way to test asynchronous code. For example, capybara uses a maximum wait time for asynchronous calls and automatically ends tests after that time has passed.
That can lead to problems of its own. For example, suppose we click to close a modal, and want to assert that the modal is closed. In capybara, when the time runs out, if the asynchronous work of closing the modal happens after the time limit, the test will end and fail. On the other hand, Ember can ensure that the asynchronous work associated with closing the modal finishes before calling assert.
 Gif: Actor Tom Hanks frowning with his hand over his mouth (Source)
What next? Another Error
Now that I understood the bug, I needed to figure out a solution. I bounced around a few ideas, especially at the beginning. Even though I had wanted to use Ember.run.later, my initial reaction was to try to go back to using setTimeout
...

monitorTimeWithSetTimeout() {
   const dateNow = Date.now();
   // component renders the millisecondsElapsed
   this.set('millisecondsElapsed', dateNow -
                        this.get('initialTime')) ;
   setTimeout(() => this.setTimeout(), 250);
},

...
Running the acceptance tests again, I got this infamous error:
Assertion failed: You have turned on testing mode, which disabled the run-loop’s autorun. You will need to wrap any code with asynchronous side-effects in an Ember.run
Why does that happen? Well, I like to think there are two worlds in your Ember application: the Ember World, and the World Outside Ember. The Ember World uses run loops, and asynchronous work in the World Outside Ember, like websockets, ajax calls, should also be wrapped in an Ember.runso that the run loop can handle side effects correctly.
In fact, there’s actually a lot of things that can have asynchronous side effects, even calling “Ember.object.set” on a property bound to a template. Ember saves us by smartly by wrapping your code in an “Autorun”, basically an Ember.run, which runs in development and production, so that the side effects occur in a run loop.
However, Autoruns are disabled in testing. The Ember docs list several reasons for this:
Autoruns are Embers way of not punishing you in production if you forget to open a runloop before you schedule callbacks on it. While this is useful in production, these are still situations that should be revealed in testing to help you find and fix them. Some of Ember’s test helpers are promises that wait for the run loop to empty before resolving. If your application has code that runs outside a runloop, these will resolve too early and give erroneous test failures which are difficult to find. Disabling autoruns help you identify these scenarios and helps both your testing and your application!
This means if you try to use setTimeout, make ajax calls, or even set properties which have asynchronous side effects, you’ll get an error in testing. That way, you can catch potentially unpredictable side effects before they happen in production.
What’s the solution?
One commenter calls the problem with recursive Ember.run.later a “hurtful issue,” and I can see why. There is no perfect elegant, concise solution to this problem. The right solution requires thinking deeply about your own application and testing.
One suggestion that appears frequently on the Ember forums is to wrap the callback in an Ember.run:
monitorTimeWithSetTimeoutInRun() {
   const dateNow = Date.now();
   // component renders the millisecondsElapsed
   this.set('millisecondsElapsed', dateNow -
                        this.get('initialTime')) ;
   setTimeout(Ember.run(() =>
              this.monitorTimeWithSetTimeoutInRun()), 250);
},
The advantage of this solution is that in testing, the timer functions the same way it would in production.
The disadvantage of this solution is that setTimeout still lives in a world outside of Ember, and as mentioned previously, won’t respect an internal timer queue. In my project, I found this to be more unpredictable than I would have liked. Sometimes, due to run loop execution, the next setTimeout()would execute after the element that was supposed to stop it was destroyed. If you’re doing something like if (!this.get(‘isDestroyed), you’re probably encountering an error like this.
A Better Solution
Since my code dealt with a lot of application-wide state, I really wanted to take advantage of the Ember Run Loop.
I turned to the Square #ember Slack channel, and immediately someone suggested I check out rwjblue’s Ember Lifeline. Thank you, slack channel hero. Ember Lifeline had an innovative approach in the pollTask function — rather than hackily incorporating setTimeout, pollTask handles work differently in testing versus development/production. In development/production, Ember.run.later is called recursively. But in testing, the next asynchronous run is saved, and you’re able to manually tick forward the poller.
Since I was working in an app that doesn’t yet support using Ember add-ons, and I had no need for the whole Ember Lifeline library, I just incorporated a few key ideas into my own app. I can manually tick the timer and control exactly what work I’m doing. My tests finally didn’t hang, nothing broke, and I’d found a satisfying solution to my all my errors.
import Ember from 'ember';

// Used for testing
let _asyncTaskToDo = null;

export function runNextAsyncTask() {
  // Used in testing
  // to manually call next recursive call
  _asyncTaskToDo();
}

export default Ember.Component.extend({
  millisecondsElapsed: 0,

  didInsertElement(...args) {
    this._super(...args);
    this.set('initialTime', Date.now());
   Ember.run.later(() => this.monitorTimeWithEmberRun(), 250);;
  },

  monitorTimeAndSaveCalls() {
   const dateNow = Date.now();
   // component renders the millisecondsElapsed
   this.set('millisecondsElapsed', dateNow -
                        this.get('initialTime')) ;
   this.queueAsyncTask(() => {
      Ember.run.later(() =>
                      this.monitorTimeAndSaveCalls(), 250);
   });

  },

  queueAsyncTask(taskToDo) {
    // if testing, save next work to do
    // so that we don't block the run loop
    if (Ember.testing) {
      _asyncTaskToDo = taskToDo;
    } else {
      taskToDo();
    }
  },
});
For me, it didn’t matter that the timer wasn’t “actually” running in my tests. I cared more that the functions executed on each tick were monitoring correctly and making API calls at the correct frequency. This had the additional advantage that my timer wouldn’t end up running in the background of anyone else’s tests. There’s understandable hesitation in running different code in testing than in production. But the thing about projects that rely on timing is that it’s nearly impossible for tests to be the same as production. Even if you’re using setTimeout you’ll often end up using Sinon’s fake timers—so your code already won’t execute exactly as it would in production. Writing concise, testable code that doesn’t actually rely on any of the timing means higher test coverage and makes time less of an issue.
 Gif: Four people dancing on stage in celebration. (Source)
It took awhile for me to find the right solution for my project, and while it worked for me, it might not be the right choice for everyone. I’m interested to see what sort of different solutions the Ember community comes up with in the future as they deal with this problem!
Takeaways
I learned a lot this summer about Ember, but also how to solve problems in general. I can’t capture everything I learned in a few bullet points, but here goes:
Ember thoughts:
-
Wrap your asychronous code in
Ember.run. You will save yourself so many strange, unpredictable test failures. -
Even if you don’t think you’ll interact with the Run Loop directly, it’s worth learning about. I think it’s unlikely that in a real world application you won’t have some sort of asynchronous work that lives outside of the Ember World.
-
Ember can be very powerful and efficient if you let it. Take advantage of all it has to offer.
Other thoughts:
-
You can look at other project’s source code for inspiration, even if you can’t use it directly. Even though I couldn’t use Ember Lifeline, it helped me find an elegant solution for an ugly problem.
-
On that note, source code can be the ultimate source of truth. There were many times where other explanations of the Run Loop were outdated or vague. Reading backburner.js was a gamechanger. Learning to read and understand source code was a huge lesson from the summer.
-
The solutions you read online aren’t always the best option. I read lots of examples of pollers that had complex polling objects or used
setTimeout()orsetInterval(). While those options worked for some people, something simpler and Ember-esque was better for me. It was worth the investment of writing something special for my project. -
Learn how other people learn. Watching other team members solve problems taught me so much: different ways of developing, of debugging, of googling, of using keyboard shortcuts — even watching videos on 1.5x speed to get through them faster.
-
But even the smartest people on your team won’t know everything and can’t answer all of your questions. So if you do spend the time to dig deep into a problem, make sure to share that knowledge — whether it’s in a presentation, an email, or a blogpost (10/10 would recommend).
Kudos
 Gif: Dwight Schrute from the Office tearfully looking up mouthing “Thank you”, with text “Thank you” (Source)
This summer was amazing. A huge shout-out to my team for encouraging me and supporting me, in my work and in this blogpost. And special special thanks to George, for always reminding me how important this project is. Marie Chatfield, a mentor, inspiration, and Ember queen. And Lenny, whose incredible knowledge is only outshined by his ability to share it, and who sat with me for countless hours debugging, reading through backburner.js, and discussing my midnight slack rants. Overall, thank you to Square for being such a wonderful, inclusive, smart place.

