
Online Payments with React + Square
Create a custom payment form using React and Square
The info found here is now out of date, as SqPaymentForm has been replaced with Web Payments SDK. Check out our updated blog post!
There are a lot of ways to accept payments online. Wouldn’t it be nice to implement a single form that could accept as many payment methods as we want at a single time? Let’s take a look at implementing a custom payment form using Square and React. This form will enable us to take credit cards online, and give us support for Apple Pay, Google Pay, and Masterpass in a single payment form.
Things required to understand this post:
-
React (simplified with
create-react-app)
Our final (payment) form:
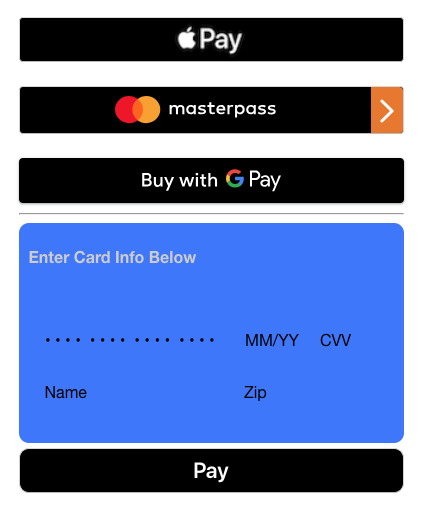
React and Square’s Payment Form
If you’re familiar with React, then you’re accustomed to passing along props and controlling your component via its state. Let’s focus on how to get a basic setup up and running with Square’s payment form controlled by a React component. We’ll also demonstrate how to dynamically load the Square payment form script in case you want to simply insert the payment form component on a page. Dynamic loading the script is only relevant if you don’t want the script to only load on a checkout page (or wherever you’d like to take a payment).
If you’re not acquainted with Square’s payment form, head over to the docs and get familiar. There are some templates, explanations, and guides on getting the form set up using basic HTML, CSS, and JavaScript.
At a basic level, the payment form directly captures your customer’s card details directly on Square’s servers using an <iframe>. The payment form facilitates the generation of these <iframe> elements and provides an API for creating a nonce (a one-time-use token) to reference those details later (all without you knowing any sensitive information!).
The main problem you hit with these <iframe> elements replacing other elements in the DOM is that React usually likes to be in charge of managing all your DOM interactions. This requires doing a bit of extra setup on our components to be sure we render everything correctly, in the right order, and correctly handle different events generated by the Square payment form script.
Dynamically Load The Square Payment Form Script
Our base component is where we’ll actually manage dynamically loading:
<script src=”https://js.squareup.com/v2/paymentform”></script>
into the <head> of the DOM and trigger our child component to render. The child component will actually be responsible for assembling, formatting, and managing our payment form. This is done to ensure the script has loaded and we can pass the SqPaymentForm object down to our child component.
import React, { Component } from 'react';
import PaymentForm from './components/PaymentForm';

class App extends Component {
  constructor(props){
    super(props)
    this.state = {
      loaded: false
    }
  }

  componentWillMount(){
    const that = this;
    let sqPaymentScript = document.createElement('script');
    sqPaymentScript.src = "https://js.squareup.com/v2/paymentform";
    sqPaymentScript.type = "text/javascript"
    sqPaymentScript.async = false;
    sqPaymentScript.onload = ()=>{that.setState({
      loaded: true
    })};
    document.getElementsByTagName("head")[0].appendChild(sqPaymentScript);
  }

  render() {
    return (
      this.state.loaded &&
        <PaymentForm
          paymentForm={ window.SqPaymentForm }
        />
    );
  }
}

export default App;
You can see we’re just using some vanilla JavaScript inside the lifecycle method componentWillMount() to create a <script> element and set some attributes, and then making sure that we’re updating our React component’s state to loaded once the script has actually loaded on the page. This will trigger React to re-render and return true for this.state.loaded inside our render() method and allow our child component to render.
The other notable part of our code is how we’re passing SqPaymentForm via the paymentForm prop. We are passing in the SqPaymentForm object that is attached to the window, so rendering the payment form and triggering submission is easier to manage.
Full code example can also be found at https://github.com/mootrichard/square-react-online-payments
React Payment Form Component
To keep things simple, we’re modifying existing templates found on Square’s GitHub. For more info on customizing or setting up a Square payment form, check out our guides. We’ll focus more on the difference between those templates and wiring things into our React component.
Our render() Method
  render(){
    return (
      <div className="container">
        <div id="form-container">
          <div id="sq-walletbox">
            <button style={{display: (this.state.applePay) ? 'inherit': 'none'}}
                    className="wallet-button"
                    id="sq-apple-pay"></button>
            <button style={{display: (this.state.masterpass) ? 'block': 'none'}}
                    className="wallet-button"
                    id="sq-masterpass"></button>
            <button style={{display: (this.state.googlePay) ? 'inherit': 'none'}}
                    className="wallet-button"
                    id="sq-google-pay"></button>
            <hr />
          </div>

          <div id="sq-ccbox">
            <p>
              <span style={styles.leftCenter}>Enter Card Info Below </span>
              <span style={styles.blockRight}>
                {this.state.cardBrand.toUpperCase()}
              </span>
            </p>
            <div id="cc-field-wrapper">
              <div id="sq-card-number"></div>
              <input type="hidden" id="card-nonce" name="nonce" />
              <div id="sq-expiration-date"></div>
              <div id="sq-cvv"></div>
            </div>
            <input
              id="name"
              style={styles.name}
              type="text"
              placeholder="Name"
            />
            <div id="sq-postal-code"></div>
          </div>
          <button className="button-credit-card"
                  onClick={this.requestCardNonce}>Pay</button>
        </div>
        <p style={styles.center} id="error"></p>
      </div>
    )
  }
The key parts to note in the elements we have is the divs elements with the id’s: sq-apple-pay, sq-masterpass, sq-google-pay, sq-card-number, sq-cvv, sq-expiration-date, and sq-postal-code. We transformed the examples to use divs for everything instead of form components, since these are all the fields that will be targeted by Square’s payment form script to be replaced with <iframe> elements. Also, since we’re using React, we will have our own functions for controlling submission and triggering the request of a nonce from the payment form.
Digital Wallet Payments & Methods Supported
To adjust what digital wallet options (sometimes called mobile wallet options) you want to support, just provide different key-value pairs in your SqPaymentForm configuration object (see more on that here). You should be able to see in the render() method that we’re controlling the display of our mobile payment options using the component’s state.
callbacks: {
  methodsSupported: (methods) => {
    if(methods.googlePay){
      this.setState({
        googlePay: methods.googlePay
      })
    }
    if(methods.applePay){
      this.setState({
        applePay: methods.applePay
      })
    }
    if(methods.masterpass){
      this.setState({
        masterpass: methods.masterpass
      })
    }
    return;
  },
We are setting the state inside of the methodsSupported() callback that the Square payment form has provided to us. Since each mobile wallet option is specific to the browser that a customer is visiting from, you need to conditionally render the buttons to match what should be available based on your customer’s browser or mobile device. We also have to make these separate conditionals since the payment form calls the methodsSupport() function once for each method you’re choosing to support. Our example is trying to support Masterpass, Apple Pay, and Google Pay, so three calls will be made. It’s a little aggressive in our calls to setState(), but only three calls, so no worries — just keep it in mind if you’re calling setState() elsewhere, since every call will trigger a re-render of the component.
Linking & Controlling the Component
The main takeaway is to use state inside of the provided callback. Using state in the component allows us to react (so punny) to different events emitted by Square’s payment form script. You can learn more about all these events are in the docs. In our example, a key place for this tie-in would be the inputEventReceived() callback since it’s called on every input event. In our example component, we update the brand of the card (in the top right corner) once it has been identified by the payment form.
Thoughts and Conclusions
This is only one way of approaching implementing the Square payment form in React. Initially it seemed like a good idea to try passing in the config object as a prop, but that doesn’t work too well for configuring your callback functions, unless you’re comfortable overriding them before creating your paymentForm object (this just felt wrong).
The main place I’ve seen developers trip up is usually on not disabling autoBuild. The paymentform script is going to immediately look for elements with the provided element id’s on build, but the problem arises because React might not have rendered the elements to the DOM yet. It is better to control the build process by triggering it with a call to.build().
The implementation of the form in React is fairly straight forward (if you know React) and just requires understanding of the React lifecycle in relation to the paymentform lifecycle.
You can find a full example of this form over at: https://github.com/mootrichard/square-react-online-payments.
If you liked this post on React + Square, but would like to see this refactored using React’s Hooks API, tweet at me, respond here on Medium, or bug me in our Slack community and I’ll follow up with a post with how to refactor this example using the React Hooks API.
Want more? Sign up for our monthly developer newsletter or come hang out with us in the Square Dev Slack channel! You can also follow us on Twitter at @SquareDev.


